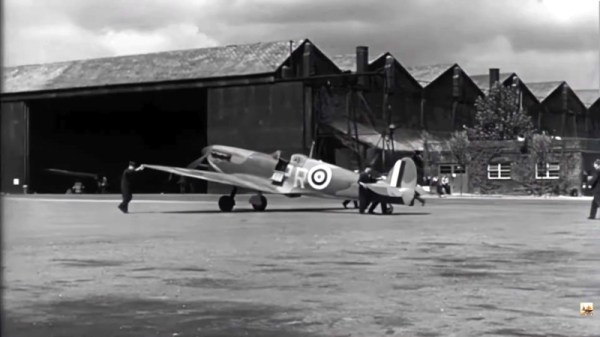
A Parts Bin Cyberdeck Built For Satellite Hacking

While there’s little in the way of hard rules dictating what constitutes a cyberdeck, one popular opinion is that it should be a piecemeal affair — a custom rig built up of whatever high-tech detritus the intrepid hacker can get their hands on, whether it be through trades or the time-honored tradition of dumpster diving. It should also be functional, and ideally, capable of some feats which would be difficult to accomplish with a garden variety laptop.

If you’re looking for an example that embraces these concepts to the fullest, look no further than the Spacedeck built by [saveitforparts]. Combining a touch screen all-in-one computer pulled from a police cruiser in the early 2000s, an RTL-SDR, and the contents of several parts bins, the rig is designed to work in conjunction with his growing collection of motorized satellite dishes to sniff out signals from space.

As you can see in the build video below, the design for this mobile satellite hacking station was originally very different, featuring considerably more modern hardware with all the buzzword interfaces and protocols you’d expect. But [saveitforparts] couldn’t get all the parts talking satisfactorily, so he went in the closet and dug out one of the surplus police terminals he’d picked up a while back.

He didn’t have the appropriate connector to power the machine up, but by cracking open the case and tracing out the wires, he figured out where he needed to inject the 12 V to get it spun up. From there he installed a new Mini PCI WiFi adapter, loaded up an era-appropriate build of Linux, and got the standard software-defined radio tools up and running.

What really sets this build apart are the two custom panels. The top one offers access to the various ports on the computer, as well as provides a sort of switchboard that connects the RTL-SDR to various onboard filters. The lower panel includes the hardware and controls necessary to aim different styles of motorized satellite dishes, as well as a USB hub and connector that leads into a commercial satellite meter tucked into the case.

At the end of the video [saveitforparts] demonstrates the various capabilities of the Spacedeck, such as the ability to pull in imagery from weather satellites. Considering the sort of satellite sniffing we’ve seen him pull off in the past, we have no doubt this machine is going to be listening in on some interesting transmissions before too long.

Continue reading “A Parts Bin Cyberdeck Built For Satellite Hacking”

Building The Sanni Cartridge Reader To Back Up And Restore Games And Saves

Game cartridges are generally seen as a read-only medium with the contents as immutable as text chiseled into a granite slab, and with accompanying save files on the cartridge surviving for generations. The unfortunate truth is that as with any media storage, cartridges can and do fail, and save files are often just ethereal bits in battery-backed SRAM. This makes being able to copy not only the game data but also the save files off these cartridges essential. Projects like the Open Source Cartridge Reader by [sanni] make this something that everyone can do.

Intended to be a kind of Swiss Army knife of game cartridges, many game systems are supported directly, and many others via (user-created) adapters. A how-to-build tutorial is provided on the project wiki, though anyone interested in building such a system would do well to look at the expected price tag on the BOM page, which comes in at $134. A recent video by [Kytor Industries] (also included below) demonstrates how to assemble one of these systems, including some modding of the preassembled components.

The main components are the Arduino Mega 2560 Pro MCU module, a Makerbase assembly with LCD, control knob, and SD card slot, an SI5351-based clock generator, a PIC12F629 MCU (for snesCIC and handling SNES DRM) and a lot of pin headers and card edge connectors for specific cartridge types. The assembly is rounded off with a surface-mounted GBA card reader and an enclosure.

One important gotcha is that some of these cartridges run on 5V, while others use 3.3V.  N64 cartridges require the dedicated voltage switch to be set to 3.3V, lest 5V gets sent into the unsuspecting cartridge. Once everything is configured properly, the firmware is flashed onto the Mega 2560 Pro module. The Sanni reader is then ready to run. You can use it to dump ROMs onto SD cards, along with dumping and restoring save files and loading ROMs onto new cartridges.

(Thanks to [Roman] for the tip)

Continue reading “Building The Sanni Cartridge Reader To Back Up And Restore Games And Saves”

Large E-Paper Slow Movie Player Offers Great Docs

Over the last couple of years we’ve seen several iterations of the “slow movie player” concept, where a film is broken up into individual frames which are displayed on an e-paper display for a few minutes at a time. This turns your favorite movie into a constantly changing piece of long-term art. Unfortunately, due to the relatively high cost of e-paper panels, most of the examples we’ve seen have only been a few inches across.

Of course, technology tends to get cheaper with time, which has allowed [szantaii] to put together this beautiful 10.3-inch version. With a 1872 × 1404 Waveshare panel capable of displaying 16 shades of gray and a Raspberry Pi Zero 2 W installed in a commercially purchased frame, the final product looks very professional. It certainly wouldn’t look out of place in a well-appointed living room.

It’s not just a large display that sets this project apart. [szantaii] has done a phenomenal job documenting both the hardware and software of this project, which includes the “Slow Movie Player service” Python software he’s written. Even if you aren’t using an identical hardware setup, his MIT-licensed code will absolutely get you going in the right direction.

We especially liked the several example configurations provided, as well as the explanation of how ImageMagick’s various grayscale conversion options impact the appearance of the final image.

All in all, this is not only a beautiful and well implemented version of the slow movie player concept — but it’s also the kind of project that helps elevate the entire community thanks to its transparency. We wouldn’t be surprised to see this latest iteration inspire more folks to pick up an e-paper panel and build one of their own. Could 2023 be the year of the slow movie player? We certainly hope so.

Webcam VR

Immersive Virtual Reality From The Humble Webcam

[Russ Maschmeyer] and Spatial Commerce Projects developed WonkaVision to demonstrate how 3D eye tracking from a single webcam can support rendering a graphical virtual reality (VR) display with realistic depth and space. Spatial Commerce Projects is a Shopify lab working to provide concepts, prototypes, and tools to explore the crossroads of spatial computing and commerce.

The graphical output provides a real sense of depth and three-dimensional space using an optical illusion that reacts to the viewer’s eye position. The eye position is used to render view-dependent images. The computer screen is made to feel like a window into a realistic 3D virtual space where objects beyond the window appear to have depth and objects before the window appear to project out into the space in front of the screen. The resulting experience is like a 3D view into a virtual space. The downside is that the experience only works for one viewer.

Eye tracking is performed using Google’s MediaPipe Iris library, which relies on the fact that the iris diameter of the human eye is almost exactly 11.7 mm for most humans. Computer vision algorithms in the library use this geometrical fact to efficiently locate and track human irises with high accuracy.

Generation of view-dependent images based on tracking a viewer’s eye position was inspired by a classic hack from Johnny Lee to create a VR display using a Wiimote. Hopefully, these eye-tracking approaches will continue to evolve and provide improved motion-responsive views into immersive virtual spaces.

Hack Your Heathkit To Trace MOSFET Curves

[TRX Lab] has an old Heathkit model IT-1121 curve tracer, and wants to modify it so he can plot the I-V curves of MOSFETs. For the uninitiated, curve tracers are used to determine the precise characteristics of components by measuring the output for a set of specific inputs – either voltage or current depending on the device you’re testing.

The IT-1121 was introduced in 1973 and supports bipolar and FET transistors of types NPN, PNP, N-channel, and P-channel, along with various other semiconductor devices. But [TRX] wanted to enhance the tester to deal with MOSFETs as well.

The IT-1121 is very flexible, and has selector switches for all the usual polarity and sweep settings — Heathkit also sold a model IT-3121 in later years, but this seems to have been the same basic tester. [TRX] found two shortcomings when plotting the I-V curve of MOSFETs. First, there is no way to apply a Vgs threshold voltage to the curves. Second, when set for FET testing, the polarity of the gate voltage stair step waveform doesn’t match the desired polarity of the drain-source voltage.

In the video below the break, [TRX] first walks us through some of the reasons you’d want a curve tracer in your lab. In the next part of the video, he breadboards up the modification for testing, and finally buttons it up and installs it. Implementing the modification was pretty straightforward. [TRX] designed four op-amp circuit that adds the adjustable offset and a switch to toggle the polarity of the gate voltage waveform. The whole thing fits on a small breadboard inside the case. Two holes are drilled in the panel for the potentiometer and switch.

There’s no GitHub repository for this project, but he presents the full details in the video and says viewers are free to make snapshots of the schematics and layout if they want to build their own.

Modern I-V curve tracers are pretty pricey. Even used, decades-old professional curve tracers are above the budget of most home and small office labs. If you have, or can get one of these at a decent price, this would be a modification well worth considering. You might also consider a home-brew tracer, like this one we covered last year.

Continue reading “Hack Your Heathkit To Trace MOSFET Curves”

This Open Hardware Li-Ion Charger Skips The TP4056

There’s a good chance that if you build something which includes the ability to top up a lithium-ion battery, it’s going to involve the incredibly common TP4056 charger IC. Now, there’s certainly nothing wrong with that. It’s a decent enough chip, and there are countless pre-made modules out there that make it extremely easy to implement. But if the chip shortage has taught us anything, it’s that alternatives are always good.

So we’d suggest bookmarking this opensource hardware Li-Ion battery charger design from [Shahar Sery]. The circuit uses the BQ24060 from Texas Instruments, which other than the support for LiFePO4 batteries, doesn’t seem to offer anything too new or exciting compared to the standard TP4056. But that’s not the point — this design is simply offered as a potential alternative to the TP4056, not necessarily an upgrade.

[Shahar] has implemented the design as a 33 mm X 10 mm two-layer PCB, with everything but the input and output connectors mounted to the topside. That would make this board ideal for attaching to your latest project with a dab of hot glue or double-sided tape, as there are no components on the bottom to get pulled off when you inevitably have to do some rework.

The board takes 5 VDC as the input, and charges a single 3.7 V cell (such as an 18650) at up to 1 Amp. Or at least, it can if you add a heatsink or fan — otherwise, the notes seem to indicate that ~0.7 A is about as high as you can go before tripping the thermal protection mode.

Like the boilerplate TP4056 we covered recently, this might seem like little more than a physical manifestation of the typical application circuit from the chip’s datasheet. But we still think there’s value in showing how the information from the datasheet translates into the real-world, especially when it’s released under an open license like this.

A closeup of a ring and "flower" electrode attached to a translucent piece of material with fainter wires. The flower and ring electrodes are made of molybdenum that has a somewhat accordion fold back-and-forth cross-section.

Electronic Bandage Speeds Wound Healing

We’re a long way from the dermal regenerators in Star Trek, but researchers at Northwestern University have made a leap forward in the convenient use of electrotherapy for wound healing.

Using a ring and center “flower” electrode, this bioresorbable molybdenum device restores the natural bioelectric field across a wound to stimulate healing in diabetic ulcers. Only 30 minutes of electrical stimulation per day was able to show a 30% improvement in healing speed when used with diabetic mice. Power is delivered wirelessly and data is transmitted back via NFC, meaning the device can remain on a patient without leaving them tethered when not being treated.

Healing can be tracked by the change in electrical resistance across the wound since the wound will dry out as it heals. Over a period of six months, the central flower electrode will dissolve into the patient’s body and the rest of the device can be removed. Next steps include testing in a larger animal model and then clinical trials on human diabetic patients.

This isn’t the first time we’ve covered using electricity in medicine.

Continue reading “Electronic Bandage Speeds Wound Healing”