How To Make A Larger Air-Cored Inductor

Radio amateurs often have a love-hate relationship with home-made inductors, sharing all kinds of tips and tricks as to how the most stable nanohenry inductor can be wound. But there’s another group in the world of electronics with an interest in high-quality inductors, namely the audio enthusiasts. They need good quality inductors with a values in the millihenries, to use in loudspeaker crossover networks. [Homemade Audio] takes us through their manufacturing process for these coils, and the result is a watchable video resulting in some very well-made components.

The adjustable former is a machined aluminium affair of which we’re treated to the full manufacture. It’s likely the same results could be achieved with a 3D printed reel. The free-as-in-beer Coil64 on Windows is used to calculate the dimensions and number of turns, and it’s set up on a jig with a cordless screwdriver doing the winding. The best technique for flat layers of turns is explained, and a coat of varnish is put on each completed layer. We’re guessing this is to stop the coil “singing” at audio frequencies.

With a set of cable ties holding it together the result is a very tidy component. It’s adjusted a few turns to get the right value with an LCR meter, however experience tells us that a tiny percentage either way won’t harm the resulting network too much. If you make your own speakers, the video below the break could be extremely useful.

Need a loudspeaker primer? We have just the article for you.

Continue reading “How To Make A Larger Air-Cored Inductor”

The sensor hub in all its glory, sensor itself on top, standing on 3D-printed feet, and the PCB on the bottom

Hacker-Friendly And Elegant Air Quality Sensor Hub

Ever wanted an indoor environment sensor that’s dead simple yet a complete package? That’s the anotter-sensor-hub project from [Jana Marie], designed for the Sensirion SEN05x series sensors, with a SEN055 sensor shown in the picture above. Given such a sensor, you can measure VOCs and NOCs (Volatile and Non-Volatile Organic Compounds), as well as PM1, PM2.5, PM4 and PM10 particulate matter indices, with temperature and humidity sensing thrown in for good measure. Fully open and coupled with 3D printable stand files, this alone makes for an air quality hub fit for a hacker’s desk. That’s not all, however — this board’s elegant extensibility is a good match for the sensor’s impressive capabilities!

The PCB itself might look simple, it’s simply an ESP32 and some supporting circuitry required. But you’ll notice there’s also a trove of connector footprints for different interfaces; whatever else you might want to add to your sensor hub, whether it connects through I2C, SPI or PWM, you can! As usual, the sensor itself is the most expensive part of such a project — the boards themselves are around $5 USD apiece fully assembled, but one sensor-included hub will set you back roughly $42 USD. That said, it’s a great value for the price, and the trove of sensing data you can get might just more than pay for itself in quality-of-life improvements you make. Of course, everything is open-source and comes as a complete packages for you to start using. The firmware, KiCad files, 3D holder and even Grafana dashboard files can be found on GitHub.

Such air quality sensor platforms have been getting more and more popular, and hackers have been paying attention. Having a full open-source package like this at our disposal is amazing. If you’re looking for a cheaper “baby’s first air quality sensor”, drop by your local IKEA — there’s a way less featureful but quite cheap sensor that you can equip with an ESP8266, perhaps, even on a custom PCB.

Two pairs of steel parallel pliers sit on a rough wooden benchtop. The pair on the left is open and the pair on the right is closed, demonstrating the parallel nature of the pliers' jaws over their entire range of motion. There are three brass pins flush with the steel surface of the handles and you can just barely make out the brass and copper filler material between the steel outer surfaces of the handles.

Producing A Pair Of Parallel Pliers

A regular pair of pliers is fine most of the time, but for delicate work with squarish objects you can’t go wrong with a pair of parallel pliers. [Neil Paskin] decided to make his own pair from scratch. (YouTube)

The jaws were machined down from round stock in [Paskin]’s mill before heat treating and tempering. The steel portions of the handles were cut from 16 gauge plate steel and half of them were stamped on a fly press to make the bridging section around the pivot bolt. The filler for the handles is copper on one side and brass on the other as [Paskin] didn’t have enough brass of the correct size to do both.

The steel and filler were joined with epoxy and copper pins before beveling the edges and sanding to give a comfortable contour to the handles. The bolts for the pliers started as ordinary hex bolts before being machined down on the lathe to a more aesthetically-pleasing shape and size. The final touches included electrolytically etching a logo into the bridge and then spraying down the pliers with a combination lubricant and corrosion preventative spray. This is surely a pair of pliers worth handing down through the generations.

For more mesmerizing machining, checkout this pocket safe or this tiny adjustable wrench.

Continue reading “Producing A Pair Of Parallel Pliers”

Stair Climbing Rover Gets Up With Rocker Bogies

Doctor Who eventually made light of the fact that the Daleks were critically impaired when it came to staircases. This rover from [WildWillyRobots] doesn’t share that issue, thanks to a smart suspension design.

The rover itself is built using 3D printed components for everything from the enclosure, to the suspension system, as well as the wheels themselves. It uses a rocker-bogie design, which NASA designed for Mars-bound rovers and we often see copied for terrestrial applications. Gear motors are used for their plentiful torque, and they are placed directly within the wheels. Servos allow the individual wheels to be steered, allowing the rover to crab sideways and perform zero-radius turns.

The rocker-bogie setup does a great job of keeping the rover’s wheels touching the ground, even over rough terrain. It readily tackles a random pile of bricks with ease, in a way that many four-wheeled designs would struggle to match. Given its trials on Mars, it’s easy to call the rocker-bogie setup a thoroughly-proven design.

We’ve featured plenty of other rocker-bogie builds in the past; many of them are 3D printed as well.

Continue reading “Stair Climbing Rover Gets Up With Rocker Bogies”

OpenSPICE: A Portable Python Circuit Simulator

[Roman Parise] and [Georgios Is. Detorakis] have created OpenSPICE a fork of the PySpice project, adding a new simulation engine written entirely in Python. This enables the same PySpice simulations to be executed on any platform that runs python (which we reckon is quite a few!) whilst leveraging the full power of the python infrastructure. Since it is a fork — for supported platforms — you can also run your simulations upon Ngspice as well as Xyce, giving options for scaling up to larger systems when required, but importantly without having to recreate your circuit from scratch.

The OpenSPICE simulator first converts the parsed netlist into a set of data structures that represent the equations describing the various parts of the system. These are then in turn passed along the scipy library “optimize.root” function which solves the system, generating a list of branch currents and node voltages. The output of the simulation is a numpy array, which can be further processed and visualized with the mathplotlib library. All pretty standard stuff in python circles. Since this is based upon PySpice, it’s also possible to use KiCAD netlists, so you have a nice way to enter those schematics. We’ve not dug into this much yet, but support for the vast libraries of spice models out there in circulation would be high up on our wish list if it already can’t handle this. This scribe will most definitely be checking this out, as LTSpice whilst good, is a bit of a pain to use and does lack the power of a Python backend!

Continue reading “OpenSPICE: A Portable Python Circuit Simulator”

A closeup of a black flexible PCB with an out-of-focus quarter in the background, approximately the same size as the end of the PCB we're looking at. One the right is a USB C connector and to its left are two SMD components with visible pins. Several smaller SMD components (resistors or caps?) are soldered to other parts of the board.

Making The AirPods Pro Case Repairable

Apple is often lauded for its design chops, but function is often sacrificed at the altar of form, particularly when repair is involved. [Ken Pillonel] has made it easier for everyone to replace the batteries or lightning port in the AirPods Pro case. (YouTube)

With such notable hacks as adding USB C to the iPhone already under his belt, [Pillonel] has turned his attention to fixing the notoriously poor repairability of AirPods and AirPods Pro, starting with the cases. While the batteries for these devices are available, replacement Lightning ports are not, and taking the housing apart for the case is an exercise in patience where the results can’t be guaranteed.

He designed a USB C replacement port for broken Lightning ports that is a perfect fit if you happen to get the case apart in one piece. If you’re less successful, he has you covered there too with a 3D printable enclosure replacement.

We sure miss the days of schematic proliferation here at Hackaday, but we know you don’t let glued enclosures or unobtainium parts stand in the way of repairs.

Continue reading “Making The AirPods Pro Case Repairable”

Domesticating Plasma With A Gorgeous Live Edge Table

If you’ve been reading Hackaday for any length of time, you’ll know we don’t often cover woodworking projects here. It’s not because we aren’t impressed with the skill and effort that folks put into them, and truth be told, we occasionally we even feel a pang of envy when looking at the final result. It’s just that, you know…they’re made of wood.

But when [Jay Bowles] of Plasma Channel sent in this live edge wooden table that features not only a pair of custom-made neon tubes but the burned out transistors and ICs from his previous high-voltage exploits — we knew this wasn’t exactly your grandpa’s idea of woodworking. In fact, he wisely offloaded a lot of the dead tree cutting and shaping to the burly gentlemen at the local sawmill so he could better focus his efforts on the sparky bits.

At its core, he’s created what’s generally known as a “river table” — a surface made of two or more pieces of live edge wood (that is, a piece of lumber that features at least one uncut edge) that are linked via a band of colored epoxy which looks like flowing water. It’s not uncommon to embed stones or even fake fish in the epoxy to really sell the underwater effect, but this is Plasma Channel we’re talking about, so [Jay] had other ideas.

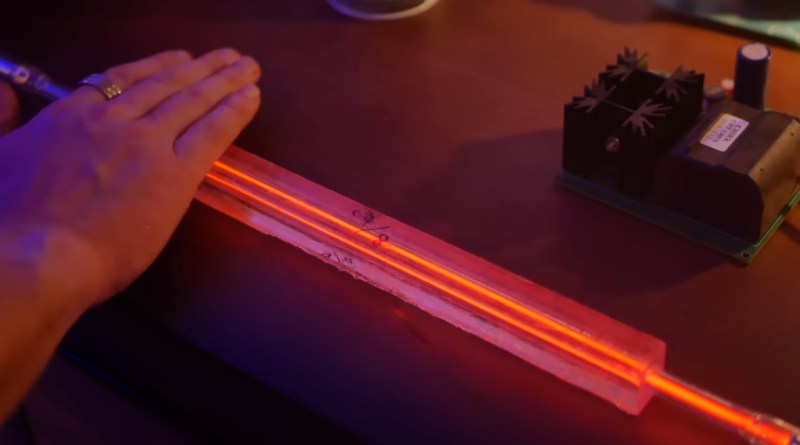
The first step was hitting up a local neon supplier who could fabricate a pair of neon tubes which roughly followed the shape of his epoxy river. While he was waiting for them to be finished, [Jay] played around with a clever experimental rig that let him determine how thick he could pour the epoxy over the tubes before he lost the capacitive coupling effect he was going for. By embedding a short length of neon tube off-center in a block of epoxy, he could see how the thickness impacted his ability to manipulate the plasma with a wave of his hand just by flipping it over.

With the tube placed on clear standoffs, he was able to position it at the ideal depth for the final epoxy pours. It was around this time that he scattered the remains of his previous projects on the “bottom” of the river, so they can spend the rest of their days looking up at his latest technical triumph. We’re not sure if this is to punish the fallen silicon for giving up early or to honor their sacrifice in the name of progress, but in either event, we respect anyone who keeps a jar of blown components laying around for ritualistic applications.

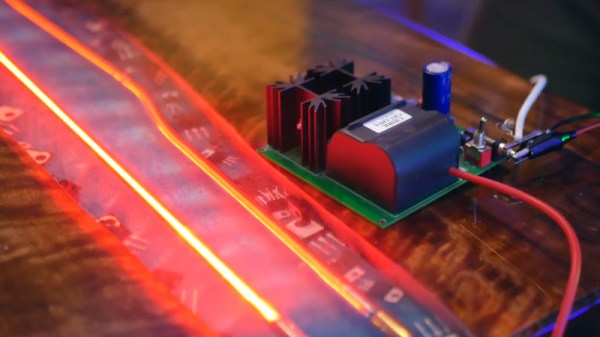
Once the table was assembled, all that was left was to power the thing. Given his previous projects, [Jay] had no shortage of existing HV supplies to try out. But not being satisfied with anything in the back catalog, he ended up building a new supply that manages to pump out the required amount of juice while remaining silent (to human ears, at least). The unit is powered by a battery pack cleverly embedded into the legs of the table, and is easy to fiddle with thanks to a pulse-width modulation (PWM) module wired hooked to the input. All the components were then held in place with a wide array of custom brackets courtesy of his newly arrived 3D printer.

There’s a lot to love about this project, and more than a few lessons learned. Whether you’re interested in recreating the Tron-like effect of the neon tubes, or have been contemplating your own epoxy-pour worktable and want to see how a first-timer tackles it, this video is a great resource.

Continue reading “Domesticating Plasma With A Gorgeous Live Edge Table”