We often say that hardware hacking has never been easier, thanks in large part to low-cost modular components, powerful microcontrollers, and highly capable open source tools. But we can sometimes forget that what’s “easy” for the tinkerer that reads datasheets for fun isn’t always so straightforward for everyone else. Which is why it’s so refreshing to see projects like this LED chandelier from [MakerMan].
 Despite the impressive final result, there’s no microcontrollers or complex electronics at work here. It’s been pieced together, skillfully we might add, from hardware that wouldn’t be out of place in a well-stocked parts bin. No 3D printed parts or fancy laser cutter involved, and even the bits that are welded together could certainly be fastened some other way if necessary. This particular build is not a triumph of technology, but ingenuity.
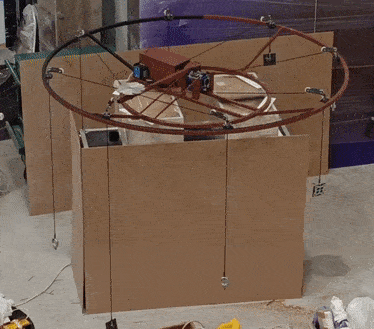
The video below is broken up roughly into two sections, the first shows how the motorized crank and pulley system was designed and tested; complete with various bits of scrip standing in for the final LED light tubes. Once the details for how it would move were nailed down, [MakerMan] switches over to producing the lights themselves, which are nothing more than some frosted plastic tubes with LED strips run down the center. Add in a sufficiently powerful 12 VDC supply, and you’re pretty much done.
As it so happens, this isn’t the first motorized lighting fixture that [MakerMan] has put together.
Continue reading “Light Meets Movement With A Minimum Of Parts” →