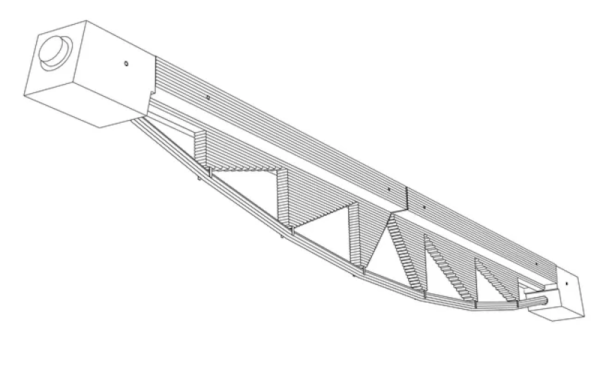
A functioning model of the Wunderwaffe DG-2 from Call of Duty: Zombies.

DIY Wunderwaffe And Others Make Up This Open-Source Arsenal

Unless you stay up all night and have a dozen printers going, it’s probably way too late to make one of these beautiful prop weapons designed by [Andrew] of The Ray Gun Project in time for Halloween. Most of them are from Call of Duty: Zombies, though there is an awesome little disco grenade from Fortnite as well.

All of the projects are fantastic, but we chose to highlight the Wunderwaffe DG-2 from COD: Zombies because, well, vacuum tubes. For those unfamiliar with the ‘waffe’s operation, those vacuum tubes act as ammo magazines. Once they’re empty, you power them down with that big red switch and eject them one at a time with the lever, just like in the game.

Inside is a Feather M0 Express that runs the RGB LEDs and uses a Hall effect sensor to read magnets in the quick-change ammo magazine. You can see how it works in the demo video after the break.

There are BOMs for several of the prop weapons, along with assembly drawings and support forums for anyone who wants to build their own. Don’t feel like gathering all the bits and bobs yourself? [Andrew] is selling hardware packs for the ray gun, but you’ll have to scrounge the parts yourself if you want to build the Wunderwaffle.

Are you a Grinch who wants to keep kids off of your lawn? Scare ’em off with a giant NERF gun.

Continue reading “DIY Wunderwaffe And Others Make Up This Open-Source Arsenal”

Turn signal monitor

Annoy Yourself Into Better Driving With This Turn Signal Monitor

Something like 99% of the people on the road at any given moment will consider themselves an above-average driver, something that’s as statistically impossible as it is easily disproven by casual observation. Drivers make all kinds of mistakes, but perhaps none as annoying and avoidable as failure to use their turn signal. This turn signal monitor aims to fix that, through the judicious use of negative feedback.

Apparently, [Mark Radinovic] feels that he has a predisposition against using his turn signal due to the fact that he drives a BMW. To break him of that habit, one that cost him his first BMW, he attached Arduino Nano 33 BLEs to the steering wheel and the turn signal stalk. The IMUs sense the position of each and send that over Bluetooth to an Arduino Uno WiFi. That in turn talks over USB to a Raspberry Pi, which connects to the car’s stereo via Bluetooth to blare an alarm when the steering wheel is turned but the turn signal remains untouched. The video below shows it in use; while it clearly works, there are a lot of situations where it triggers even though a turn signal isn’t really called for — going around a roundabout, for example, or navigating a sinuous approach to a drive-through window.

While [Mark] clearly built this tongue firmly planted in cheek, we can’t help but think there’s a better way — sniffing the car’s CANbus to determine steering angle and turn signal status comes to mind. This great workshop on CANbus sniffing from last year’s Remoticon would be a great place to start if you’d like a more streamlined solution than [Mark]’s.

Continue reading “Annoy Yourself Into Better Driving With This Turn Signal Monitor”

This Robot Can’t Keep Its Eyes Off The Money

Some say there’s no treasure quite as valuable as the almighty dollar. [Norbert Zare] likes alt-rock soundtracks on Youtube videos and robots obsessed with money, so set about building the latter.

The project is fundamentally a simple one. A Raspberry Pi 3B+ is outfitted with a Pi Camera, and set up to control twin servo motors attached to a simple pan/tilt assembly. The Pi runs OpenCV set up in a face-tracking mode. This allows the robot to readily track money in its field of view, as the vast majority of money out there has someone’s face on it. OpenCV is used to detect where the money is in the field of view, and guide the Pi’s camera towards the cash.

It’s a neat repurposing OpenCV’s face detection algorithm, and that’s much faster than training your own money-tracking system. However, it seems like the robot would also track regular human faces, too. Perhaps it could be optimised to do a color check, such that only greyscale or green faces were followed by the robot.

Does the project do anything useful or important? Arguably no, but if a robot can be this obsessed with money, perhaps we all can learn something. Alternatively, it might just have served as a useful project for [Norbert] to learn about programming and mechatronics projects. Either way, we dig it. Code is on Github for the curious.

Using OpenCV in this way has become common over the years. If you want to detect cats, however, maybe consider giving Tensorflow a try. Video after the break.

Continue reading “This Robot Can’t Keep Its Eyes Off The Money”

Heathkit IM-13 VTVM Repair

If you are under a certain age, you might not know the initialism VTVM. It stands for vacuum tube voltmeter. At first glance, you might just think that was shorthand for “old voltmeter” but, in fact, a VTVM filled a vital role in the old days of measuring instruments. [The Radio Mechanic] takes us inside a Heathkit IM-13 that needed some loving, and for its day it was an impressive little instrument.

Today, our meters almost always have a FET front end and probably uses a MOSFET. That means the voltage measurement probes don’t really connect to the meter at all. In a properly working MOSFET, the DC resistance between the gate and the rest of the circuit is practically infinite. It is more likely that a very large resistor (like 10 megaohms) is setting the input impedance because the gate by itself could pick up electrostatic voltage that might destroy the device. A high resistance like that is great when you make measurements because it is very unlikely to disturb the circuit you are trying to measure and it leads to more accurate measurements.

Continue reading “Heathkit IM-13 VTVM Repair”

A breadboard filled with logic chips and wiring

SPAM-1 Is A Well-Documented Discrete CPU With An Impressive Software Library

Here at Hackaday we love projects that are so well-documented that you can spend days reading up on what the designer has achieved. [John Lonergan] didn’t disappoint when he designed the SPAM-1, an 8-bit CPU built from discrete logic gates. His detailed log contains a wealth of information on such things as designing opcodes, optimizing program counter logic, running a digital simulation, as well as his thoughts on microcode design. The sheer volume of it may be a bit off-putting to beginners, so it might be best to start with the video series that describes the architecture and goes into detail on several sub-blocks.

The design has changed a bit since [John] first started on the project, as he decided to add more and more features, but the final result is a well-thought out architecture that keeps the simplicity needed for discrete hardware but still has enough features to keep it interesting for seasoned CPU aficionados. The instruction size is rather large (48 bits) to simplify the instruction decoding at the expense of larger code size. Conditional jump instructions are not present; instead, all instructions have an optional control flag to make them conditional, a feature inspired by the ARM instruction set.

Once the design was mature enough, [John] modelled the entire thing in Verilog and simulated his design to verify correct operation and to check the timings, estimating it to be workable up to 5 MHz or so. A large stack of breadboards and DIP chips from the 74xx series then brought the design to life.

Not content with simply designing, simulating and implementing a custom CPU in hardware, [John] also spent significant effort on the software side of things, writing an assembler and even a C-like compiler for the SPAM-1 platform. And if that wasn’t enough, he also added an emulator for the classic CHIP-8 language, which allows it to run existing programs like Pong and Tetris. Input and output for all this software is mostly through a UART connection to a PC. A VGA interface is still on [John]’s to-do list, but he did build an adapter to connect a classic NES controller to the system.

The SPAM-1 is a worthy addition to the long list of discrete-logic CPUs we’ve seen here, such as this breadboard computer running a UNIX-like OS or this minimalistic one. If you’d like to see one that implements an existing instruction set, try this homebrew RISC-V computer.

Continue reading “SPAM-1 Is A Well-Documented Discrete CPU With An Impressive Software Library”

Solar Cells, Half Off

A company named Leap Photovoltaic claims they have a technology to create solar panels without silicon wafers which would cut production costs in half. According to [FastCompany] the cells are still silicon-based, but do not require creating wafers as a separate step or — as is more common — acquiring them as a raw material.

The process is likened to 3D printing as silicon powder is deposited on a substrate. The design claims to use only a tenth of the silicon in a conventional cell and requires fewer resources to produce, too.

Continue reading “Solar Cells, Half Off”

Cheap DIY Mic Sounds (And Looks) Damn Good

As any musician, podcaster, or youtuber will be quick to tell you, there’s no substitute for a good microphone. They’ll also be quick to tell you all about their favorite microphone, why it’s better than all the others, and how much it cost (oh, and how round it sounds, whatever that means). But what if you could build your own that sounds as good, if not better, and do it for only $30?

That’s what [Matt] from DIY Perks set out to discover when he built his DIY USB-C Microphone. He was able to source the same microphone capsule that can be found in his high-end, $600 CAD E100S, and built a simple pre-amplifier that bumps its quiet output up to line-level. He even connected it to the mic module with some custom cable made from two tiny enameled wires that won’t transmit bumps and vibrations, wrapped inside desoldering braiding which acts as a shield. He fed the output from the pre-amp into a cheap USB audio interface and voilĂ ! — top-notch sound for next to nothing. Make sure you check out the video below to hear a comparison between the mic and its professional counterparts.

Of course, sounding good isn’t quite enough. [Matt] wasn’t satisfied until the piece looked the part as well, which is why he encased the mic module in custom-bent brass mesh shielding and tubing (which also helps to reduce electrical interference). The brass cage sits suspended via rubber o-rings on a beautiful bent brass mount, which sits atop an articulated brass arm of [Matt]’s own design. Finally, the arm is mounted to a wood and brass enclosure that also serves to house the electronics.

And, in true open-source fashion, the video description is full of links to parts, schematics, and templates in case you want to build one of these beauties for yourself. Between this fantastic build and this other, super-overkill scratch-built USB microphone we featured earlier in the year, there has never been a better time to make yourself a mic you won’t have to trade your car for.

Thanks to [RichV] and [BaldPower] for the tip!

Continue reading “Cheap DIY Mic Sounds (And Looks) Damn Good”