Badge builder's meetup at DC27

Pictorial Guide To The Unofficial Electronic Badges Of DEF CON 27

DEF CON has become the de facto showplace of the #Badgelife movement. It’s a pageant for clever tricks that transform traditional green rectangular circuit boards into something beautiful, unique, and often times hacky.

Today I’ve gathered up about three dozen badge designs seen at DC27. It’s a hint of what you’ll see in the hallways and meetups of the conference. From hot-glue light pipes and smartphone terminal debugging consoles to block printing effects and time of flight sensors, this is a great place to get inspiration if you’re thinking of trying your hand at unofficial badge design.

If you didn’t catch “The Badgies” you’ll want to go back and read that article too as it rounds up the designs I found to be the craziest and most interesting including the Car Hacking Village, Space Force, SecKC, DC503, and Frankenbadge. Do swing by the Hands-On articles for the AND!XOR badge and for [Joe Grand’s] official DC27 badge. There was also a lot of non-badge hardware on display during Hackaday’s Breakfast at DEF CON so check out that article as well.

Enough preamble, let’s get to the badges!

Continue reading “Pictorial Guide To The Unofficial Electronic Badges Of DEF CON 27”

Core Rope Memory Makes One Of The Oddest LED Flashers We’ve Ever Seen

If you’ve heard of core rope memory, it will probably be in the context of vintage computing equipment such as Apollo-era NASA hardware. A string of magnetic cores and sense wires form a simple ROM arrangement, which though long-ago-superceded by semiconductor memory remains possible to recreate by the experimenter. It’s a path [Nicola Cimmino] has trodden, as he’s not only made a few nibbles of core rope memory, but incorporated it with an Arduino as part of one of the most unusual LED flashers we’ve ever seen. The memory holds a known sequence of bits which is retrieved in sequence by the Arduino, and the LED is kept flashing as long as the read values conform to those expected.

The memory itself is simple enough (and not to be confused with magnetic core memory). The cores are ferrite rings that form a sequence of small transformers that become the bits of the memory. Individual bits are set high or low by either passing a sense wire through a core to create a primary, or bypassing it. Multiple sense wires can be used for separate nibbles in the same cores, so for example his four nibbles all share the same four cores. Pulses are sent down the wires, either passing through a core or not, and equivalently picked up or not on sense lines.

In this case the sense wire is driven directly to ground by Arduino pins which means that the circuit is relying upon the current limiting of the ATmega328 to avoid destroying itself, it’s possible we’d add a driver transistor. The bits are read meanwhile from the secondary windings through a diode rectifier and capacitor to an Arduino analogue pin.

Core memory has been paired with an Arduino before on these pages, though of the RAM variety.

The Not Quite USB-C Of Nintendo Switch Accessories

Historically gaming consoles are sold at little-to-no profit in order to entice customers with a low up-front price. The real profits roll in afterwards from sales of games and accessories. Seeking a slice of the latter, aftermarket accessory makers jump in with reverse-engineered compatible products at varying levels of “compatible”.

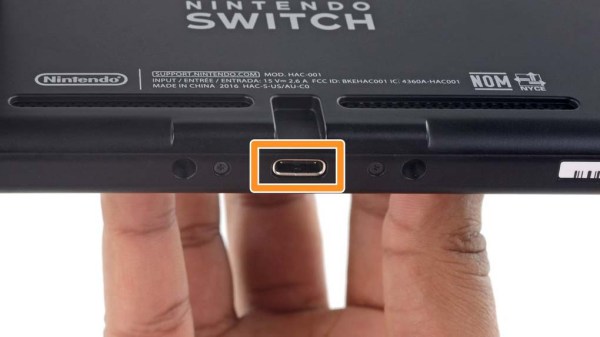
When the Nintendo Switch was released with a standard USB-C port for accessories, we had hoped those days of hit-or-miss reverse engineering were over, but reality fell short. Redditor [VECTORDRIVER] summarized a few parts of this story where Nintendo deviated from spec, and accessory makers still got things wrong.

Officially, Nintendo declared the Switch USB-C compliant. But as we’ve recently covered, USB-C is a big and complicated beast. Determined to find the root of their issues, confused consumers banded together on the internet to gather anecdotal evidence and speculate. One theory is that Nintendo’s official dock deviated from official USB-C dimensions in pursuit of a specific tactile feel; namely reducing tolerance on proper USB-C pin alignment and compensating with an internal mechanism. With Nintendo playing fast and loose with the specs, it makes developing properly functioning aftermarket accessories all the more difficult.

But that’s not the only way a company can slip up with their aftermarket dock. A teardown revealed Nyko didn’t use a dedicated chip to manage USB power delivery, choosing instead to implement it in software running on ATmega8. We can speculate on why (parts cost? time to market?) but more importantly we can read the actual voltage on its output pins which are too high. Every use becomes a risky game of “will this Switch tolerate above-spec voltage today?” We expect that as USB-C becomes more common, it would soon be cheapest and easiest to use a dedicated chip, eliminating the work of an independent implementation and risk of doing it wrong.

These are fairly typical early teething problems for a new complex technology on their road to ubiquity. Early USB keyboard and mice didn’t always work, and certain combination of early PCI-Express cards and motherboards caused damage. Hopefully USB-C problems — and memories of them — will fade in time as well.

[via Ars Technica]

[Main image source: iFixit Nintendo Switch Teardown]

Arduino Converts Serial To Parallel: The Paralleloslam

After a youth spent playing with Amigas and getting into all sorts of trouble on the school computer network, I’ve always had a soft spot in my heart for hardware from the 80s and 90s. This extends beyond computers themselves, and goes so far as to include modems, photocopiers, and even the much-maligned dot matrix printer.

My partner in hacking [Cosmos2000] recently found himself with a wonderful Commodore MPS 1230 printer. Its parallel interface was very appropriate in its day, however parallel ports are as scarce as SID chips. Thankfully, these two interfaces are easy to work with and simple in function. Work on a device to marry these two disparate worlds began.

Enter: The Paralleloslam

While I was gallivanting around the Eastern coast of Australia, [Cosmos2000] was hard at work. After some research, it was determined that it would be relatively simple to have an Arduino convert incoming serial data into a parallel output to the printer. After some testing was performed on an Arduino Uno, a bespoke device was built – in a gloriously plastic project box, no less.

An ATMEGA328 acts as the brains of the operation, with a MAX232 attached for level conversion from TTL to RS232 voltage levels. Serial data are received on the hardware TX/RX lines. Eight digital outputs act as the parallel interface. When a byte is received over serial, the individual bits are set on the individual digital lines connected to the printer’s parallel port. At this point, the strobe line is pulled low, indicating to the attached device that it may read the port. After two microseconds, it returns high, ready for the next byte to be set on the output lines. This is how parallel interfaces operate without a clock signal, using the strobe to indicate when data may be read.

At this point, [Cosmos2000] reached out – asking if I had a name for the new build.

“Hm. Paralleloslam?”

“Done. Cheers!”

Continue reading “Arduino Converts Serial To Parallel: The Paralleloslam”

The Lichtspiel: Not A Simple Child’s Toy.

For his niece’s second birthday, [Stefan] wondered what a toddler would enjoy the most? As it turns out, a box packed with lights, dials and other gadgets to engage and entertain.

For little Alma’s enjoyment, three potentionmeters control a central LED, a row of buttons toggle a paired row of more lights, a rotary encoder to scroll the light pattern of said row left and right, and some sockets to plug a cable into for further lighting effects. Quite a lot to handle, so [Stefan] whipped up a prototype using an Arduino — although he went with an ATmega 328 for the final project — building each part of the project on separate boards and connected with ribbon cables to make any future modifications easier.

[Stefan] attempted to integrate a battery — keeping the Lichtspiel untethered for ease of use — and including a standby feature to preserve battery life. A power bank seemed like a good option to meet the LED’s needed 5V, but whenever the Lichtspiel switched to standby, the power bank would shut off entirely — necessitating the removal of the front plate to disconnect and reconnect the battery every time. The simpler solution was to scrap the idea entirely and use the charging port as a power port instead — much to the delight of his niece who apparently loves plugging it in.

Continue reading “The Lichtspiel: Not A Simple Child’s Toy.”

FrankenKorg: The Modern Remote Keyboard

On a dreary night in November, [Smecher] collected the instruments of electronic life around him to infuse a musical spark into FrankenKorg — a resurrected keytar.

This hack is a “re-braining” of a RK-100 Korg Keytar, replacing the original circuits with an ATMega32 — the original functionality and appearance are preserved allowing any restored version of the original boards to be seamlessly re-integrated. In light of that, the original boards were ditched after a brief investigation, and a haphazard building process on a protoboard began. Three LS138 3-8 demuxers that accompany the ATMega handle scanning the keys since there weren’t enough pins on the ATMega alone for all the Korg’s features. Check out [Smecher]’s breakdown of his process in the video after the break!

Continue reading “FrankenKorg: The Modern Remote Keyboard”

Malduino Elite – First Impressions

A while back, I wrote an article about Malduino, an Arduino-based, open-source BadUSB device. I found the project interesting so I signed up for an Elite version and sure enough, the friendly postman dropped it off in my mail box last Friday, which means I got to play around with it over the weekend. For those who missed the article, Malduino is USB device which is able to emulate a keyboard and inject keystrokes, among other things. When in a proper casing, it will just look like a USB flash drive. It’s like those things you see in the movies where a guy plugs in a device and it auto hacks the computer. It ships in two versions, Lite and Elite, both based on the ATmega32U4.

The Lite version is really small, besides the USB connector it only contains a switch, which allows the user to choose between running and programming mode, and a LED, which indicates when the script has finished running.

Original Malduino Elite sketch and Lite prototype

The Elite version is bigger, comes with a Micro-SD card reader and four DIP switches, which allow the user to choose which script to run from the card. It also has the LED, which indicates when a script has finished to run. This allows the user to burn the firmware only once and then program the keystroke injection scripts that stored in the Micro-SD card, in contrast to the Lite version which needs to be flashed each time a user wants to run a different script.

These are the two Malduinos and because they are programmed straight from the Arduino IDE, every feature I just mentioned can be re-programmed, re-purposed or dropped all together. You can buy one and just choose to use it like a ‘normal’ Arduino, although there are not a lot of pins to play around with. This freedom was one the first things I liked about it and actually drove me to participate in the crowd-funding campaign. Read on for the full review.
Continue reading “Malduino Elite – First Impressions”