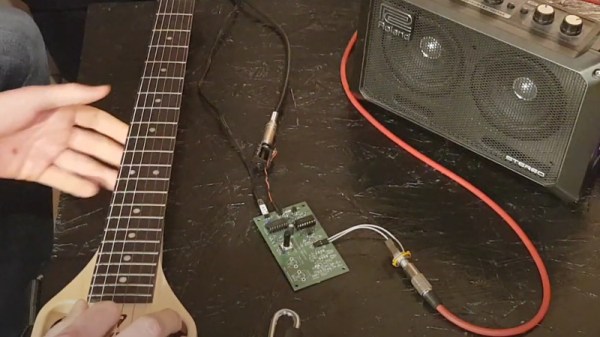
Should You Be Able To Repair It? We Think So.

You own it, you should be able to fix it. So much equipment on sale today has either been designed to be impossible to maintain, unnecessarily too complex to maintain, maintainable only with specialist tooling only available to authorised service agents, or with no repair parts availability. It’s a hot-button issue in an age when sustainability is a global concern, so legislators and regulators worldwide now finally have it in their sights after years of inaction and it’s become a buzzword. But what exactly is the right to repair, and what do we want it to be?

Is It Designed For Repair?

A Nestle Dolce Gusto machine
For some reason, pod coffee makers are especially resistant to repair. Andy1982, CC BY 3.0

The first question to consider is this: does it matter whether or not you have the right to repair something, if it’s designed specifically with lack of repairability in mind? Consider a typical domestic pod coffeemaker such as a Tassimo or similar: despite being physically quite a simple device, it is designed to be especially complex to dismantle and reassemble. You just can’t get into it when something goes wrong.

Should it be the preserve of regulators to require design for easy repair? We think so. There are other forces working on the designers of home appliances; design-for-manufacture considerations and exterior appearance concerns directly affect the firm’s bottom line, while the end users’ repair experience is often at the bottom of the list, even though the benefit at a national level is obvious. That’s what laws are for.
Continue reading “Should You Be Able To Repair It? We Think So.”

Practical Print Makes IPad A Magnificent Eye Piece

Be it the ever shrinking size of components, the miniscule size of the printing on such pieces, or the steady march of time that makes visits to the optometrist an annual ritual, many of us could use some assistance when things start getting fuzzy at the workbench. Arm-mounted LED magnifying lenses can be a handy helper. Zooming in on a macro photo on a smartphone is also a common option that we’ve used many times.

[Timo Birnschein] started down a similar path when he realized that his iPad Pro comes with an app called simply “Magnifier”. A 12” iPad isn’t exactly the most convenient device to hold while trying to solder small parts, so he spent some time designing and 3D printing a specialty iPad stand that he calls a “Quick and Dirty High Performance EE Microscope.” We call it a magnificent tool hack!

Rotating the iPad diagonally so that the camera is closest to the subject leaves plenty of room to work and makes great use of the available screen space. [Timo] reports that at 50% magnification the 12” screen makes even 0603 SMD parts easy to read. Now he rejoices to have more to do with his iPad than watching YouTube and reading Hackaday- although we don’t know why you couldn’t do both.

The STL files have been released on Thingverse for your experimentation. [Timo] notes that he’d like to add an LED ring to brighten things up, and a fume extractor to protect the delicate lens on the iPad. We have to wonder if some plastic wrap over the lens might produce the same effect at almost no cost. Whatever [Timo] decides to do, we’re sure it’ll be brilliant.

If you don’t have an iPad and a 3D printer, you might enjoy an earlier post that shows how you can use your phone as a microscope. If Lego and Raspberry Pi are your go-to parts, you can set your sights on this Lego/Pi/Arduino microscope.

Do you have your own preferred solution for seeing yourself through a hazy situation? Be sure to write it up, and then drop it in the Tip Line!


A Whole Lot Of Stepper Motors Make The Most Graceful 7-Segment Displays

Over the years we’ve seen many takes on the 7-segment display. Among the most interesting are the mechanical versions of what is most often an LED-based item. This week’s offering is from [John Burd], who published a very odd video showing off the clock he made. But look beyond YouTuber antics and you’ll see the stepper motors he used to turn the segments are dripping with graceful beauty. (Video, embedded below.)

Okay if you want to hear [Charlie Sheen] say “Raspberry P-eye”, this is the video for you. [John] used Cameo to get the (former?) star to talk about what was used to build the clock. Like we said, the video is weird. Let’s embrace that right away and then never talk about it again.

The thing is, the build is such a good idea. [John] went with some stepper motors you can source relatively cheaply from Ali Express and the like. Typically they’re around a buck or two each and have a couple of wings for screw mounting brackets. This builds on the segment displays we’ve seen that use hobby servos by allowing you finer control of how the segments move. Sure, the 90° rotation isn’t all that much to work with, but it will be much smoother and you can get fancy with the kinematics you choose. The only place we see room for improvement is the alignment of the segments when they are turned “off” as you can see the center segment in the video thumbnail below is not quite level. Maybe a linkage mechanism would allow for a hing mechanism that aligns more accurately while hiding the servos themselves behind the mounting plate? It’s in your hands now!

In the demo video you’ll also find some interesting test rigs built to proof out the project. One just endurance tests the mechanism, but the other two envision water-actuated segments. One pumps a hollow, transparent segment with colored liquid. The other tried to use water droplets sprayed in the air to illuminate laser segments. Both are cool and we’d like to see more of the oddball approaches which remind us of the ferrofluid clock.

Continue reading “A Whole Lot Of Stepper Motors Make The Most Graceful 7-Segment Displays”

Homebrew ROM Reader Saves Data From A Vintage Minicomputer

Have you ever heard of a Centurion minicomputer? If not, don’t feel bad — we hadn’t either, until [David Lovett] stumbled upon a semi-complete version of the 1980-ish mini in all its wood-trimmed, dust-encased glory. And what does a hacker do with such an acquisition but attempt to get it going again?

Of course, getting a machine from the Reagan administration running is not without its risks, including the chance of losing whatever is on the machine’s many ROM chips forever. When finding a commercial ROM reader supporting the various chips proved difficult, [David] decided to build his own. The work was eased considerably by the fact that he had managed to read one chip in a commercial reader, giving him a baseline to compare his circuit against. The hardware is straightforward — a 12-bit counter built from a trio of cascaded 74LS161s to step through addresses, plus an Arduino Nano to provide clock pulses and to read the data out to the serial port.

The circuit gave the same results as the known good read, meaning results would be valid for the rest of the chips. The breadboard setup made supporting multiple ROM pinouts easy, even for the chips that take -9 volts. What exactly the data on the ROMs mean, if anything, remains a mystery, but at least it’s backed up now.

Before anyone notes the obvious, yes, [David] could have used a 555 to clock the reader — perhaps even this one. We’d actually have loved that, but we get it — sometimes you just need to throw an Arduino at a job and be done with it.

Continue reading “Homebrew ROM Reader Saves Data From A Vintage Minicomputer”

FreeBSD Experiment Rethinks The OS Install

While the medium may have evolved from floppy disks to DVDs and USB flash drives, the overall process of installing an operating system onto a desktop computer has been more or less the same since the 1980s. In a broad sense you could say most OS installers require more clicking than typing these days, but on the whole, not a lot has really changed. Of course, that doesn’t mean there isn’t room for improvement.

Among the long list of projects detailed in FreeBSD’s April to June 2021 Status Report is a brief update on an experimental installer developed by [Yang Zhong]. In an effort to make the installation of FreeBSD a bit more user friendly, the new installer does away with the classic terminal interface and fully embraces the modern web-centric design paradigm. Once the user has booted into the live OS, they simply need to point the browser to the loopback address at any time to access the installer’s GUI.

Now that alone wouldn’t be particularly groundbreaking. After all, Google has implemented an entire operating system with web frameworks in Chrome OS, so is making the installer a web app really that much of a stretch? But what makes [Yang]’s installer so interesting is that the web interface isn’t limited to just the local machine, it can be accessed by any browser on the network.

That means you can put the install disc for FreeBSD into a headless machine on your network, and use the browser on your laptop or even smartphone to access the installer. The Graybeards will point out that savvy users have always been able to access the text installer from another computer over SSH, but even the most staunch Luddite has to admit that simply opening a browser on whatever device you have handy and pointing it to the target machine’s IP address is a big usability improvement.

While the software appears complete enough to get through a basic installation, we should remind readers these are still early days. There’s currently no authentication in place, so once you’re booted into the live environment, anyone on the network can format your drives and start the install process.

Some sections of the GUI aren’t fully functional either, with the occasional note from [Yang] popping up to explain what does and doesn’t work. For example, the manual network configuration panel currently only works with WiFi interfaces, as that’s all he personally has to test with. Quite a modern installer, indeed.

Some would argue that part of what makes alternative operating systems like Linux and BSD appealing is the fact that they can happily run on older hardware, so we imagine the idea of an installer using a memory-hungry web browser to present its interface won’t go over well with many users. In our testing, the experimental installer ISO won’t even boot unless it detected at least 4 GB of RAM onboard. But it’s certainly an interesting experiment, and something to keep an eye on as it matures.

[Thanks to Michael for the tip.]

ESP8266 Network Meters Show Off Unique Software

Like the “Three Seashells” in Demolition Man, this trio of bright yellow network monitors created by [David Chatting] might be difficult to wrap your head around at first glance. They don’t have any obvious controls, and their constantly moving indicators are abstract to say the least. But once you understand how to read them, and learn about the unique software libraries he’s developed to make them work, we’re willing to bet you’ll want to add something similar to your own network.

First-time configuration of the monitors is accomplished through the Yo-Yo WiFi Manager library. It’s a captive portal system, not unlike the popular WiFiManager library, but in this case it has the ability to push the network configuration out to multiple devices at once. This MIT-licensed library, which [David] has been developing with [Mike Vanis] and [Andy Sheen], should be very helpful for anyone looking to bring multiple sensors online quickly.

The Device Wheel

We’re also very interested in what [David] calls the Approximate library. This allows an ESP8266 or ESP32 to use WiFi signal strength to determine when its been brought in close proximity to particular device, and from there, determine its IP and MAC address. In this project, it’s used to pair the “Device Wheel” monitor with its intended target.

Once locked on, the monitor’s black and white wheel will spin when it detects traffic from the paired device. We think this library could have some very interesting applications in the home automation space. For example, it would allow a handheld remote to control whatever device the user happens to be closest to at the time.

Whether you follow along with the instructions and duplicate the meters as-is, or simply use the open source libraries that power them in your own project, we think [David] has provided the community with quite a gift in these unique gadgets.

Making A Left-Handed NES Controller

The controller for the original Nintendo Entertainment System is a classic, but perhaps not best known for its adherence to good ergonomic principles. Regardless, it can grow awkward to use for long stretches of time. To help alleviate this, [Taylor] whipped up an easy way to convert a NES controller to left-handed operation.

The mod board in question, installed on a NES controller PCB.

The crux of the hack is simple, with the controller’s buttons swapped left-to-right to enable the controller to be flipped upside down. In this orientation, the D-pad is used by the right hand and the action buttons by the left–the opposite of the usual way. Thus, left and right on the D-pad must be switched, as well as A and B, so all the controls are otherwise in a logical layout.

This is achieved through the use of a little mod board of [Taylor]’s own design. The original HD14021BP chip is desoldered from the controller’s PCB, and installed in the mod board instead. The modboard can then be soldered back into the controller, rerouting the traces to swap the buttons. There’s also a version that [Taylor] designed that can flip between right-handed and left-handed operation thanks to some onboard DIP switches.

It’s a tidy hack that could save the thumbs of some dedicated Tetris players. Alternatively, you can always make your own NES controller from scratch. Video after the break.

Continue reading “Making A Left-Handed NES Controller”