Triple Monitor Luggable PC Is An All In One Powerhouse

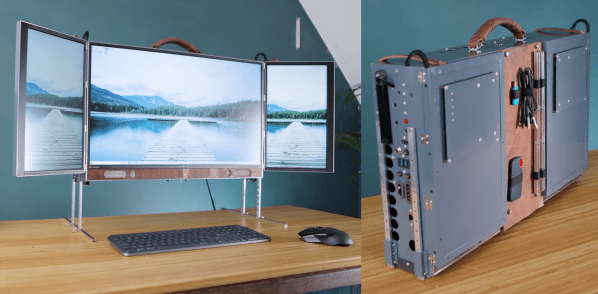
[Matt] from [DIY Perks] has made a name for himself building nice custom computing machines, and his latest triple-monitor luggable PC (video after the break) is sure to give most high-performance desktop machines a run for their money.

The large central monitor folding laptop monitors mounted vertically on either size look impressive, but only just scratches the surface of this build. Hidden behind aluminum panels are Ryzen 5950X CPU and RTX 3080 GPU with water cooling, 64 GB of RAM, and two 8 TB SSDs. A set of high-quality speaker drivers, subwoofer, and audio amps is also included. All this hardware pulls about 600 W of power from a large DC-DC converter block, which in turn receives power from either a pair of onboard AC-DC converters or a 16 V – 63 V DC source, like a battery system.

To mount everything to the back of the main monitor, [Matt] created 3D printed adaptor blocks with threaded inserts which slide under existing hooks on the back of the monitor. Aluminum angles screw to these blocks to cover the edges of the display panel, together with a large mounting plate with pre-drilled holes to mount all the components on standoffs. A set of adjustable and removable legs mount to the side of the PC. A hinged door in the back cover allows storage space for a keyboard and mouse during transport. When folded, the laptop monitors don’t fully cover the main monitor, so [Matt] created a leather cover that doubles as a cable and accessory organizer.

Whether its dual screens and an integrated SDR, or a rotating-folding screen, there is no shortage of ways to build a portable powerhouse. Continue reading “Triple Monitor Luggable PC Is An All In One Powerhouse”

A CRT Monitor Restoration

Nothing quite says vintage computer like a dedicated glass terminal. We enjoyed [Adam]’s restoration of an Acorn CRT monitor. The 14 inch display had a common problem: a defective power switch. Replacing a switch shouldn’t be a big deal, of course, but these old CRT monitors have exciting voltages inside and require special care.

One common issue, for example, is the fact that the old CRTs are really large capacitors and can hold a dangerous charge for some time. The easiest way to handle the potential problem is to make sure the device is unplugged, ground a screwdriver blade, and push the blade under the second anode cap. Most of the time, nothing happens. Once in a while, though, you’ll hear a loud pop and you just saved yourself a nasty shock.

Even though the actual repair was pretty mundane, the teardown was a great nostalgia trip and while we don’t want to give up our LCD, we do like the old glass. CRTs have a long history and came a long way before their last gasps. They even took a turn as mass storage devices.

Tesla Door Handle Improvements

Automotive engineer and former Tesla employee [SuperfastMatt] takes at look at the notorious Tesla door handle design and how it’s changed over the years (see the video below the break). The original handle design consisted of many moving parts, switches and wires which were prone to failure.  Strictly speaking, the door handle is located on the outside of the car’s interior. While it’s sheltered from direct exposure to the elements, it still experiences the extremes of temperature, humidity, and condensation. The handles were so prone to failure that a cottage industry sprang up to provide improved parts and replacements.

Tesla made various improvements over the years, culminating in the latest version which [Matt] reviews in this video. Nearly all the failure points have been eliminated, and the only moving parts, other than the handle itself, is a magnetic sensor to detect handle motion (previously this was sensed by microswitches). [Matt] indelicately opens up the control module, and discovers an NXP programmable angle sensor ( KMA215 ). This all-in-one sensor detects the angle of a magnetic field, and reports it over an automotive communications bus that’s become more and more common over the last ten years: Single Edge Nibble Transmission (SENT) aka SAE J2716. SENT is a low-cost, transmit-only protocol designed for sensors to send data to the ECU. Check out [Matt] decoding it on the oscilloscope and Raspberry Pi in the video — it looks pretty simple at first glance.

We agree with [Matt]’s conclusion that the door handle design has been significantly improved with this latest iteration, questions of whether one needs a retracting door handle aside. If you’d like to learn more about SENT, here is a tutorial written by IDT (now Renasas) applications engineer Tim White. This isn’t [Matt]’s first encounter with a Tesla door handle — back in 2012 we covered his project which used one to dispense beer. Thanks to [JohnU] for sending in this tip.

Continue reading “Tesla Door Handle Improvements”

Taking A Deep Dive Into SPI

With the prevalence of libraries, it has never been easier to communicate with hundreds of different sensors, displays, and submodules. But what is really happening when you type SPI.begin() into the Arduino IDE? In his most recent video, [Ben Eater] explores the Serial Peripheral Interface (SPI) and how it really works.

Most Hackaday readers probably know [Ben] from his breadboard-based computers, such as the 6502 build we featured in 2019. Since then he has been hard at work, adding new and interesting additions to his breadboard computer, as well as diving into different communication protocols to better understand and implement them. For this video, [Ben] set the goal of connecting the BME280, a common pressure, temperature, and humidity sensor with an SPI interface, to his breadboard 6502 computer. Along the way, [Ben] discusses how exactly SPI works, and why there is so much conflicting nomenclature and operations when looking at different SPI devices.

If breadboard computers aren’t your thing, there are tons of other uses for the BME280, such as helping to modernize a Casio F-91W.

Continue reading “Taking A Deep Dive Into SPI”

Farewell Sir Clive Sinclair; Inspired A Generation Of Engineers

It is with sadness that we note the passing of the British writer, engineer, home computer pioneer, and entrepreneur, Sir Clive Sinclair, who died this morning at the age of 81 after a long illness. He is perhaps best known among Hackaday readers for his ZX series of home computers from the 1980s, but over a lifetime in the technology industry there are few corners of consumer electronics that he did not touch in some way.

Sinclair’s first career in the 1950s was as a technical journalist and writer, before founding the electronics company Sinclair Radionics in the 1960s. His output in those early years was a mixture of miniature transistor radios and Hi-Fi components, setting the tone for decades of further tiny devices including an early LED digital watch at the beginning of the 1970s, miniature CRT TVs in the ’70s and ’80s, and another tiny in-ear FM radio which went on sale in the ’90s.

Continue reading “Farewell Sir Clive Sinclair; Inspired A Generation Of Engineers”

A smartphone with a robot vacuum in the background

Hacking A Robot Vacuum To Write A Replacement App

While internet-connected devices can be very useful around the house, and it is pretty cool to be able to monitor your dishwasher from half a world away, it’s important to be mindful of privacy and security issues. For instance, the Cecotec Conga 1490 robot vacuum [Rastersoft] bought came with an Android app, which upon installation asked for near-total access to the user’s phone. Not content with such an invasion of privacy, let alone the potential security implications, [Rastersoft] set to work trying to reverse engineer the robot’s communications (translated) to find out what exactly it was doing when online. He did this by configuring a Raspberry Pi as an access point, letting the vacuum connect to it, and logging all the data flowing through.

As it turned out, the robot phoned home to its manufacturer, reporting its serial number and some configuration settings. The server then passed control to the mobile app, but not without routing all subsequent commands through the remote server. Not only is this creepy, it also means that if the manufacturer were to shut down the server, the app would stop working entirely. [Rastersoft] therefore got the idea to write custom software to control the robot. He began by reconfiguring the Pi’s network setup to fool the vacuum into thinking it was connecting to its manufacturer’s server, and then wrote some Python code to emulate the server’s response. He was now in control of all data flowing back and forth.

After a lot of experimentation and data analysis, [Rastersoft] managed to decipher the commands sent by the app, enabling him to write a complete replacement app seen in the video after the break that includes control of all the vacuum’s standard actions, but also a new feature to manually control the vacuum’s movement. All code is available on GitHub for those who would like to hack their Congas too.

We think this is a great example of software hacking to future-proof devices that you own, while also mitigating many of the dangers to your security and privacy posed by the default software. The fact that the commands you send from your phone to your vacuum go all the way around the world, potentially being stored and read by others, is rather ridiculous in the first place. After all, we’ve already seen how robot vacuums could spy on you.

Continue reading “Hacking A Robot Vacuum To Write A Replacement App”

Powering Up With USB: Untangling The USB Power Delivery Standards

Powering external devices directly from a PC’s I/O ports has been a thing long before USB was even a twinkle in an engineer’s eye. Some of us may remember the all too common PS/2 pass-through leads that’d tap into the 275 mA that is available via these ports. When USB was first released, it initially provided a maximum of 500 mA which USB 3.0 increased to 900 mA.

For the longest time, this provided power was meant only to provide a way for peripherals like keyboards, mice and similar trivial devices to be powered rather than require each of these to come with its own power adapter. As the number of  computer-connected gadgets increased USB would become the primary way to not only power small devices directly, but to also charge battery-powered devices and ultimately deliver power more generally.

Which brings us to the USB Power Delivery (USB-PD) protocol. Confusingly, USB-PD encompasses a number of different standards, ranging from fixed voltage charging to Programmable Power Supply and Adjustable Voltage Supply. What are the exact differences between these modes, and how does one go about using them? Continue reading “Powering Up With USB: Untangling The USB Power Delivery Standards”