Smoothing Big Fonts On Graphic LCDs

Here’s a neat little trick: take the jaggies out of scaled fonts on the fly! This technique is for use on graphic displays where you might want to scale your fonts up. Normally you’d just write a 2×2 block of pixels for every area where there would have been one pixel and boom, larger font. Problem is, that also multiplies each empty area and you end up with jagged edges in the transitions that really catch your eye.

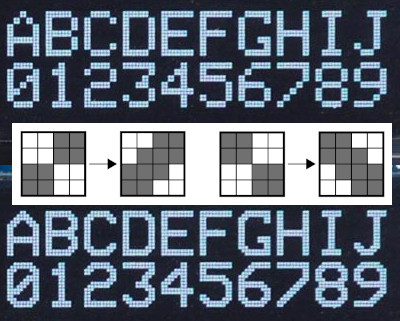
[David Johnson-Davies] entered big-brain mode and did something much cleverer than the obvious solution of using multiple font files. Turns out if you analyze the smoothing problem you’ll realize that it’s only the angled areas that are to blame, horizontal and vertical scaling are nice and smooth. [David’s] fix looks for checker patterns in what’s being drawn, adding a single pixel in the blank spots to smooth out the edge incredibly well!

The technique has been packaged up in a simple function that [David] wrote to play nicely in the Arduino ecosystem. However, the routine is straightforward and would be quick to implement no matter the language or controller. Keep this one in your back pocket!

Now if all you have on hand is an HD44780 character LCD, that one’s arguably even more fun to hack around on just because you’re so limited on going beyond the hard-coded font set. We’ve seen amazing things like using the custom character slots to play Tetris.

POV LED Staff Takes Art For A Spin

The human body does plenty of cool tricks, but one of the easiest to take advantage of is persistence of vision (POV). Our eyes continue to see light for a fraction of a second after the light goes off, and we can leverage this into fun blinkenlight toys like POV staffs. Sure, you can buy POV staffs and other devices, but they’re pretty expensive and you won’t learn anything that way. Building something yourself is often the more expensive route, but that’s not the case with [shurik179]’s excellent open-source POV staff.

There’s a lot to like about this project, starting with the detailed instructions. It’s based on the ItsyBitsyM4 Express and Adafruit’s Dotstar LED strips. You could use the Bluetooth version, but it’s already quite easy to load images to the staff because it shows up as a USB mass storage device. We like that [shurik179] added an IMU and coded the staff so that the images look consistent no matter how fast the staff is spinning. In the future, [shurik179] might make a Bluetooth version that’s collapsible. That sounds like quite the feat, and we can’t wait to see it in action.

As cool as it is to wave a POV staff around, there’s no real practical application. What’s more practical than a clock?

The Clock Under The Dome

In what can only be described as a work of art, [suedbunker] has created a clock under a glass dome. Sporting Nixie tubes, a DS3223, BCD encoders, and MPSA43 transistors driven by an MCP23008 I/O expander it is truly a sight to behold. [suedbunker] has previously created the Circus Clock, a similar clock that celebrated a diversity of ways of displaying the time.

The dome clock represents a continuation of that idea. Reading the clock requires looking at the horizontal and vertical numbers separately. The hours are on the horizontal and minutes are on the vertical. Monday to Sunday is represented in the neon bulbs on the back. The power supply at the bottom provides a wide range of voltages including 5 V, 12 V, 24 V, 45 V, 90 V, 150 V, and -270 V for all the various types of lights. For safety, an optocoupler is used on the -270 volts to drive the clear seven-segment display.

An Arduino Nano controls the whole clock by communicating with the DS3232 real-time clock module and the port expanders via I2C. The soldering and wiring work, in particular, is tidy and beautiful. We look forward to future clocks by [suedbunker] and his wife.

Continue reading “The Clock Under The Dome”

When Only The Tiniest Of Violins Will Do

Playing the tiniest of violins may be a phrase to encapsulate the complete lack of sympathy as someone unpleasant receives their just deserts, but have any of you ever considered how such a feat might be achieved? Unless you’re an unusually talented virtuoso with the bow, it’s difficult to believe that such a small instrument could be played with ease, even if it were to be available in the first place.

Happily a solution is at hand to all those minuscule stringed instrument woes, courtesy of [Alexandra Covor], who has created a miniature PCB violin that is after a fashion playable. It may not be a conventional instrument with a horsehair bow and traditional sounding mechanism, but its electronic voice should still deliver enough to delight.

At the heart of the violin-shaped PCB is an ATtiny85 and a piezoelectric buzzer, and just where you might expect them are a set of strings made from wire attached to the PCB. The instrument can play stored tunes, but since the strings are hooked up to an analogue input on the microcontroller, it can be played as a touch instrument. Finally a pair of LEDs behind the translucent FR4-only F-holes complete the look. It’s fair to say that Itzhak Perlman and his ilk are safe from challengers bearing this instrument, but it’s still an eye-catching piece of PCB art.

This isn’t the first tiny violin that’s been featured here, some others are much smaller.

Flash Is Dead, But Its Culture Should Live On

Flash is all but gone already, but as we approach the official Adobe end-of-life date on December 31st, it’s picking up traction one last time as people reminisce about the days of Internet past. Back in July, [Jonas Richner] created an impressive website that catalogs not only almost 20 years of Flash games, but also testimonials for the software from dozens of developers who began their careers with it.

Flash started in 1996 with the intention of being a standard for animations and vector graphics on the early Web. With the release of Flash Player 5 in August of 2000, Macromedia (later acquired by Adobe) presented the first version of ActionScript, an object-oriented scripting language meant to bring interactivity to animated Flash movies. Since then, thousands of games made with the platform were released online through websites like Newgrounds and shared all over the world, with the most popular games easily reaching tens of millions of plays.

These games became popular in part thanks to how quickly they could be created with the Flash authoring tools, but also because it was so easy for players to run them. With a single plugin for your web browser of choice, the barrier of entry was extremely low. Most home computers from the mid-2000s were able to run Flash software without needing dedicated graphics hardware. This prompted a “creative chaos” as [Richner] puts it, spawning millions of games and animations which started genres and careers lasting to this day.

Unfortunately, browsers have been dropping support for the plugin due to vulnerabilities in the most recent iterations of its scripting engine and Google no longer indexes Flash files. It would seem this particularly creative era of the Internet is coming to an end. However, you can still relive old games and animations made with plugins such as Flash and Shockwave with [BlueMaxima]’s Flashpoint, and like [Richner], we also hope that the people building today’s platforms and technologies keep the lessons from Flash in mind.

Radio Remote Control Via HTML5

It’s a common scene: a dedicated radio amateur wakes up early in the morning, ambles over to their shack, and sits in the glow of vacuum tubes as they call CQ DX, trying to contact hams in time zones across the world. It’s also a common scene for the same ham to sit in the comfort of their living room, sipping hot chocolate and 
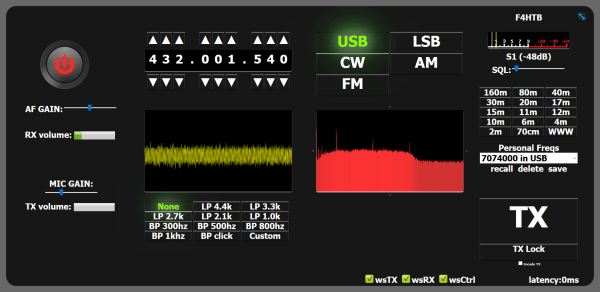
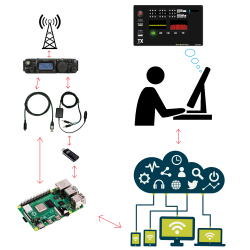
remote-controlling their rig from a laptop. As you can imagine, this essentially involves a server running on a computer hooked up to the radio, which is connected via the internet to a client running on the laptop. [Olivier/ F4HTB] saw a way to improve the process by eliminating the client software and controlling the rig from a web browser.

[Oliver]’s software, aptly named Universal HamRadio Remote, runs a web server that hosts an HTML5 dashboard for controlling the radio. It also pipes audio back and forth (radio control wouldn’t be very useful if you couldn’t talk!), and can be run on a Raspberry Pi. Not only does this make setup easier, as there is no need to configure the client machine, but it also makes the radio accessible from nearly any modern device.

We’ve seen a similar (albeit expensive and closed-source) solution, the MFJ-1234, before, but it’s always refreshing to see the open-source community tackle a problem and make it their own. We can’t wait to see where the project goes next!

A Transistor-less Sound Synthesizer

A synthesizer without transistors could almost be the basis of a trick question, surely without transistors it must be using a vacuum tube or similar. Not [Dr. Cockroach]’s synth though, instead of transistors it uses coupled pairs of LEDs and light-dependent resistors as its active components. Its oscillator circuit comes courtesy of [Patrick Flett], and uses a pair of LED/LDR combinations to alternately charge and discharge a capacitor. This feeds another LDR/LED pair that appears to act as a buffer to drive a bridge rectifier, with a final amplifier following it.

The result oscillates, though at frequencies in the low audio range with a cluster of harmonics thrown in. Its sound is best described as something akin to a small single-cylinder motorcycle engine at the lower frequencies, and is something we see could have all sorts of interesting possibilities.

This approach of using LDR-based active devices may be something of a dead end that could have had its day back in the 1930s, but it’s nevertheless an entertaining field to explore. It’s not the first time we’ve followed [Dr. Cockroach] at it, in the past we’ve seen the same technique applied to logic gates.

Have a listen to the synth in the video below the break. Continue reading “A Transistor-less Sound Synthesizer”