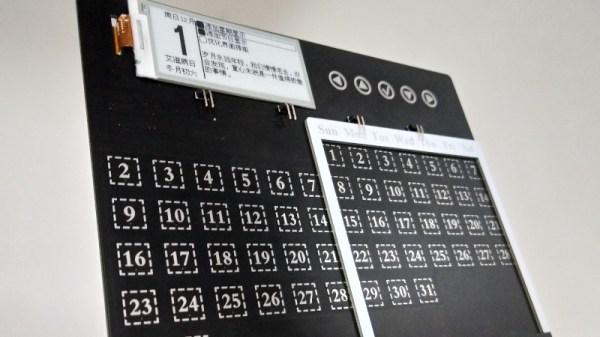
A Division In Voltage Standards

During my recent trip to Europe, I found out that converters were not as commonly sold as adapters, and for a good reason. The majority of the world receives 220-240 V single phase voltage at 50-60 Hz with the surprisingly small number of exceptions being Canada, Colombia, Japan, Taiwan, the United States, Venezuela, and several other nations in the Caribbean and Central America.

While the majority of countries have one defined plug type, several countries in Latin America, Africa, and Asia use a collection of incompatible plugs for different wall outlets, which requires a number of adapters depending on the region traveled.

Although there is a fair degree of standardization among most countries with regards to the voltage used for domestic appliances, what has caused the rift between the 220-240 V standard and the 100-127 V standards used in the remaining nations?

Continue reading “A Division In Voltage Standards”

Raspberry Pi 4 HDMI Is Jamming Its Own WiFi

Making upgrades to a popular product line might sound like a good idea, but adding bigger/better/faster parts to an existing product can cause unforeseen problems. For example, dropping a more powerful engine in an existing car platform might seem to work at first until people start reporting that the increased torque is bending the frame. In the Raspberry Pi world, it seems that the “upgraded engine” in the Pi 4 is causing the WiFi to stop working under specific circumstances.

[Enrico Zini] noticed this issue and attempted to reproduce exactly what was causing the WiFi to drop out, and after testing various Pi 4 boards, power supplies, operating system version, and a plethora of other variables, the cause was isolated to the screen resolution. Apparently at the 2560×1440 setting using HDMI, the WiFi drops out. While you could think that an SoC might not be able to handle a high resolution, WiFi, and everything else this tiny computer has to do at once. But the actual cause seems to be a little more interesting than a simple system resources issue.

[Mike Walters] on a Twitter post about this issue probed around with a HackRF and discovered a radio frequency issue. It turns out that at this screen resolution, the Pi 4 emits some RF noise which is exactly in the range of WiFi channel 1. It seems that the Pi 4 is acting as a WiFi jammer on itself.

This story is pretty new, so hopefully the Raspberry Pi Foundation is aware of the issue and working on a correction. For now, though, it might be best to run a slightly lower resolution if you’re encountering this problem.

A Python Serial Terminal To Get You Out Of A Jam

When fiddling around with old computers, you can occasionally find yourself in a sticky situation. What may be a simple task with today’s hardware and software can be nearly impossible given the limited resources available to machines with 20 or 30 years on the clock. That’s where [bison] recently found himself when he needed to configure a device over serial, but didn’t have any way of installing the appropriate terminal emulator on his Fujitsu Lifebook C34S.

His solution, since he had Python 2.6 installed on the Debian 6 machine, was to write his own minimal serial terminal emulator. He intended for the code to be as terse as possible so it could be quickly typed in, should anyone else ever find themselves in need of talking to a serial device on Linux but can’t get screen or minicom installed.

The code is very simple, and even if you never find yourself needing to fire up an impromptu terminal, it offers an interesting example of how straightforward serial communications really are. The code opens up the /dev/ttyS0 device for reading, and after appending the appropriate return character, pushes the user’s keyboard input into it. Keep looping around, and you’ve got yourself an interactive terminal.

With this program written, [bison] was able to connect the 266 MHz C34S to his Retro WiFi SI, a modem adapter that bridges the gap between a vintage computer and modern wireless network. Gadgets like these allow you to browse BBSes as the creator intended, and can be fashioned with nothing more exotic than an ESP8266 running some open source code.

Add LEDs To Your Stained Glass

Stained glass is an art form that goes back many centuries, with the churches and cathedrals of Europe boasting many stunning examples from the mediaeval masters of the craft. You do not however have to go to York or Chartres cathedrals to experience stained glass, for it remains a vibrant and creative discipline with many contemporary practitioners. One thing the stained glass of today has in common with that of yesteryear though is that it remains static, being composed of pieces of glass held together by metal strips. This is something that [Frank Zhao] has addressed as he has evolved a technique that allows him to incorporate LEDs into static stained glass, making for a particularly eye-catching effect.

It’s likely that we join many readers in not knowing the intricacies of making a piece of stained glass, so his is a fascinating write-up for its step-by-step run-through. His stained glass cat has pieces of glass edged with copper tape, which he then solders together. Driving the LEDs is not something that should be alien to us, but his method of using the copper-and-solder stained glass joints as conductors for them by creating strategically placed cuts is very effective. The final effect is of a homogeneous piece without the cuts being particularly visible , but with a pleasing array of lights on the cat’s tail. Those of us for whom stained glass production is new have learned something of the technique, and stained glass artists have seen their craft do something completely new.

Stained glass hasn’t featured here too often, the closest we’ve come is this striking fake stained glass Iron-Man themed panel a few years ago.

A Printed Case For Your ESP Environmental Sensors

We’ve said it before but it’s worth repeating: rolling your own hardware solution is ridiculously easy these days. If you want to make a network attached environmental sensor, you wire a DHT11 up to an ESP8266 and you’re done. Time to move onto the software. In fact, it can take longer to come up with some kind of suitable enclosure for your hardware project than it does to assemble the thing.

Which is why [Pixel Hawk] has come up with this elegant 3D printed enclosure for the ESP8266 and ESP32. It’s designed to hold the microcontroller in the bottom compartment, while the environmental sensor (either the DHT11 or DHT22) is mounted to the top so it’s exposed to the outside. The case snap fits together so you don’t have to worry about gluing it, and there’s even an opening so you can keep the USB cable plugged in.

In the notes for the design, he mentions that in testing it was determined that the heat of the ESP itself can skew the temperature readings. So he recommends putting the microcontroller to sleep whenever possible, and keeping reads short so the enclosure doesn’t have time to heat up. He’s also created an alternate version of the case with more openings which should help combat this issue if you need to keep the chip awake.

If you’re looking for a complete solution, [Pixel Hawk] has included the source code he personally used to get his ESP32 sensor talking to Blynk, but you certainly don’t have to go that route if you don’t want to. There’s no shortage of existing projects out there that will help you get started with whole-house environmental monitoring. Our very own [Elliot Williams] happens to be partial to MQTT when he wants to get all his gadgets to play nice.

In Case You Cannot Make It To An Escape Room

Escape rooms are awesome for people who like to solve puzzles, see how things work, or enjoy a mystery. Everyone reading this falls into at least one of those categories. We enjoy puzzles and mysteries, but we have a fondness for seeing how things work. To this end, we direct your attention to [doktorinjh]’s “Bomb Disarming Puzzle in a Suitcase” Game, which is a mysterious puzzle box he built himself. I guess the mystery is mostly in the gameplay, which you can watch below because he shows us his build photos and describes the hardware inside.

At its heart is an Arduino Mega, a wise choice since our back-of-the-napkin estimation puts his I/O count over forty-five and the Mega can handle them all with a few pins to spare. Working inside the confines of a briefcase came with its own challenges, but we adore the way he used the hexagon theme in the top panel to allow for knob clearance. It was so subtle that we almost missed it.

The escape room theme is delightful, and we appreciate the mix of games, aesthetics, and techno-trickery in many forms.

Continue reading “In Case You Cannot Make It To An Escape Room”

A Single-Digit-Micrometer Thickness Wood Speaker

Researchers have created an audio speaker using ultra-thin wood film. The new material demonstrates high tensile strength and increased Young’s modulus, as well as acoustic properties contributing to higher resonance frequency and greater displacement amplitude compared to a commercial polypropylene diaphragm in an audio speaker.

Typically, acoustic membranes have to remain very thin (on the micron scale) and robust in order to allow for a highly sensitive frequency response and vibrational amplitude. Materials made from plastic, metal, ceramic, and carbon have been used by engineers and physicists in an attempt to enhance the quality of sound. While plastic thin films are most commonly manufactured, they have a pretty bad impact on the environment. Meanwhile, metal, ceramic, and carbon-based materials are more expensive and less attractive to manufacturers as a result.

Cellulose-based materials have been making an entrance in acoustics research with their environmentally friendly nature and natural wooden structure. Materials like bagasse, wood fibers, chitin, cotton, bacterial cellulose, and lignocellulose are all contenders for effective alternatives to parts currently produced from plastics.

The process for building the ultra-thin film involved removing lignin and hemicellulose from balsa wood, resulting in a highly porous material. The result is hot pressed for a thickness reduction of 97%. The cellulose nano-fibers remain oriented but more densely packed compared to natural wood. In addition, the fibers required higher energy to be pulled apart while remaining flexible and foldable.

At one point in time, plastics seemed to be the hottest new material, but perhaps wood is making a comeback?

[Thanks Qes for the tip!]