Backup Camera, Digital Dash, Road Assist… In 1969?

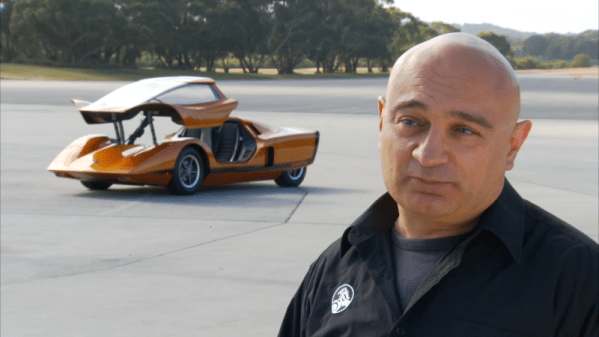
If your friend told you their car had a backup camera, a digital dashboard, climate control, could scan for radio stations, and even helped stay on the road, you wouldn’t think much about it. Unless the year was 1969. The car — the Hurricane by Australian automaker Holden — was never a production vehicle. But it was way beyond the state of the art in 1969 and isn’t too dated, even today.  The concept car was actually found in 1988 and restored by 2011. Honestly, it still looks great.

The car looks amazing and was meant to be a research vehicle and — probably — nice eye candy for the car shows. Seating two passengers with a mid-mounted 253 cubic inch V8, it featured many things we take for granted now: a backup camera, temperature control, and a  (somewhat) digital dashboard, for example. There was a system to help it stay in lane, but that required magnets in the road — it was 1969, after all.

The fiberglass body was unique and had a canopy instead of doors. The power seats lifted up when the canopy came up and went down for driving. The passenger compartment was a steel cage. The vehicle featured headrests, a foam-lined fuel tank, and a fire warning system. Two of the brakes were even oil-cooled.

Continue reading “Backup Camera, Digital Dash, Road Assist… In 1969?”

Getting Back That YouTube Dislike Button

Ah, Google. Very few companies have mastered the art of creating amazing technology and products, and then so effectively abandoning and mishandling them. Case in point, YouTube. Citing “dislike attacks”, which are coordinated down-voting of particular videos, YouTube opted to hide the dislike counter on all videos. It could be pointed out that dislikes still impact the recommendation algorithm the same way they always have, and that creators still see their dislike counts on their own dashboard.

There might be something to the idea that YouTube doesn’t like the notoriety of their Rewind videos leading the dislike count, with 2018 at nearly 20 million. There may even be validity in the theory that corporate partners don’t like visible dislike numbers on their videos. Regardless, YouTube made the change, and people hate it. Their platform, so nothing you can do about it, right?

“Life, uh, uh, finds a way,” to quote my favorite fictional mathematician. Yes, a hacker, one of us, has figured out a workaround. [Dmitrii Selivanov] has put together the “Return YouTube Dislike” browser extension, which does a couple of things. First, it is pulling archived data about videos, taking advantage of the gap in time between the official announcement, and the removal of the dislike API.

But for new videos? That’s where things are harder. If you install the extension, your video likes and dislikes are tracked, and the combined user data is used to extrapolate an estimated dislike count on any given video. [Dimitrii] is also working on a way to allow individual channels to share their stats with the project, to give more official numbers for their videos.

The extension is open source, and the Chrome web store shows over a million users. Linus Tech Tips, along with a bunch of other channels, have covered this, so check out their videos for more.

Continue reading “Getting Back That YouTube Dislike Button”

How To Get Into Lost Wax Casting (with A Dash Of 3D Printing)

I’ve always thought that there are three things you can do with metal: cut it, bend it, and join it. Sure, I knew you could melt it, but that was always something that happened in big foundries- you design something and ship it off to be cast in some large angular building churning out smoke. After all, melting most metals is hard. Silver melts at 1,763 °F. Copper at 1,983 °F. Not only do you need to create an environment that can hit those temperatures, but you need to build it from materials that can withstand them.

Turns out, melting metal is not so bad. Surprisingly, I’ve found that the hardest part of the process for an engineer like myself at least, is creating the pattern to be replicated in metal. That part is pure art, but thankfully I learned that we can use technology to cheat a bit.

When I decided to take up casting earlier this year, I knew pretty much nothing about it. Before we dive into the details here, let’s go through a quick rundown to save you the first day I spent researching the process. At it’s core, here are the steps involved in lost wax, or investment, casting:

  1. Make a pattern: a wax or plastic replica of the part you’d like to create in metal
  2. Make a mold: pour plaster around the pattern, then burn out the wax to leave a hollow cavity
  3. Pour the metal: melt some metal and pour it into the cavity

I had been kicking around the idea of trying this since last fall, but didn’t really know where to begin. There seemed to be a lot of equipment involved, and I’m no sculptor, so I knew that making patterns would be a challenge. I had heard that you could 3D-print wax patterns instead of carving them by hand, but the best machine for the job is an SLA printer which is prohibitively expensive, or so I thought. Continue reading “How To Get Into Lost Wax Casting (with A Dash Of 3D Printing)”

Hacking A Cheap Action Cam Into A Dashcam With A Microcontroller

Repurposing commodity electronics is one of the true forms of hacking, and it’s always the simple little hacks that lead to big ones. [Everett] wanted to use a $20 GoPro clone as a dash cam, so he wired a microcontroller into it to automate some actions and make it practical.

The camera turns on automatically when connected to external power like a car charger, but starting and stopping a recording and power down all had to be done manually. [Everett] wanted to automate these functions, so he opened up the camera and started probing with an oscilloscope. He found the power button, record button, 3.3 V and external 5 V traces conveniently next to each other in the top of the camera.

To automate the required functions, he wired in a PIC10 on a small breakout board, powered by the 3.3 V line. It detects if 5 V is connected to the charging port on start-up via an N-channel FET, then automatically starts a recording. When the 5 V power is switched off with the car, it waits 10 seconds before stopping the recording and switching off the camera. If no external 5 V is not detected on start-up the microcontroller does nothing, which allows the camera to be used as a normal handheld. [Everett] mounted the camera to his rearview mirror with a magnetic bracket made using a combination of a 3D printer and 3D pen.

This is a simple and practical little hack, and the firmware is available on Github. Cheap dashcams are available for similar prices, but you won’t get any hacking satisfaction that way.

The very nature of actions cameras inspire hacking. You can simply add an external battery with the help of a 3D printer, or go all out and build a gimballed helmet cam from scratch

Automate Your Life With Node-RED (Plus A Dash Of MQTT)

For years we’ve seen a trickle of really interesting home automation projects that use the Node-RED package. Each time, the hackers behind these projects have raved about Node-RED and now I’ve joined those ranks as well.

This graphic-based coding platform lets you quickly put together useful operations and graphic user interfaces (GUIs), whether you’re the freshest greenhorn or a seasoned veteran. You can use it to switch your internet-connected lights on schedule, or at the touch of a button through a web-app available to any device on your home network. You can use it as an information dashboard for the weather forecast, latest Hackaday articles, bus schedules, or all of them at once. At a glance it abstracts away the complexity of writing Javascript, while also making it simple to dive under hood and use your 1337 haxor skills to add your own code.

You can get this up and running in less than an hour and I’m going to tackle that as well as examples for playing with MQTT, setting up a web GUI, and writing to log files. To make Node-RED persistent on your network you need a server, but it’s lean enough to run from a Raspberry Pi without issue, and it’s even installed by default in BeagleBone distributions. Code for all examples in this guide can be found in the tutorial repository. Let’s dive in!

Continue reading “Automate Your Life With Node-RED (Plus A Dash Of MQTT)”

Mustang Dash Becomes Bookshelf Art Piece

Despite most of the common gauges remaining the same over the last 60 years, the automotive dashboard of days past used very different technology to those today. Cable driven speedometers were common, along with mechanical drive for the odometer, too. Fuel and temperature gauges were often wired directly to their senders, and some oil pressure gauges actually ran an oil line right up to the back of the dash. Now, things are mostly handled over the CAN bus, which inspired [Thomas]’s bookshelf-based Mustang build.

The idea behind the project is to build a nice piece of bookshelf art, using a modern CAN-driven Mustang dashboard. Through research and much trial and error, [Thomas] was able to figure out the CAN messages necessary to interface with a 2009 Mustang dashboard. There were innumerable hiccups along the way – [Thomas] had to 3D print his own connectors, reflash CAN bus interfaces, and make more than a few educated guesses to get things working.

The dash is combined with an Arduino with an MP3 shield and a 30 watt audio system, which provides both CAN signals to drive the dash as well as the obligatory sound effects of a Mustang tearing about town. It’s all finished up with an ignition keyswitch and 3 LED-lit buttons in the traditional Mustang colors.

It’s a fun build which does a great job of showcasing the basic tools and techniques required to interface with modern automotive subsystems. Salvaging an instrument cluster can be a great way to add immersion to your home racing sim, too. Video after the break.

Continue reading “Mustang Dash Becomes Bookshelf Art Piece”

Hackaday Prize Entry: Another Internet Button

It’s long been a staple of future-gazing, the idea that we will reach a moment at which all of life’s comforts can be summoned at the press of a button. Through the magic of technology, that is, without the army of human servants with which wealthy Victorians surrounded themselves to achieve the same aim.

Of course, to reach this button-pressing Nirvana, someone has to make the buttons. There are plenty of contenders for the prize of One Button To Rule Them All, the one we’ll probably have seen the most of is Amazon’s Dash. Today though we’re bringing you another possibility. [Hendra Kusumah]’s A.I.B. (Another IoT Button) is as its name suggests, a button connected to the Internet. More specifically it’s a button that connects to IFTTT and allows you to trigger your action from there.

Hardware wise, it couldn’t be simpler. A button, a Particle Photon, some wires, and a resistor. Then install the code on the board, and away you go. With a small code change, it also works with an ESP8266. That’s it, it couldn’t be simpler. You might ask where the fun in that lies, but you’d be missing the point. It’s the event that you trigger using the button that matters, so why make creating the button a chore?

We’ve shown you many IoT buttons, just a couple of posts are this ESP8266 button and a look at  the second-generation Amazon Dash.