A small round NRF51822 board glued to the underside of a mailbox lid, with a small vibration sensor attached

Check Your Mailbox Using The AirTag Infrastructure

When a company creates an infrastructure of devices, we sometimes subvert this infrastructure and use it to solve tricky problems. For example, here’s a question that many a hacker has pondered – how do you detect when someone puts mail into your mailbox? Depending on the availability of power and wireless/wired connectivity options, this problem can range from “very easy” to “impractical to solve”. [dakhnod] just made this problem trivial for the vast majority of hackers, with the FakeTag project – piggybacking off the Apple’s AirTag infrastructure.

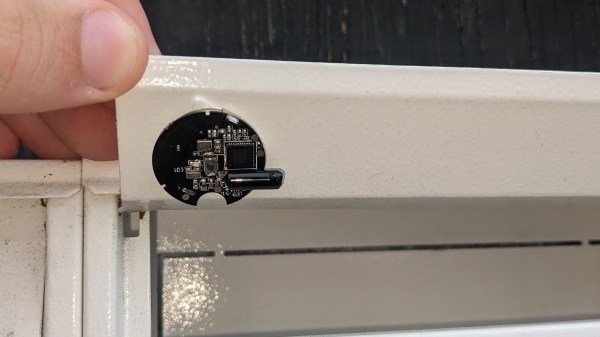
This project uses a cheap generic CR2032-powered NRF51822 board, sending the mailbox status over the FindMy system Apple has built for the AirTag devices. For the incoming mail detection, he uses a simple vibration sensor, glued to the flap lid – we imagine that, for flap-less mailboxes, an optical sensor or a different kind of mechanical sensor could be used instead. Every time someone with a FindMy-friendly iPhone passes by [dakhnod]’s mailbox, he gets an update on its status, with a counter of times the sensor has been triggered. [dakhnod] estimates that the device could run for up to a year on a single battery.

Continue reading “Check Your Mailbox Using The AirTag Infrastructure”

Laser-Engraving Hairlines: When A Line Isn’t A Line

When is a line not a line? When it’s a series of tiny dots, of course!

The line is actually tiny, laser-etched craters, 0.25 mm center-to-center.

That’s the technique [Ed Nisley] used to create a super-fine, colored hairline in a piece of clear plastic — all part of his project to re-create a classic Tektronix analog calculator from the 1960s, but more on that in a moment.

[Ed] tried a variety of methods and techniques, including laser engraving a solid line, and milling a line with an extremely tiny v-tool. Results were serviceable, but what really did the trick was a series of tiny laser-etched craters filled in with a red marker. That resulted in what appears — to the naked eye — as an extremely fine hairline. But when magnified, as shown here, one can see it is really a series of small craters. The color comes from coloring in the line with a red marker, then wiping the excess off with some alcohol. The remaining pigment sitting in the craters gives just the right amount of color.

This is all part of [Ed]’s efforts to re-create the Tektronix Circuit Computer, a circular slide rule capable of calculating all kinds of useful electrical engineering-related things. And if you find yourself looking to design and build your own circular slide rule from scratch? We have you covered.

Soap Mouse Is A Slippery Interface For Mid-Air Input

We all have those gnarly hacks that we still think about years after we first saw them. For serial tipster [Inne], one of those is [Patrick Baudisch]’s soap mouse, which is a DIY device for mousing in mid-air that uses components from off the shelf and around the house.

How does it work? The guts are encased in plastic shaped like a flattened pill, which slips into a fuzzy sock. By squeezing it a bit, the plastic pill rotates, spinning the outward-facing sensor round and round. Although we briefly reported on the soap mouse way back in 2006, we think it deserves to be in the spotlight today, especially since there’s a complete PDF guide to building one that’s optimized for gaming. If you want a regular pointing device instead, the conversion is described within.

[Patrick] uses a CompUSA (RIP) mouse in the guide, but any sufficiently slim and also short mouse should work as long as it has a decently long focal range, which is necessary for the sensor to see the hull. Plenty of travel mice out there should fit the bill.

The hull itself is made from two small (empty) bottles of hand sanitizer, chosen for their size, shape, and clarity of plastic. The outermost housing is a baby sock with a snap sewn on. [Patrick] says moving the sock against the plastic is difficult, and has tried various methods for lubrication, such as a bit of mineral oil inside some plastic bags.

Be sure to check out the video after the break, which does a great job of explaining everything from the various types of interaction to construction in 5½ minutes.

Since 2006, [Patrick] has held workshops where people have built their own soap mice. Have you built one? Let us know in the comments. And don’t forget about the Digi-Key-sponsored Odd Inputs and Peculiar Peripherals contest, which runs through July 4th. Declare your independence from regular keyboards and mice and win big!

Continue reading “Soap Mouse Is A Slippery Interface For Mid-Air Input”

Resulting tweezer assembly, with a 3D printed replacement case for both of the probes

Hackaday Prize 2022: Glue-Hindered Smart Tweezer Repair Involves A Rebuild

[Dan Julio] owns a pair of Miniware multimeter tweezers, a nifty helper tool for all things SMD exploration. One day, he found them broken – unable to recognize any component between the two probes. He thought it could be a broken connection problem, and decided to take them apart. Presence of some screws on their case fooled him – in the end, it turned out that the case was glued together, and could only be opened destructively. For an entry in the “Reuse, Recycle, Revamp” round of 2022 Hackaday Prize, he tells us how he brought these tweezers back from the dead.

During the disassembly, he broke a custom flexible PCB, which wasn’t reassuring either. However, that was no reason to give up – he reverse-engineered the connections and the charging circuitry, then assembled parts of the broken tweezers together using a small generic protoboard as a base. Indeed, it was likely a broken connection between probes, because the reassembled tweezers worked!

Of course, having exposed PCBs wouldn’t do, and from the very start, assembling these tweezers back together was not an option. Instead, he developed a replacement case in OpenSCAD, bringing the tweezers back to life as his trusty tool – and still leaving repairability on the table. If you’re interested in the details, he goes more into how these tweezers are designed when it comes to charging and connectivity, and we recommend that you give his write-up a read!

We’ve been seeing smart tweezers around for over a decade now, from reviews and hacks of commercially made ones, to DIY chopstick-based and PCB-based ones. If you already own a pair of tweezers you’ve grown attached to, you can neatly retrofit them with a capacitance sensing function!

A fusion splicer being used to repair an optical fiber

Using A Fusion Splicer To Repair A Samsung TV’s Cable

Some Samsung TVs come with a system called One Connect, where all external cabling is connected to a separate box so that only one small signal cable goes to the TV. In some versions, the cable linking the TV with its Connect Box is a pure fiber optic cable that’s nearly transparent and therefore easy to hide.

Thin fiber optic cables are fragile however; when [Elecami Wolf] got one of these TVs for a very low price it turned out that this was because its One Connect cable had snapped. Replacement cables are quite expensive, so [Elecami Wolf] went on to investigate the inner workings of the fiber optic cable and figured out how to repair a broken one.

The cable consists of four pairs of plastic-coated glass fibers, which are attached to receivers and transmitters inside the thick connectors on either end. Repairing the cable required two things: figuring out which fibers should connect to each other, and a reliable way of connecting them together.

The first was difficult enough: a simple 1:1 connection didn’t work, so it took a bit of work to figure out the correct connection setup. One clever trick was pointing a camera at a working cable and comparing the flashing lights at each end; this helped to identify the right order for two of the four pairs. For the other two, a combination of reverse-engineering the electronic circuits and some systematic trial-and-error yielded a complete wiring diagram.

For the second part, [Elecami Wolf] called on a fiber optic expert who lent him a fusion splicer. This is a rather neat piece of equipment that semi-automatically brings two pieces of fiber together and welds them with an electric arc. Once this was complete, it was a matter of covering the splices to protect them from sharp bends, and the fancy TV was working again.

Although not everyone will have access to a multi-mode fusion splicer machine, [Elecami Wolf]’s videos provide fascinating insights into the workings of modern fiber-optic based consumer electronics. This might be the first fiber-optic splicing attempt we’ve seen; but if you’re trying to hook up an optical fiber to your circuit, this ball lens setup is a neat trick.

Continue reading “Using A Fusion Splicer To Repair A Samsung TV’s Cable”

RIP John Birkett, Parts Vendor Extraordinaire

It is with sadness that we note the passing of John Birkett, proprietor of the legendary eponymous surplus radio and electronics store on an unassuming street in the British city of Lincoln, at the age of 93. He has been a fantastic source of esoteric parts and electronic assemblies for many decades, and though many of you from beyond where this is being written may never have heard of him the chances are that if you follow electronics enthusiasts from the UK you will have unwittingly seen parts which passed through his hands.

A typical Birkett advert from 1986
Gateway to a world of wonders: a typical Birkett advert from 1986.

There was a time when surplus stores were a relatively common sight, given their window of opportunity by the huge quantity of post-war and Cold War military gear at knock-down prices. My town had one when I was a kid, but though it sold its share of electronic goodies it was more of a place for sturdy olive green outdoor wear or all the 1930s British military uniform items you might ever need. J. Birkett was different, as a purely electronics store the shop rapidly became the go-to place for both the most necessary and the most unexpected of parts.

His motto was “Not a piece of junk in sight”, and though as with much surplus equipment there is plenty of junk to be found it was his eye in managing to stock the junk which was most interesting and useful that made his selection special. Such was its reach that most of his customers including me never made it to Lincoln and the store itself, instead we came to him through his mail-order business and attendance at radio rallies. I fondly remember the anticipation of receiving a Birkett parcel, and I still have plenty of parts that came from him. An FM tuner converted for use as a 2 meter receiver is still in a box somewhere, and I’m pretty certain my storage unit still holds a pair of Pye Cambridge VHF transceivers he supplied.

According to Google the shop remains open, and we hope that state of affairs will continue. Surplus may not be what it once was, but we thank John Birkett for what he gave to generations of British hardware hackers. May he rest in peace.

Header image: Oliver Mills, (CC BY-SA 2.0).

MIDI Controller Looks Good, Enables Your Air Guitar Habit

We all want to be guitar heroes, but most of us have to settle for letting a MIDI board play our riffs using a MIDI controller. [Joris] thinks a MIDI controller should look like a cool instrument and thus the Ni28 was born. Honestly, we first thought we were looking at wall art, but on closer look, you can see the fretboard and the soundhole are festooned with buttons.

Actually, they aren’t really buttons. The Ni in the name is because the buttons are nickel-plated brass plates that act like touch switches. There’s virtually no activation force required and you can easily touch more than one plate at a time.

Continue reading “MIDI Controller Looks Good, Enables Your Air Guitar Habit”