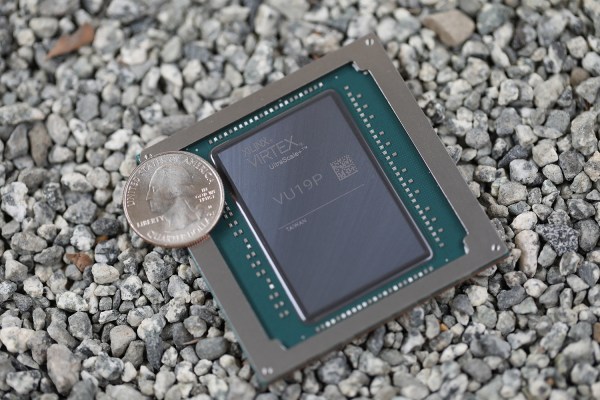
Casting A Cannon Is A Lot Harder Than You Think

We’ve seen backyard casting, and for the most part, we know what’s going on. You make a frame out of plywood or two by fours, get some sand, pack it down, and very carefully make a mold around a pattern. This is something else entirely. [FarmCraft101] is casting a bronze cannon. Sure, it’s scaled down a bit, but this is the very limit of what sanity would dictate a single person can cast out of molten metal.

This attempt at casting a cannon is more or less what you would expect from a backyard bronze casting experiment. There’s a wooden flask and a greensand mold, everything is tamped down well and there’s a liberal coating of talcum powder inside. This is a large casting, though, and this presented a problem: during the pour, the halves of the flask were only held together with a few c-clamps. This ended poorly, with molten bronze pushing against the mold and eventually flowing onto the garage floor. Doing this alone was perhaps a bad idea.

The failure of the mold meant some math was necessary, and after some quick calculations it was found that more than 300 pounds pushing the sides of the mold apart. A second pour, with the sides of the flask bound together with nylon straps, was much more successful with a good looking bronze cannon ready for some abuse with a wire wheel.

This is only the first video in the series, with the next videos covering the machining and boring out of the barrel. That’s some serious craft right there.

Continue reading “Casting A Cannon Is A Lot Harder Than You Think”

Getting To Know Every Bit Of An ATtiny13

We recently heard it said of a hacker who pulled off a particularly nice VGA hack on an 8-bit microcontroller: “He knows all the bits, personally.” High praise, indeed. If you want to get on a first-name basis with a ton of transistors, then have a look at [Heinz D]’s Vacation Course in ATtiny13 Assembler (original in German, translated into English by robots here).

But be warned, this isn’t the easy way to learn AVRs. Not content with simply stripping away every layer of abstraction, this month-long “course” in AVR assembly starts off programming the chip initially with just two pushbuttons in its native machine language of high and low voltages. But still, especially if you can get a few assignments done in one sitting, you’re writing in the relative splendor of assembly language and uploading code with a proper programmer before long, because there’s a real limit to how much code one can toggle in before going mad.

There’s a beautiful minimalism to this entirely ground-up approach, and maybe it’s an appropriate starting point for learning how the machine works at its lowest level. At any rate, you’ll be able to lord it over the Arduino crew that you were able to get blink.ino up and running with just a pair of mechanical contacts and a battery. Real programmers

And once you’ve mastered AVR assembly language, you can recycle those two buttons to learn I2C or SPI. What other protocols are there that don’t have prohibitive timeouts? What’s the craziest code that you’ve ever entered bit by bit?

3D Printed Knife Sharpening Tool Makes The Job Easy

A sharp knife is a joy to use, but many of us are guilty of buying the cheapest kitchen tools available and rarely maintaining them. Keeping knives sharp is key to working with them both safely and effectively, but to sharpen by hand requires patience and skill. [CNC Kitchen] instead decided to use technology to get around the problem, designing a 3D-printed tool to make the job easy (Youtube video, embedded below).

The knife sharpener is a straightforward build, requiring a few simple 3D printed parts in combination with some nuts, bolts, and aluminum rods. It’s designed to use commonly sized whetstones, which makes procurement easy. The design has undergone refinement over the years, with [CNC Kitchen] adding pockets for the magnets and a spherical bearing which reduces slop in the movement.

[CNC Kitchen] reports that the tool works wonderfully, allowing even a novice to sharpen knives well. Parts are available on Thingiverse for those who wish to print their own. If however, you insist on doing things the old-fashioned way, you can get an electronic coach to help improve your technique. Video after the break.

Continue reading “3D Printed Knife Sharpening Tool Makes The Job Easy”

This Solar-Powered Ear Ring Turns With The Sun

Jewelry making offers many opportunities for the electronics tinkerer, and on these pages we’ve seen some eye-catching creations using LEDs to great effect. They all have the same limitation though, it’s difficult to power something that tiny without a cumbersome battery. In seeking to solve that problem there have been a variety of inventive solutions tried, but they haven’t matched the approach of [Lloyd Konneker] who has turned the whole premise of most electronic jewelry on its head.

Instead of LEDs, the party trick of his earring is an electric motor that makes it spin, and instead of giving out light it takes it in as solar power.  The motor is a pager alert device, the solar cells are repurposed photodiodes, and the power is stored in a capacitor until there is enough to drive the motor, at which point a MOSFET is triggered to do the work. It’s all made possible by a Texas Instruments TPS3839 supply voltage supervisor chip, and it works well enough to turn from time to time in bright sunlight. The prototype uses a conventional PCB, but a better version is in the works with a flexible board.

His write-up should be of interest to anyone with a need to learn about micropower circuits, as it goes into significant detail on their tuning and operation. Last year’s Hackaday Prize had an entire section devoted to energy harvesting which is well worth searching the site for, a typical example was this solar powered microcontroller board.

Nvidia Jetson Robots Get A Head Start With Isaac Software Tools

We live in an exciting time of machine intelligence. Over the past few months, several products have been launched offering neural network processors at a price within hobbyist reach. But as exciting as the hardware might be, they still need software to be useful. Nvidia was not content to rest on their impressive Jetson hardware and has created a software framework to accelerate building robots around them. Anyone willing to create a Nvidia developer account may now play with the Isaac Robot Engine framework.

Isaac initially launched about a year ago as part of a bundle with Jetson Xavier hardware. But the $1,299 developer kit price tag pushed it out of reach for many of us. Now we can buy a Jetson Nano for about a hundred bucks. For those familiar with Robot Operating System (ROS), Isaac will look very familiar. They both aim to make robotic software as easy as connecting common modules together. Many of these modules called GEMS in Isaac were tailored to the strengths of Nvidia Jetson hardware. In addition to those modules and ways for them to work together, Isaac also includes a simulator for testing robot code in a virtual world similar to Gazebo for ROS.

While Isaac can run on any robot with an Nvidia Jetson brain, there are two reference robot designs. Carter is the more expensive and powerful commercially built machine rolling on Segway motors, LIDAR environmental sensors, and a Jetson Xavier. More interesting to us is the Kaya (pictured), a 3D-printed DIY robot rolling on Dynamixel serial bus servos. Kaya senses the environment with an Intel RealSense D435 depth camera and has Jetson Nano for a brain. Taken together the hardware and software offerings are a capable and functional package for exploring intelligent autonomous robots.

It is somewhat disappointing Nvidia decided to create their own proprietary software framework reinventing many wheels, instead of contributing to ROS. While there are some very appealing features like WebSight (a browser-based inspect and debug tool) at first glance Isaac doesn’t seem fundamentally different from ROS. The open source community has already started creating ROS nodes for Jetson hardware, but people who work exclusively in the Nvidia ecosystem or face a time-to-market deadline would appreciate having the option of a pre-packaged solution like Isaac.

Postal-Themed Rat Rod Mower Really Delivers

There are birthday presents, and then there are birthday presents. You know, the amazing ones that are the polar opposite of phoning it in. This is one of those presents.

So, [peterbrazil]’s wife is a rural mail carrier on a small island. For her upcoming birthday, he wanted to build a lil’ something she could show off in the local Tractor Days Parade. He found an old Cub Cadet riding mower that was destined for the dump, and the rest is well-documented history.

This glorious conversion required a lot of frame work, but it’s obvious this wasn’t [peterbrazil]’s first rodeo. He got some tires and tie rods from a friend who used to race lawnmowers (yeah, really) and went from there. He wanted this rat rod to be totally slammed (lowered as far as possible), but that would prohibit [Mrs. peterbrazil] from riding it ’round the farm after her parade dust settles. Instead, he went for the raked look, which means the front is lower than the back.

We love all of the reuse here, which includes a wheelbarrow cleverly cut into a seat and a dashboard, an old mailbox for a bed/cargo box, and a pitchfork grill. There are some modern touches as well, like a 3D printed mailbox shift knob with a working door, printed ignition switch box for the dash, and an adapter that makes room for a huge cone air filter. The seat cushion is a nice touch, too—the sunflower fabric adds both femininity and farm flavor to the build.

Always wanted to build a hot rod, but don’t have the garage space? Get some traction with an R/C rod.

Simulated Newton’s Cradle Makes A Flashy Desk Toy

Newton’s Cradle was once upon a time, a popular desk toy in offices around the world. For [TecnoProfesor], however, it wasn’t quite flashy enough. Instead, they built a simulated version with flashing LEDs. As you do.

Rather than relying on the basic principles of the cradle to make it work, this relies on two servo motors to move the balls on the ends, with the ones in the middle remaining stationary. Each ball is fitted with an RGB LED, which flashes with the simulated “motion” of the cradle. By using ping pong balls, the light from the LEDs is nicely diffused. The frame is built from wooden dowels, metal rods, and acrylic.

It’s a project that is sure to confuse at first glance, but it’s a great way to learn basic microcontroller skills like interfacing with LEDs and servomotors. We’d love to see a version that works like a real Newton’s Cradle, flashing the LEDs as they are hit by their neighbours. We’ve even seen them automated, for the truly lazy among us.  Alternatively, one could go completely ridiculous and have such a device tweet on every hit, though you might run afoul of the API’s spam restrictions. If you give it a go, drop us a line.