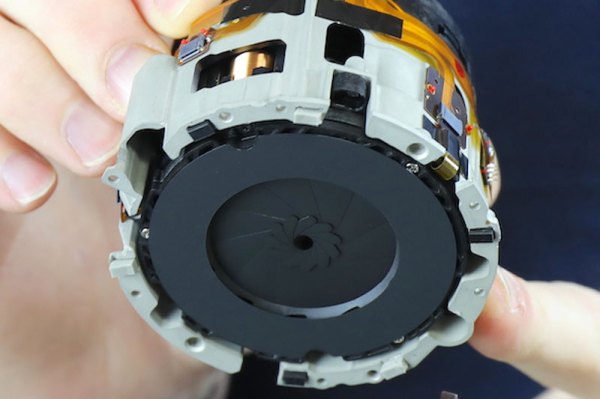
The photographic hire company Lensrentals had a $2k Sony FE 135mm f1.8 GM camera lens returned with a problem: it was having issues focusing. So, they decided to do the obvious thing and take it apart. It’s a fascinating insight into some of the engineering that goes into a high-end camera lens.
That is perhaps a rather scary thing to do, because this is a very new lens that doesn’t even have a service manual yet. That’s akin to rechipping a Ferrari when you’ve never even opened the hood before.
One of the interesting things inside is the presence of a number of shims that adjust the placement between the groups of lens elements. It seems that however good their manufacturing tolerances are, sometimes you just have to put a shim or two in there to align things.
[Dr. Suess] created memorable books with minimal words and bright artwork. He inspired children and adults alike, and one of them, [Len], grew up to create wind instruments for the Bellowphone channel on YouTube. Behind the whimsy of his creations is significant engineering, and this time, we get to see the construction of a fipple. The video is also shown after the break. Even though fipple sounds like a word [Dr. Suess] would have coined, it is a legitimate musical term that means a whistle-like mouthpiece. In this case, it blows air across glass jars to create the sound for [Len]’s bottle organ. Check out the second video below for a performance from The Magic Flute.
[Len] uses clear rigid PVC for the fipples and a custom forming die to shape them while they are soft. The rest is precision hand-tool work with a razor saw, hand file, and wet-dry sandpaper. Once complete, the fipple looks like any musical instrument part produced by exacting construction techniques. Making a mouthpiece is one thing, but if it is not directed correctly it will not make any sound, so we also learn how to turn steel strapping into an organ bottle assembly. If you add some tubing and rubber squeeze balls, you can make your own instrument.
Part of the reason the Bellowphone channel exists is that [Len] found a lot of support in the pipe organ community that showed him the secret inner workings of their livelihood and now is his chance to share that enthusiasm with the maker community.
Let’s say you’ve watched a few episodes of “The Joy of Painting” and you want your inner [Bob Ross] to break free. You get the requisite supplies for oil painting – don’t forget the alizarin crimson! – and start to apply paint to canvas, only to find your happy little trees are not so happy, and this whole painting thing is harder than it looks.
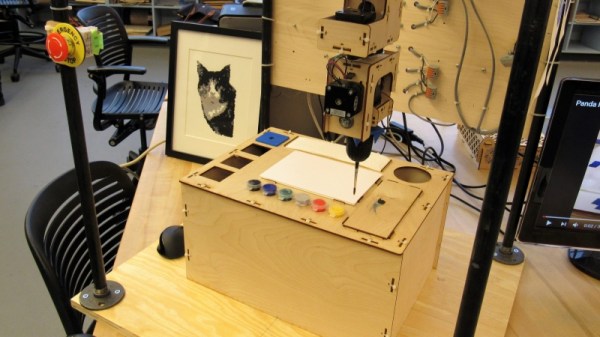
[Saint Bob] would certainly encourage you to stick with it, but if you have not the patience, a CNC painting robot might be a thing to build. The idea behind [John Opsahl]’s “If Then Paint” is not so much to be creative, but to replicate digital images in paint. Currently in the proof-of-concept phase, If Then Paint appears to have two main components: the paint management system, with syringe pumps to squeeze out different paints to achieve just the right color, and the applicator itself, a formidable six-axis device that supports tool changes by using different brushes chucked up into separate hand drill chucks. The extra axes at the head will allow control of how the brush is presented to the canvas, and also allow for cleaning the brush between colors. The videos below show two of the many ways [John] is exploring to clean the brushes, but sadly neither is as exciting as the correct [Bob Ross] method.
It looks like If Then Paint has a ways to go yet, but we’re impressed by some of the painting it has produced already. This is just the kind of project we like to see in the 2019 Hackaday Prize – thought out, great documentation, and a lot of fun.
At the top of the British electronic intelligence agency is the Government Communications Headquarters (GCHQ), a very public entity whose circular building can easily be found by any inquisitive soul prepared to drive just off the A40 in Cheltenham which is about two hours west of London. But due to the nature of its work it is also one of the most secretive of UK agencies, from which very little public information is released. With over a century of history behind it and with some truly groundbreaking inventions under its belt it is rumoured to maintain a clandestine technology museum that would rewrite a few history books and no doubt fascinate the Hackaday readership.
Perhaps the most famous of all its secrets was the wartime Colossus, the first all-electronic stored program digital computer, which took an unauthorised book in the 1970s to bring to public attention. Otherwise its historical artifacts have been tantalisingly out-of-reach, hinted at but never shown.
A temporary exhibition at the Science Museum in London then should be a must-visit for anyone with an interest in clandestine technology. Top Secret: From ciphers to cyber security occupies the basement gallery, and includes among other exhibits a fascinating selection of artifacts from the Government agency. On a trip to London I met up with a friend, and we went along to take a look.
Many a budding maker has experimented with invisible inks, with a wide variety of solutions having a viable set of properties for this purpose. However, [Ben Krasnow] stumbled upon a different method entirely when tinkering with a UV laser.
The effect is subtle, but remains visible for several minutes.
The laser in question was a MNL100 UV laser, configured to produce nanosecond-scale 20 kW pulses at up to 24 Hz, operating at wavelength of 337 nm, deep in the ultraviolet. After piping the laser light through an optical fiber and aiming it at some regular white paper, dark marks were observed, which disappear without a trace over the course of a few minutes.
Upon investigation, the dark marks seemed to be the result of fluorescent whitening agents in the paper. It appears they are overloaded or otherwise changed chemically by the laser, and slowly return back to normal over time. Further experiments showed that hydrogen peroxide was able to remove the marks instantly, and an argon atmosphere slowed the rate at which the marks faded.
It’s an interesting look at an odd chemical effect, with the benefit of a well-equipped optics lab to analyse what’s going on. Following the phenomenon down the rabbit hole leads to some tips on how to extract fluorescent additives from common laundry detergent. Be it paper, plastic, or textile, if it looks really bright white to your eye it probably contains stilbene organic compounds as optical brighteners, a hidden trait you never actually thought about before. Video after the break.
It’s been fifty years since man first landed on the Moon, but despite all the incredible advancements in technology since Armstrong made that iconic first small step, we’ve yet to reach any farther into deep space than we did during the Apollo program. The giant leap that many assumed would naturally follow the Moon landing, such as a manned flyby of Venus, never came. We’ve been stuck in low Earth orbit (LEO) ever since, with a return to deep space perpetually promised to be just a few years away.
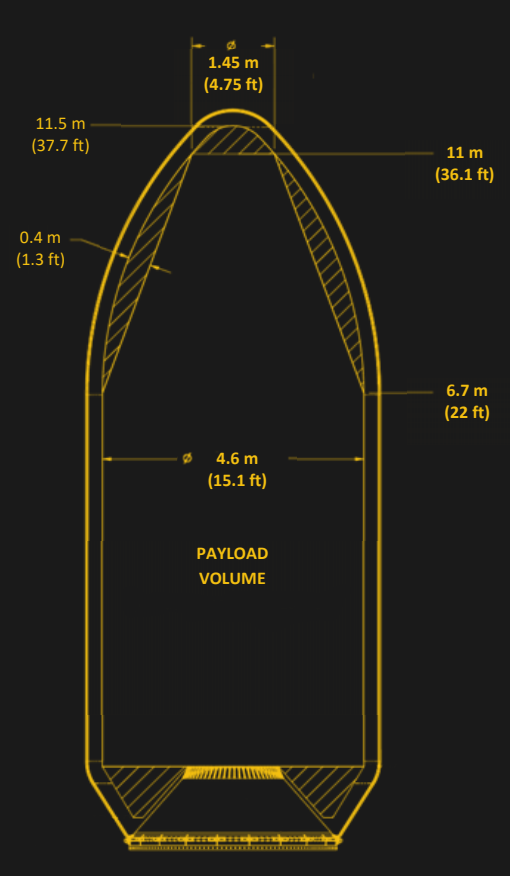
Falcon Heavy Payload Fairing
But why? The short answer is, of course, that space travel is monstrously expensive. It’s also dangerous and complex, but those issues pale in comparison to the mind-boggling bill that would be incurred by any nation that dares to send humans more than a few hundred kilometers above the surface of the Earth. If we’re going to have any chance of getting off this rock, the cost of putting a kilogram into orbit needs to get dramatically cheaper.
Luckily, we’re finally starting to see some positive development on that front. Commercial launch providers are currently slashing the cost of putting a payload into space. In its heyday, the Space Shuttle could carry 27,500 kg (60,600 lb) to LEO, at a cost of approximately $500 million per launch. Today, SpaceX’s Falcon Heavy can put 63,800 kg (140,700 lb) into the same orbit for less than $100 million. It’s still not pocket change, but you wouldn’t be completely out of line to call it revolutionary, either.
Unfortunately there’s a catch. The rockets being produced by SpaceX and other commercial companies are relatively small. The Falcon Heavy might be able to lift more than twice the mass as the Space Shuttle, but it has considerably less internal volume. That wouldn’t be a problem if we were trying to hurl lead blocks into space, but any spacecraft designed for human occupants will by necessity be fairly large and contain a considerable amount of empty space. As an example, the largest module of the International Space Station would be too long to physically fit inside the Falcon Heavy fairing, and yet it had a mass of only 15,900 kg (35,100 lb) at liftoff.
To maximize the capabilities of volume constrained boosters, there needs to be a paradigm shift in how we approach the design and construction of crewed spacecraft. Especially ones intended for long-duration missions. As it so happens, exciting research is being conducted to do exactly that. Rather than sending an assembled spacecraft into orbit, the hope is that we can eventually just send the raw materials and print it in space.
There’s certainly no shortage of “smart” gadgets out there that will provide you with a notification, or even a live audiovisual stream, whenever somebody is at your door. But as we’ve seen countless times before, not everyone is thrilled with the terms that most of these products operate under. Getting a notification on your phone when the pizza guy shows up shouldn’t require an email address, credit card number, or DNA sample.
For [Nick Touran], half the work was already done. There was already a traditional wired doorbell in his home, he just had to come up with a minimally invasive way to link it with Home Assistant. He reasoned that he could tap into the low-voltage side of the doorbell transformer and watch for the telltale fluctuations that would indicate the bell was doing its thing. The ESP8266 has an ADC to measure voltage and WiFi to connect to Home Assistant, so it seemed like the perfect bridge between old and new.
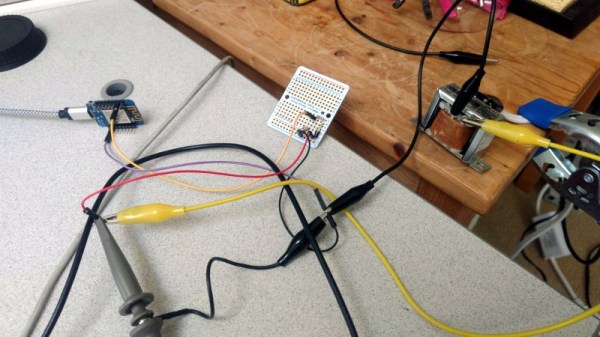
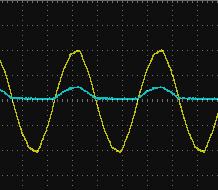
Transformer voltage before and after
Of course, as with any worthwhile project, it ended up being a bit more complicated. Wired doorbells generally operate on 16-24 VAC, and [Nick] knew if he tried to put his Wemos D1 across the line he’d release the critical Magic Smoke. What he needed was a voltage divider circuit that would take low-voltage AC and drop it to an even lower DC voltage that the microcontroller could cope with.
The simple circuit [Nick] comes up with cuts the voltage way down and removes the negative component completely. So what was originally 18.75 VAC turned into a series of 60 Hz blips at 2.4 VDC; perfect for feeding into a microcontroller ADC. With a baseline to work from, he could then write some code that would watch for variations in this signal to determine when the bell was ringing.
Or at least, that was the idea. While the setup worked well enough on the bench, its performance in the real-world left something to be desired. If his house guest had a heavy hand, it worked great. But a quick tap of the doorbell button would tend to go undetected. After investigating the issue, [Nick] found that he needed to use some software trickery to ensure the ESP8266 was able to keep up with the speedy signal. Once he was able to reliably detect short and long button presses, the rest was just a simple matter of sending an MQTT message to his automation system.