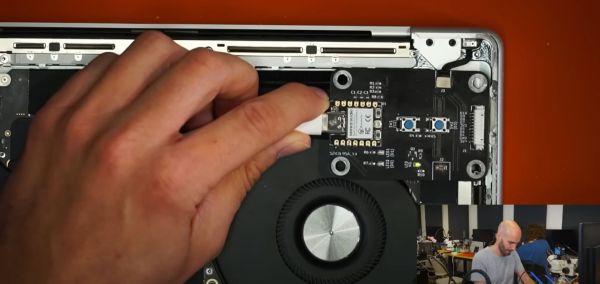
The dash of Xiaomi Mi 1S scooter, with the top panel taken off and an USB-UART adapter connected to the dashboard, sniffing the firmware update process

Xiaomi Cryptographically Signs Scooter Firmware – What’s Next?

[Daljeet Nandha] from [RoboCoffee] writes to us, sharing his research on cryptographic signature-based firmware authenticity checks recently added to the Xiaomi Mi scooter firmware. Those scooters use an OTA firmware update mechanism over BLE, so you can update your scooter using nothing but a smartphone app – great because you can easily get all the good new features, but suboptimal because you can easily get all the bad new features. As an owner of a Mi 1S scooter but a hacker first and foremost, [Daljeet] set up a HTTPS proxy and captured the firmware files that the app downloaded from Xiaomi servers, dug into them, and summarized what he found.

Scooter app firmware update dialog, saying "New firmware update available. Update now?"
Confirming this update will indefinitely lock you out of any third-party OTA updates

Unlike many of the security measures we’ve seen lacking-by-design, this one secures the OTA firmware updates with what we would consider the industry standard – SHA256 hash with elliptic cryptography-backed signing. As soon as the first firmware version implementing signature checks is flashed into your scooter, it won’t accept anything except further firmware binaries that come with Xiaomi’s digital signature. Unless a flaw is found in the signature checking implementation, the “flash a custom firmware with a smartphone app” route no longer seems to be a viable pathway for modding your scooter in ways Xiaomi doesn’t approve of.

Having disassembled the code currently available, [Daljeet] tells us about all of this – and more. In his extensive writeup, he shares scripts he used on his exploration journey, so that any sufficiently motivated hacker can follow in his footsteps, and we highly recommend you take a look at everything he’s shared. He also gives further insights, explaining some constraints of the OTA update process and pointing out a few security-related assumptions made by Xiaomi, worth checking for bypassing the security implemented. Then, he points out the firmware filenames hinting that, in the future, the ESC (Electronic Speed Control, responsible for driving the motors) board firmware might be encrypted with the same kind of elliptic curve cryptography, and finds a few update hooks in the decompiled code that could enable exactly that in future firmware releases.

One could argue that these scooters are typically modified to remove speed limits, installed there because of legal limitations in a variety of countries. However, the legal speed limits are more nuanced than a hard upper boundary, and if the hardware is capable of doing 35km/h, you shouldn’t be at mercy of Xiaomi to be able to use your scooter to its full extent where considerate. It would be fair to assert, however, that Xiaomi did this because they don’t want to have their reputation be anywhere near “maker of scooters that people can modify to break laws with”, and therefore we can’t expect them to be forthcoming.

Furthermore, of course, this heavily limits reuse and meaningful modification of the hardware we own. If you want to bring a retired pay-to-ride scooter back to usefulness, add Bluetooth, or even rebuild the scooter from the ground up, you should be able to do that. So, how do we go around such restrictions? Taking the lid off and figuring out a way to reflash the firmware through SWD using something like a Pi Pico, perhaps? We can’t wait to see what hackers figure out.

The Honda Takedown: How A Global Brand Failed To Read The Room

Perhaps the story of the moment in the world of 3D printing concerns a Japanese manufacturer of cars and motorcycles. Honda has sent a takedown notice requesting the removal of models starting with the word “Honda” to the popular 3D printing model repository site Printables. It’s left in its wake puzzlement, disappointment, and some anger, but what’s really going on? Perhaps it’s time to examine what has happened and to ponder what it means for those who put online printable parts and accessories for cars or any other item manufactured by a large corporation.

If You Make Something, What Rights Do You Have?

Soichiro Honda with his 1964 Formula 1 car
Soichiro Honda, famous for being an engineer rather than a serial litigator. Roderick Eime, CC BY 2.0.

The story is that as far as we can glean from reports online, the takedown notice was sent only to Printables by the European arm of Honda, and was pretty wide-ranging with any Honda-related model in its scope. Printables complied with it, but as this is being written there are plenty of such models available from Thingiverse and other model repository sites.

Anyone who makes a career in content creation has by necessity to have a working knowledge of copyright and intellectual property law as it’s easy for the unwary to end up the subject of a nasty letter, so here at Hackaday while we’re not lawyers this is a subject on which we have some professional experience. What follows then is our take based on that experience, our view on Honda’s motivation, and whether those of you who put up 3D models have anything to worry about. Continue reading “The Honda Takedown: How A Global Brand Failed To Read The Room”

A Rotary Encoder: How Hard Can It Be?

As you may have noticed, I’ve been working with an STM32 ARM CPU using Mbed. There was a time when Mbed was pretty simple, but a lot has changed since it has morphed into Mbed OS. Unfortunately, that means that a lot of libraries and examples you can find don’t work with the newer system.

I needed a rotary encoder — I pulled a cheap one out of one of those “49 boards for Arduino” kits you see around. Not the finest encoder in the land, I’m sure, but it should do the job. Unfortunately, Mbed OS doesn’t have a driver for an encoder and the first few third-party libraries I found either worked via polling or wouldn’t compile with the latest Mbed. Of course, reading an encoder isn’t a mysterious process. How hard can it be to write the code yourself? How hard, indeed. I thought I’d share my code and the process of how I got there.

There are many ways you can read a rotary encoder. Some are probably better than my method. Also, these cheap mechanical encoders are terrible. If you were trying to do precision work, you should probably be looking at a different technology like an optical encoder. I mention this because it is nearly impossible to read one of these flawlessly.

So my goal was simple: I wanted something interrupt driven. Most of what I found required you to periodically call some function or set up a timer interrupt. Then they built a state machine to track the encoder. That’s fine, but it means you eat up a lot of processor just to check in on the encoder even if it isn’t moving. The STM32 CPU can easily interrupt with a pin changes, so that’s what I wanted.

The Catch

The problem is, of course, that mechanical switches bounce. So you have to filter that bounce either in hardware or software. I really didn’t want to put in any extra hardware more than a capacitor, so the software would have to handle it.

I also didn’t want to use any more interrupts than absolutely necessary. The Mbed system makes it easy to handle interrupts, but there is a bit of latency. Actually, after it was all over, I measured the latency and it isn’t that bad — I’ll talk about that a little later. Regardless, I had decided to try to use only a pair of interrupts.

Continue reading “A Rotary Encoder: How Hard Can It Be?”

A flat LiIon battery shown attached inside the gun safe, wired to the original control board

Gun Safe Made Safer With Lithium Battery Upgrade

A proper gun safe should be difficult to open, but critically, allow instant access by the authorized party.[Dr. Gerg] got a SnapSafe and discovered that, while it was quite easy to use, it would also lock the owner out easily whenever the batteries would run out. Meant to be used with four AAA batteries and no way to recharge them externally, this could leave you royally screwed in the exact kind of situation where you need the gun safe to open. This, of course, meant that the AAA batteries had to go.

Having torn a few laptop batteries apart previously, [Dr. Gerg] had a small collection of Li-ion cells on hand – cylindrical and pouch cells alike. Swapping the AAA battery holder for one of these was no problem voltage-wise, and testing showed it working without a hitch! However, replacing one non-chargeable battery with another one wasn’t a viable way forward, so he also added charging using an Adafruit LiPo charger board. One 3D printed OpenSCAD-designed bracket later, he fit the board inside the safe’s frame – and then pulled out a USB cable for charging, turning the battery into a backup option and essentially creating an UPS for this safe. Nowadays, the safe sits constantly plugged into a wall socket, and [Dr. Gerg] estimates it should last for a few weeks even in case of USB power loss.

When you read about hacking gun safes, it’s usually because of their poor security, with even biometric models occasionally falling victim to prying fingers. There’s talk about moving the locking features into the guns themselves, but we remain skeptical. “Powering an electronically locked box with internal batteries” is a fun problem, and just recently, we’ve seen it solved in a different way in this intricate voice-activated lockbox.

Hackaday Links Column Banner

Hackaday Links: April 17, 2022

There are plenty of stories floating around about the war in Ukraine, and it can be difficult to sort out which ones are fact-based, and which are fabrications. Stories about the technology of the war seem to be a little easier to judge, and so stories about an inside look at a purported Russian drone reveal a lot of interesting technical details. The fixed-wing UAV, reported to be a Russian-made “Orlan,” looks quite the worse for wear as it’s given a good teardown by someone wearing Ukraine military fatigues. In fact, it looks downright homemade, with a fuel tank made from what looks like an old water bottle, liberal use of duct tape to hold things together, and plenty of hot glue sprinkled around — field-expedient repairs, perhaps? The big find, though, is that the surveillance drone carried a rather commonplace — and cheap — Canon EOS Rebel camera. What’s more, the camera is nestled into a 3D printed cradle, strapped in with some hook-and-loop tape, and its controls are staked in place with globs of glue. It’s an interesting collection of hardware for a vehicle said to cost the Russian military something like $100,000 to field. The video below shows a teardown of a different Orlan with similar results, plus a lot of dunking on the Russians by a cheery bunch of Ukrainians.

Continue reading “Hackaday Links: April 17, 2022”

Can You Help Solve The Mystery Of This 1930s TV?

84 years ago, a teenager built a TV set in a basement in Hammond, Indiana. The teen was a radio amateur, [John Anderson W9YEI], and since it was the late 1930s the set was a unique build — one of very few in existence built to catch one of the first experimental TV transmitters on air at the time, W9XZV in Chicago. We know about it because of its mention in a 1973 talk radio show, and because that gave a tantalizing description it’s caught the interest of [Bill Meara, N2CQR]. He’s tracking down whatever details he can find through a series of blog posts, and though he’s found a lot of fascinating stuff about early TV sets he’s making a plea for more. Any TV set in the late ’30s was worthy of note, so is there anyone else out there who has a story about this one?

The set itself was described as an aluminium chassis with a tiny 1″ CRT, something which for a 1930s experimenter would have been an expensive and exotic part. He’s found details of a contemporary set published in a magazine, and looking at its circuit diagram we were immediately struck by how relatively simple the circuit of an electrostatically-deflected TV is. Its tuned radio frequency (TRF) radio front end is definitely archaic, but something that probably made some sense in 1939 when there was only a single channel to be received. We hope that [Bill] manages to turn up more information.

We’ve covered some early TV work here not so long ago, but if you fancy a go yourself it’s not yet too late to join the party.

the RP2040 stamp

Putting The RP2040 On A Stamp

In the electronics world, a little one-inch square board with castellated edges allows a lot of circuitry to be easily added in a small surface area. You can grab a prepopulated module, throw it onto your PCB of choice, and save yourself a lot of time routing and soldering. This tiny Raspberry Pi 2040 module from [SolderParty] ticks all those boxes.

With all 30 GPIO broken out, 8MB of onboard flash, and a NeoPixel onboard, you have plenty to play with on top of the already impressive specs of the RPi2040. Gone are the days of in-circuit programmers, and it uses a UF2 bootloader to make it easy B to transfer new images over USB. Rust, MicroPython, Arduino, and the PicoSDK are all development options for code. All the KiCad files, BOM, schematics, and firmware are up on GitHub under a CERN license for your perusal pleasure. They’ve helpfully included footprints as well as a reference carrier board design.

It is a handy little project that might be good to keep in mind or just use as a reference design for your efforts. We have a good overview of the RPi2040 from an STM perspective. If you’re curious about what you could even use this little stamp for, why not driving an HDMI signal?