Finally, An Open Source Calculator

Microsoft has released the code for the Calculator app. This move is the latest in Microsoft’s efforts to capitalize on the Open Source community. Previous efforts have been the Open Sourcing of an extremely old version of DOS, and shoehorning Linux into Windows somehow in a way that’s marginally more user-friendly than spinning up a VM or popping over to your Linux partition. Oh yeah, Microsoft bought Github. Can’t forget that.

The release of the code for the Calculator app means now you too can truly verify all your calculations are correct. To build the Calculator app, you’ll need a Windows 10 computer and Visual Studio. You might think that this is the same code that’s been shipping for 30 years — it’s a simple calculator, right? Not so: the Calculator for Windows 8 had a strange and odd bug where the square root of 4, minus two, did not equal zero. Floating point is hard, kids.

Of special interest to the community, it’s now possible to disable telemetry sent from the Calculator app to Microsoft servers. Yes, the Calculator app knows you forgot how to divide, and wow man, six times nine, you needed help with that?  Fortunately, telemetry can be disabled in developer’s builds by disabling the SEND_TELEMETRY build flag. Now Microsoft won’t know you don’t do math so good.

At the time of this writing, we could not be bothered to contact Microsoft to find out when the pinball game or Ski Free will be updated and Open Sourced.


Hackaday Meetup: Vietnam

Hackaday is hosting a meetup in Ho Chi Minh City, Vietnam on Sunday, March 24th. We’d love to see you there!

Sean Boyce lives in HCMC — you’ve likely enjoyed several of his articles detailing some of the culture, like keeping track of your scooter when parking in busy areas, and squashing myths about the quality of the coffee. In less than two weeks Mike Szczys will be stopping in to visit Sean and this is a great reason to host a Hackaday meetup!

Sean enjoying a coffee on his scooter.

Join Sean and Mike at Trung Nguyên Legend Café from 7-10 pm on Sunday, March 24th for a bring-a-hack style meetup. If you have a hardware project you’ve been working on, come and show it off as an excellent conversation starter. If not, that’s fine too. We’ve also lined up three short talks spanning topics from robotics to analog electronics. Of course if you’re excited about giving a talk, let us know in the comments below and we’ll work on squeezing you in.

Hackaday tries to host live events in all corners of the world, and it’s exciting to add Vietnam to the list. Head on over to the event page for more info, and we look forward to seeing you there! Of course if you happen to be on the other side of the world this coming weekend, there’s a Hackaday Mini-Unconference happening in Cambridge, UK!

A DIY Slip Roll On The Cheap

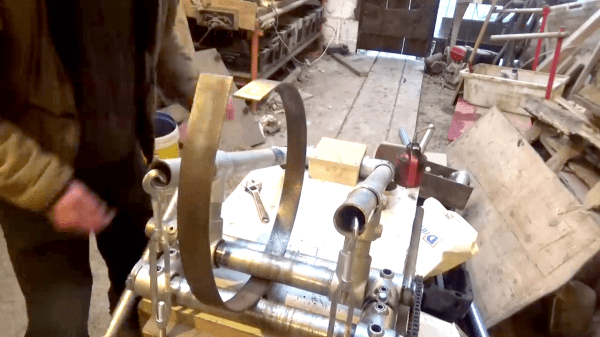
When you need to roll sheet or thin flat bar stock into an arc, you need a rolling machine, also known as a slip roll. If you’ve priced these lately, you’ll know that they can be rather expensive, especially if you are only going to use them for one or two projects. While building a fenced enclosure for his dog, [Tim] realized he could use steel fence posts and connectors to build his own slip roll for much less, and posted a video about it on his YouTube channel.

The key realization was that not only are the galvanized posts cheap and strong, but the galvanized coating would act as a lubricant to reduce wear, especially when augmented with a bit of grease. The build looks pretty straightforward, and a dedicated viewer could probably re-create a similar version with little difficulty. The stock fence connectors serve double-duty as both fasteners and bushings for the rollers, and a pair of turnbuckles supplies tension to the assembly.

The one tricky part is the chain-and-sprocket linkage which keeps the two bottom rollers moving in tandem. [Tim] cut sprockets from some plate steel with his plasma cutter, but mentions that similar sprockets can be found cheaply online and only need to be modified with a larger hole. Although most of the build is held together with set screws in the fence post fittings, the sprockets appear to be welded to the galvanized pipe. We’re sure [Tim] knows that welding galvanized steel can lead to metal fume fever, so we were hoping the video would caution viewers to remove the zinc coating on those parts before welding.

[Tim] demonstrates forming some 4 mm flat steel into circles, and the operation seems easy enough, especially given the inexpensive nature of this build. Overall, this seems like the sort of thing we could see ourselves trying on a lazy Saturday afternoon – it certainly seems like more fun than building a fence with the parts, so be sure to check out the video, after the break.

Continue reading “A DIY Slip Roll On The Cheap”

Old Meets New In 3D Printed Telegraph

We often think of 3D printing as a way to create specific components in our builds, everything from some hard-to-find little sprocket to a custom enclosure. More and more of the projects that grace the pages of Hackaday utilize at least a few 3D printed parts, even if the overall build itself is not something we’d necessarily consider a “printed” project. It’s the natural progression of a technology which at one time was expensive and complex becoming increasingly available to the maker and hacker.

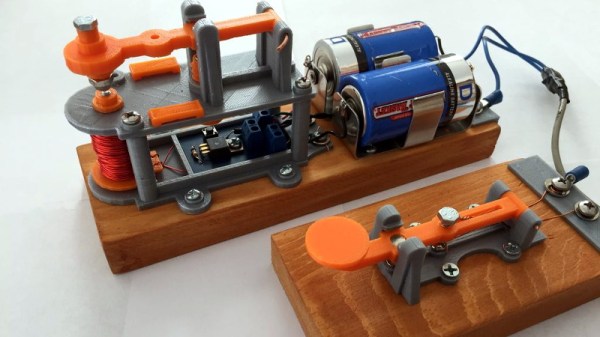
But occasionally we see 3D printing used not to create new devices, but recreate old ones. A perfect example is the almost entirely 3D printed telegraph system created by [Matt]. Projects like this help bring antiquated technology back to a modern audience, and can be an excellent educational tool. Showing someone a diagram of how the telegraph worked is one thing, but being able to run off a copy on your 3D printer and putting a working model in their hands is quite another.

[Matt] acknowledges that he’s hardly the first person to 3D print a telegraph key, but says that he’d never seen the complete system done before. The key is perhaps the component most people are familiar with from film and old images, but alone it’s really nothing more than a momentary switch. To actually put it to use, you need a telegraph sounder on the receiving end to “play” the messages.

The sounder is a somewhat more complex device than the key, and uses an electromagnet to pull down a lever and produce an audible clicking noise. In the most basic case, the coil is directly connected to the key, but in a modern twist [Matt] has added a MOSFET into the circuit so the electromagnet is triggered locally within the sounder. This prevents sparks from eroding the contacts in the key, and alleviates problems associated with current loss over long wire runs.

We’ve previously seen 3D printing used to revive vintage games which are no longer available such as “The Amazing Dr. Nim”, and how modern techniques such as additive manufacturing can help put World War II aircraft back in the air. While there was never much question that 3D printing would be a big part of our future, it would seem to be taking a fairly active role in preserving our past as well.

Omni Wheels Move This CNC Plotter

We’ve always had a soft spot for omni wheels and the bots that move around somewhat bumpily on them. Likewise, CNC pen plotters are always a welcome sight in our tip line. But a CNC plotter using omni wheels is new, and the results are surprisingly good.

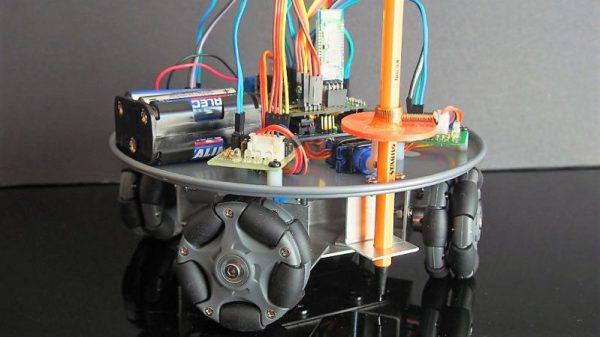
Built from the bottom of a spring-form baking pan, [lingib]’s plotter is simplicity itself. Four steppers turn the omni wheels while a hobby servo raises and lowers the pen. The controller is an Uno with a Bluetooth module for smartphone control. Translating wheel rotations into X- and Y-axis motions was not exactly trivial, and the video below shows the results. Lines are a bit wobbly, and it’s clear that the plotter isn’t hitting the coordinates very precisely. But given the somewhat compliant nature of the omni wheels, we’re surprised [lingib] got results as good as these, and we applaud the effort.

[lingib] reports the most expensive part of this $100 build was the omni wheels themselves. We suppose laser-cut MDF omni wheels could reduce the price, or even Mecanum wheels from bent metal and wood. We’re not sure either will help with the precision, though.

Continue reading “Omni Wheels Move This CNC Plotter”

Do You Know Where Your Drone Is Headed? HJWYDK Article Explores Limits Of MEMS Sensors

Knowing in what absolute direction your robot is pointed can be crucial, and expensive systems like those used by NASA on Mars are capable of calculating this six-dimensional heading vector to within around one degree RMS, but they are fairly expensive. If you want similar accuracy on a hacker budget, this paper shows you how to do it using cheap MEMS sensors, an off-the-shelf motion co-processor IC, and the right calibration method.

The latest article to be published in our own peer-reviewed Hackaday Journal is Limits of Absolute Heading Accuracy Using Inexpensive MEMS Sensors  (PDF). In this paper, Gregory Tomasch and Kris Winer take a close look at the heading accuracy that can be obtained using several algorithms coupled with two different MEMS sensor sets. Their work shows that when properly used, inexpensive sensors can produce results on par with much more costly systems. This is a great paper that illustrates the practical contributions our community can make to technology, and we’re proud to publish it in the Journal.

Continue reading “Do You Know Where Your Drone Is Headed? HJWYDK Article Explores Limits Of MEMS Sensors”

Twelve Channels Of LEDs Give RRRRGGGGBBBB Light

If you’ve ever searched Mouser or Digikey for LEDs parametrically, you won’t find just one red in your LEDs. You won’t find one green. There is quite literally an entire rainbow of colors of LEDs, and this rainbow goes into infrared and ultraviolet. You can search LEDs by frequency, and an RGEB LED is right at your fingertips. The ‘E’ stands for Emerald, and it’s better than a Bayer filter.

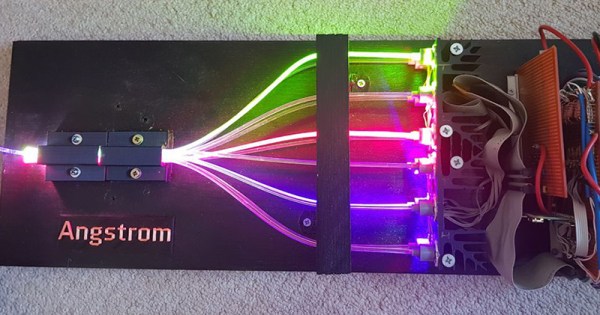
[ayjaym] over on Instructables realized anyone could buy a dozen frequencies of high-power LEDs, and the obvious application for this is to turn it into a tunable light source. The Angstrom is twelve LEDs, all different colors, and all controlled by PWM and piped down a single optical fiber. It’s an RRRRGGGGBBBB LED, ideal for microscopy, forensics, colorimetry, and seeing octoreen.

The heart of this device are twelve 3W star LEDs, with the following wavelengths: 390, 410, 440, 460, 500, 520, 560, 580, 590, 630, 660, and 780 nm. That’s deep red to almost ultra violet, and everything inbetween. These are powered by a 5 V, 60 W power supply, and controlled via a Raspberry Pi with 12 PWM channels in a circuit that’s basically just a bunch of MOSFETs. Proper heatsinking is required.

The impressive part of this build is the optics. A 3D printed mount holds and connects optical fibers and sends them into an optical combiner that is basically just a square acrylic rod. This is output to another optical fiber that will shine on just about anything. A webpage running on a Raspberry Pi sets the PWM channels of all the LEDs, and the resulting output shows up at the end of an optical fiber. It’s great if you want to look at something in a specific frequency of light. It also looks really cool, so that’s a bonus.