Nail, Meet KiCad

You know the old saying. When all you have open is KiCad, everything looks like a PCB. That was certainly true for [Evan], who needed to replace a small part recently and turned to PCBs to get the job done.

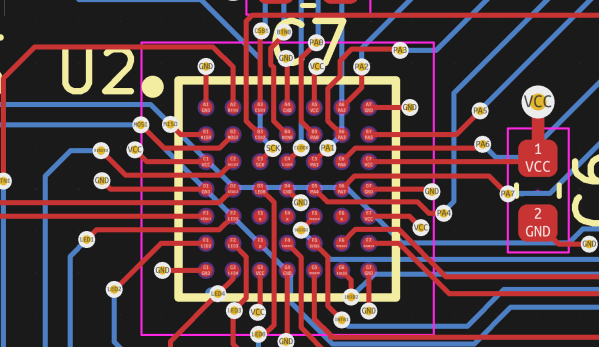
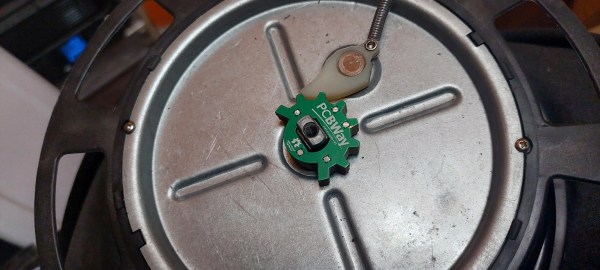
The part in question was a sheered apart detent cam from a retractable cord reel. Glue and epoxy might have worked, and [Evan] was worried about how a 3D printed PLA part would have held up. The part is an extruded 2D shape, making PCBs a non-traditional but viable choice. Using the old scanner trick, he traced the outline in KiCad 7 (which adds image references). Then with the five boards stacked up, solid core wire, solder, and a propane torch worth of heat fused it. Ultimately, this machine’s tolerances are generous, so it worked wonderfully.

Was it the “right” tool for the job? Right or wrong, it is hard to argue that in terms of durability and ease per dollar, this doesn’t come out on top. PCB files are on GitHub if you have a 5020TF-4c retractable cord reel that needs a new cam. PCBs have a fun way of adopting different use cases like enclosures, but perhaps the idea of PCBs as a mechanical part could be applied elsewhere.

Replacing A Clock IC’s Battery

You can find a lot of strange things inside IC packages. For example, the Dallas DS12885 and DS12887 real time clock “chips” were available in a large package with an internal battery. The problem, of course, is that batteries die. [New Old Computer Show] wanted to restore a machine that used one of these devices and was able to repair the device. You can see two videos below. In the first video, he replaces both the battery and adds an external oscillator which would be necessary for the DS12885. However, he actually had the DS12887, which has an internal oscillator, something the second video explains.

The repair used a PCB he ordered from Tindie. However, the board is only part of the problem. You also need to disconnect the dead battery which requires a Dremel and a steady hand.

Continue reading “Replacing A Clock IC’s Battery”

Old Ham Wisdom Leads To Better Aluminum Painting

When [bdk6] tried painting aluminum for electronic projects, he found it didn’t tend to stay painted. It would easily scratch off or, eventually, even flake off. The problem is the paint doesn’t want to adhere to the aluminum oxide coating around the metal. Research ensued, and he found an article in an old ham radio magazine about a technique that he could adapt to get good results painting aluminum.

Actually, paint apparently adheres poorly, even to non-oxidized aluminum. So the plan is to clean and remove as much aluminum oxide as possible. Then the process will convert the aluminum surface to something the paint sticks to better. Of course, you also need the right kind of paint.

The key ingredients are phosphoric acid and zinc phosphate. Phosphoric acid is found in soft drinks, but is also sold as a concrete and metal prep for painting. The zinc phosphate is part of a special paint known as a self-etching primer.

Cleaning takes soap, elbow grease, and sandpaper. The next step is a long soak in the phosphoric acid. Then you apply a few coats of self-etching primer and sand. Once it is all set, you can paint with your normal paint. That’s usually epoxy-based paint for [bdk6].

Of course, you can also dye aluminum while anodizing it. Soldering aluminum also has its challenges.

3D Printed ROV Is The Result Of Many Lessons Learned

Building an underwater remotely operated vehicle (ROV) is always a challenge, and making it waterproof is often a major hurdle. [Filip BuĊ‚awa] and [Piotr Domanowski] have spent four years and 14 prototypes iterating to create the CPS 5, a 3D printed ROV that can potentially reach a depth of 85 m.

FDM 3D prints are notoriously difficult to waterproof, thanks to all the microscopic holes between the layers. There are ways to mitigate this, but they all have limits. Instead of trying to make the printed exterior of the CPS 5 waterproof, the electronics and camera are housed in a pair of sealed acrylic tubes. The end caps are still 3D printed, but are effectively just thin-walled containers filled with epoxy resin. Passages for wiring are also sealed with epoxy, but [Filip] and [Piotr] learned the hard way that insulated wire can also act as a tube for water to ingress. They solved the problem by adding an open solder joint for each wire in the epoxy-filled passages.

For propulsion, attitude, and depth control, the CPS 5 has five brushless drone motors with 3D printed propellers, which are inherently unaffected by water as long as you seal the connectors. The control electronics consist of a PixHawk flight controller and a Raspberry Pi 4 for handling communication and the video stream to a laptop. An IMU and water pressure sensor also enable auto-leveling and depth hold underwater. Like most ROVs, it uses a tether for communication, which in this case is an Ethernet cable with waterproof connectors.

Acrylic tubing is a popular electronics container for ROVs, as we’ve seen with an RC Subnautica sub, LEGO submarine, and the Hackaday Prize-winning Underwater Glider.

Continue reading “3D Printed ROV Is The Result Of Many Lessons Learned”

The Best Threaded Holes For Resin Parts

Threaded inserts are great for melting into FDM prints with a soldering iron. The process isn’t so simple for resin prints, since they don’t generally soften with heat. Off course, you can also print the threads directly, screw a bolt into an un-threaded hole, or tap a hole. Following his usual rigorous testing process, [Stefan] from CNC Kitchen investigated various ways of adding threaded holes to resin prints.

After establishing a pull-out force on PLA using threaded inserts (205 kg) and tapped holes (163 kg), [Stefan] tested parts printed with Prusament Tough Anthracite resin. Un-threaded and tapped holes failed at 44 kg and 55 kg respectively, while printed threads were almost twice as strong, reaching 106 kg before breaking. Stephan also tried gluing inserts into the parts using resin and CA glue. The resin didn’t cure properly in the opaque parts (6 kg) while CA was comparable to plastic threads, failing at 52 kg.

Chart of results
TLDR: Print your threads for best results

[Stefan] also tested regular ELEGOO Translucent resin. The higher hardness of the cured resin allowed the parts to hold on to around 100 kg for un-threaded and tapped holes, while printed threads reached 120 kg. Threaded insert glued with resin did better on the transparent parts thanks to improved UV penetration, but were very inconsistent. Inserts glued with CA performed about the same as on the Prusament parts, failing at 56 kg.

In an attempt to improve the performance of the inserts [Stefan] printed some parts with stepped holes to match the geometry of the inserts, which had the advantage of preventing the insert from falling through during gluing. It only made a marginal difference on the Prusament parts but boosted the strength of CA-glued inserts on the ELEGOO resin to 82 kg. Two-part epoxy was also tried, which matched the un-threaded holes in strength.

So for resin parts you’ll probably be best served by just modeling the threads in CAD and printing them directly. If you need to be able to repeatedly screw and unscrew fasteners in a hole without stripping, threaded holes with CA or epoxy might be a better solution.

Continue reading “The Best Threaded Holes For Resin Parts”

Working With BGAs: Design And Layout

The Ball Grid Array, or BGA package is no longer the exclusive preserve of large, complex chips on computer motherboards: today even simple microcontrollers are available with those little solder balls. Still, many hobbyists prefer to stay with QFP and QFN packages because they’re easier to solder. While that is a fair point, BGA packages can offer significant space savings, and are sometimes the only choice: with the ongoing chip shortage, some other package versions might simply be unavailable. Even soldering doesn’t have to be complicated: if you’re already comfortable with solder paste and reflow profiles, adding a BGA or two into the mix is pretty easy.

In this article we’ll show that working with BGA chips is not as difficult as it may seem. The focus will be on printed circuit board design: how to draw proper footprints, how to route lots of signals and what capabilities your PCB manufacturer should have. We’ll cover soldering and rework techniques in a future article, but first let’s take a look at why BGAs are used at all.

Continue reading “Working With BGAs: Design And Layout”

The hairclip-embedded tool being used on a Tiger 99x game console, clipped onto a spot where the plastic ribbon meets the LCD panel itself, heating it up

World’s Smallest Hair Straightener For Fixing Old LCD Ribbons

[Stephen] writes to us about an LCD repair tool he has created. We’ve all seen old devices with monochrome LCDs connected by thin film, where connections between the PCB and the LCD have deteriorated and the LCD would no longer show parts of the picture. This is a connection heating gadget, that [Stephen] affectionately dubs as World’s Smallest Hair Straightener, made specifically to bring cool old tech back to life.

A resin-printed mold houses a coil of Kanthal wire, easy to source and simple to make. He reuses a hair clip as a housing for the heating element, which also provides pressure needed to squish the film-printed conductive traces into the LCD as the adhesive melts. High-temperature epoxy brings the two together, and with a variable power supply, this tool successfully brought an old Tiger 99x handheld back to life.

This hack was made possible, in part, because of [JohnDevin Duncan] in Hackaday comment section sharing his experience on repairing LCD ribbons back in 2015, giving valuable insights on the problem that we initially thought would be solve-able with a soldering iron. The knowledge shared was distilled by [Stephen] into a tool that we all can now use when we encounter a device we really, really want to revive.

Last time we covered this topic, quite a few hackers popped up with their stories and suggestions. Old game console fix stories are a staple here on Hackaday, a few pop to mind – this high-effort trace repair of a water-damaged GameBoy cartridge, a badly designed NES cartridge socket reinvention, and this GameBoy LCD sunburn damage restoration guide.