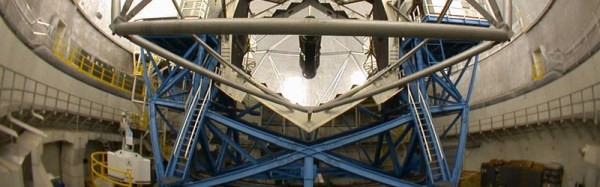
Hackaday Prize Entry: Gaming Done Tiny With Keymu

The world’s tiniest Game Boy Color, introduced at the 2016 Hackaday SuperConference, is a work of art. This microscopic game console inspired [c.invent] to create how own gaming handheld. His Keymu project on hackaday.io describes an open source, keychain-sized gaming handheld that its builder claims is really the world’s tiniest. How did he make it smaller? It’s a miniature Game Boy Advance SP, and it folds up in a handy clamshell case.

While he’s a Pi fan, [c.invent] felt the Pi Zero was too big and clunky for what he had in mind–a keychain-sized handheld. Only the Intel Edison was compact enough. He began with a custom PCB with a connector for the Edison’s fragile ribbon cable, then added an 1.5″ OLED display and an 11.7mm speaker, all powered by a 220 mAh lithium battery. [c.invent] also created inside a custom folding 3D-printed case that protects the Keymu’s electronics from keys and pocket lint.

Unlike the mini Game Boy Color, [c.invent] aims to create a fully fledged emulation console. The Edison incorporates a Linux distribution that allowing it to install emulators for GameBoy Color, GBA, NES, and SNES.

This Way To The Ingress: Keeping Stuff Dry And Clean With IP And NEMA

When designing a piece of hardware that has even the faintest chance of being exposed to the elements, it’s best to repeat this mantra: water finds a way. No matter how much you try to shield a project from rain, splashing, or even just humid air, if you haven’t taken precautions to seal your enclosure, I’ll bet you find evidence of water when you open it up. Water always wins, and while that might not be a death knell for your project, it’s probably not going to help. And water isn’t the only problem that outdoor or rough-service installations face. Particle intrusion can be a real killer too, especially in an environment where dust can be conductive.

There’s plenty you can do to prevent uninvited liquid or particulate guests to your outdoor party, but it tends to be easier to prevent the problem at design time than to fix it after the hardware is fielded. So to help you with your design, here’s a quick rundown of some standards for protection of enclosures from unwanted ingress.

Continue reading “This Way To The Ingress: Keeping Stuff Dry And Clean With IP And NEMA”

Printrbot Teases Infinite Build Volume Printer

[Brook Drumm] of Printrbot is teasing a new 3D printer. This is no ordinary 3D printer; this is an infinite build volume 3D printer, the Next Big Thing™ in desktop fabrication.

The world was introduced to the infinite build volume 3D printer last March at the Midwest RepRap Festival with a built by [Bill Steele] from Polar 3D. The design of [Bill]’s printer began as simply a middle finger to MakerBot’s Automated Build Platform patent. This was patent engineering — [Bill] noticed the MakerBot patent didn’t cover build plates that weren’t offset to the plane of the print head, and it just so happened a printer with a tilted bed could also build infinitely long plastic parts.

While [Bill Steele]’s unnamed printer introduced the idea of an infinite build volume printer to the community, a few pieces of prior art popped up in the weeks and months after MRRF. Several years ago, [Andreas Bastian] developed the Lum Printer, an unbounded conveyor belt printer. A month after MRRF, Blackbelt 3D introduced their mega-scale tilted bed printer and later started a Kickstarter that has already reached $100,000 in pledges.

Right now, details are sparse on the Printrbelt, but there are a few educated guesses we can make. The belt of the Printrbelt appears to be Kapton film attached to some sort of substrate. The hotend and extruder are standard Printrbot accouterments, and the conveyor is powered by a geared stepper motor. All in all, pretty much what you would expect.

We do know that [Brook] and [Bill Steele] are working together on this printer, apparently with [Brook] in charge of the hardware and [Bill] taking either his slicing algorithm or firmware modifications (we’re not exactly sure where the ’tilt’ in the Gcode comes from) and getting this printer running.

While the Printrbelt isn’t ready for production quite yet, this is a fantastic advance in the state of consumer, desktop 3D printing. You can check out [Brook]’s teaser videos below.

Continue reading “Printrbot Teases Infinite Build Volume Printer”

Hacking On Mars In “The Martian”

It’s been 6 years since the hacker’s treat of a book, “The Martian” by Andy Weir, was self-published, and 2 years since the movie came out. We’ve talked about it briefly before, but enough time has passed that we can now write-up the book’s juicier hacks while being careful to not give away any plot spoilers. The book has more hacks than the movie so we’re using the book as the source.

For anyone unfamiliar with the story, Mark Watney is an astronaut who’s left for dead, by himself, on Mars. To survive, he has a habitat designed for six, called the Hab, two rovers, the Mars Descent Vehicle (MDV) they arrived in, and the bottom portion of the Mars Ascent Vehicle (MAV), the top portion of which was the rocket that his five crewmates departed in when they left him alone on the inhospitable desert planet. If you haven’t read it yet, it’s easy to finish over a long weekend. Do yourself a favor and pick it up after work today.

Making Water

Watney’s major concern is food. They sent up some potatoes with the mission which will sprout roots from their eyes. To grow potatoes he needs water.

One component of the precious H2O molecule is of course the O, oxygen. The bottom portion of the MAV doesn’t produce oxygen, but it does collect CO2 from the Martian atmosphere and stores it in liquid form. It does this as one step in producing rocket fuel used later to blast off from the surface.

Continue reading “Hacking On Mars In “The Martian””

Graduation Cap Shows Us What It’s Got!

A high school graduation ceremony is well due the pomp and circumstance for making it through one of life’s many milestones. To commemorate the event with their own flair, redditor [PM_(cough)_FOR_KITTENS] hid a 32 x 32 GIF-playing LED matrix in their graduation cap!

The board is controlled by a Teensy hosting a SmartMatrix shield. With the shield’s assistance, the matrix enables scrolling text and GIFs to play across the LEDs, as well as an SD card slot to load up your favourites. Currently, it’s set to a 50-50 chance of playing a gif — one of sixty — or one of the twenty scrolling text lines loaded onto the SD card. [PM_(ahem)_FOR_KITTENS] co-opted his friend’s expertise to write the code — available here — while he designed the circuit and handled the assembly.

Carefully unwrapping his cap, [PM_(yep)_FOR_KITTENS] reinforced it with thinner and stronger cardboard, cutting slots into it, allowing the boards and wires to — barely — fit inside. A hole in the side of the cap is enough for a barely noticeable USB cable to run down his neck to a 2000 mAh battery which can power the cap for over five hours at 5V and 2A. Check out a demo video after the break!

Continue reading “Graduation Cap Shows Us What It’s Got!”

Using Nanotubes To Strengthen 3D Prints

3D printing has brought the production of plastic parts to the desktops and workshops of makers the world over, primarily through the use of FDM technology. The problem this method is that when squirting layers of hot plastic out to create a part, the subsequent vertical layers don’t adhere particularly well to each other, leading to poor strength and delamination problems. However, carbon nanotubes may hold some promise in solving this issue.

A useful property of carbon nanotubes is that they can be heated with microwave energy. Taking advantage of this, researchers coated PLA filament in a polymer film containing carbon nanotubes. As the layers of the print are laid down, the nanotubes are primarily located at the interface between the vertical layers. By using microwaves to heat the nanotubes, this allows the print to be locally heated at the interface between layers, essentially welding the layers together. As far as results are concerned, the team reports an impressive 275% improvement in fracture strength over traditionally printed parts.

The research paper is freely available, which we always like to see. There’s other methods to improve your print strength, too – you could always try annealing your printed parts.

[Thanks ????[d] ???? for the tip]

Chilling A Hot Camera

[Eric]’s camera has a problem. It overheats. While this wouldn’t be an issue if [Eric] was taking one picture at a time, this camera also has a video mode, which is supposed to take several pictures in a row, one right after the other. While a camera that overheats when it’s used is probably evidence of poor thermal engineering, the solution is extremely simple: strap a gigantic heat sink to the back. That’s exactly what [Eric] did, and the finished product looks great.

The heatsink chosen for this application is a gigantic cube of aluminum, most likely taken from an old Pentium 4 CPU cooler. Of course, there’s almost no way [Eric] would have found a sufficiently large heat sink that would precisely fit the back of his camera, which meant he had to mill down the sides of this gigantic heat sink. [Eric] actually did this in his drill press using a cross slide vice and an endmill. This is surely not the correct, sane, or safe way of doing things, but we’ll let the peanut gallery weigh in on that below.

The heatsink is held on by a technique we don’t see much around here — wire bending. [Eric] used 0.055″ (1.3 mm) piano wire, and carefully bent it to wrap around both the heatsink and the camera body. Does the heatsink cool the camera? Yes, and the little flip-up screen of the camera makes this camera a very convenient video recording device. You can check out the video of this build below.

Continue reading “Chilling A Hot Camera”