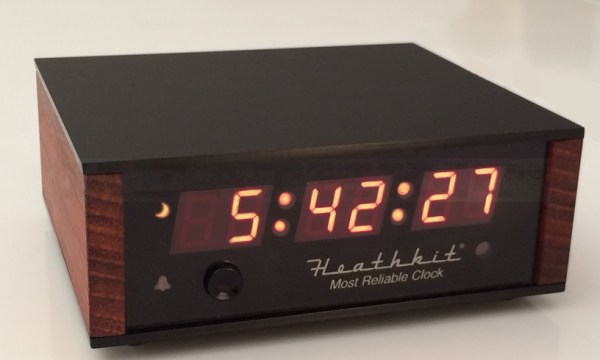
Creating A PCB In Everything: KiCad, Part 1

This is the continuation of a series of articles demonstrating how to Create A PCB In Everything. In this series, we take a standard reference circuit and PCB layout — a simple ATtiny85 board — and build it with different PCB design tools. Already, we’ve taken a look at the pre-history of PCB design with Protel Autotrax, we learned Fritzing is a joke for PCB design, and we’ve done a deep dive into Eagle. Each of these tutorials serves two purposes. First, it is a very quick introduction to each PCB design tool. Second, this series provides an overall comparison between different PCB design tools.

Now, finally, and after many complaints, it’s time for the tutorial everyone has been waiting for. It’s time for KiCad.

No, like the head of the Bajoran clergy

Although KiCad (pronounced ‘Kai-Cad’ like the head of the Bajoran clergy, not ‘Key-Cad’ like the thing that goes in a lock) is the new hotness when it comes to PCB design. The amazing growth of KiCad installations over the past few years is a long time coming. In development since 1992, KiCad has cemented itself as the premier Open Source PCB design suite, and since 2013 CERN has been making contributions to the project. More recently, the KiCad project has been showing off some amazing new features. These include 3D rendering of boards, interactive routing, push-and-shove, simulation, and dozens of other features that put it on a path to being on par with the top of the line EDA suites. Add in some great community contributions, and you have something really, really amazing. All of this is wrapped up in an Open Source license, free as in speech and beer. If you’re looking for the future of PCB design, Eagle is going to get very good but KiCad is almost there now while being Open Source.

Continue reading “Creating A PCB In Everything: KiCad, Part 1”

EmpathyBot recognizing emotion

Raspberry Pi Robot That Reads Your Emotions

It’s getting easier and easier to add machine intelligence to your hacks, even to the point where you sometimes don’t have to install any special software. In this case [Dexter Industries] has added the ability to read human emotions to their EmpathyBot robot by making use of Google Cloud Vision.

Press a button on the robot and it moves forward until it’s a certain distance from an object. It then takes a picture and sends it off to Google Cloud Vision along with a request to do face detection. The response that Google returns is in JSON format and, if it finds a face, includes the likelihood of the face being happy, sad, sorrowful or surprised. The robot parses that response and gives an appropriate canned speech using the text-to-speech software, eSpeak e.g. “You seem happy! Tell me why you are so happy!”.

[Dexter] has made the source code available on github. It’s written in python and is easy to read by anyone with even just a little programming experience. The video after the break gives a number of demonstrations, including some with non-human subjects.

Continue reading “Raspberry Pi Robot That Reads Your Emotions”

Smartphone Bench Instrument Apps: Disappointment Or Delight?

If you are interested in electronics or engineering, you’ll have noticed a host of useful-sounding apps to help you in your design and build work. There are calculators, design aids, and somewhat intriguingly, apps that claim to offer an entire instrument on your phone. A few of them are produced to support external third-party USB instrument peripherals, but most of them claim to offer the functionality using just the hardware within the phone. Why buy an expensive oscilloscope, spectrum analyzer, or signal generator, when you can simply download one for free?

Those who celebrate Christmas somewhere with a British tradition are familiar with Christmas crackers and the oft-disappointing novelties they contain. Non-Brits are no doubt lost at this point… the crackers in question are a cardboard tube wrapped in shiny paper drawn tight over each end of it. The idea is that two people pull on the ends of the paper, and when it comes apart out drops a toy or novelty. It’s something like the prize in a Cracker Jack Box.

Engineering-oriented apps follow this cycle of hope and disappointment. But there are occasional exceptions. Let’s tour some of the good and the bad together, shall we?

Continue reading “Smartphone Bench Instrument Apps: Disappointment Or Delight?”

Slow 3.5″ Raspberry Pi LCD Hacked To 40 MHz With ESP8266

As microcontrollers become more and more common, we see more ways to get a lot of performance out of one chip. A great example of this was the ESP8266 which was originally seen as a cheap WiFi card but has since blossomed into its own dev platform thanks to the horsepower hidden within. To that end, [Martin] is trying to push the now-ubiquitous WiFi chip even further by rolling out his own LCD driver for it from scratch.

The display of choice is the KeDei LCD 3.5″ module which was originally intended for use with a Raspberry Pi. [Martin] points out that this display isn’t optimized for speed, but after everything is said and done he has its clock line running at 40 MHz. To get this kind of speeds from the LCD, he depopulates the first shift register and adds his own fast-propagation circuit to establish a more-traditional serial addressing mode. With use of a WLCD driver that [Martin] also wrote, it is now relatively easy to draw on the screen very quickly with an ESP module. Check it out in the video below.

If you’re looking for your own tiny, cheap, fast display, this is one cool way to do it but we would suggest spinning a carrier board for both the ESP and the added circuitry. We’re looking forward to future projects which puts devices like these inside of really tiny magic mirrors, or uses them in other places where a small graphical display would be handy.

Continue reading “Slow 3.5″ Raspberry Pi LCD Hacked To 40 MHz With ESP8266”

Bot Wars: A Collateral Gift Of The Automation Revolution

I received an email Wednesday morning from a company launching new features for a bot called Trim which will negotiate a lower cable bill for you. Give it your Comcast login info and it will launch a support-chat window and go to work negotiating rates on your behalf. This could be a lower monthly rate, or one-time credits for slow or intermittent service.

This chatbot is a glimpse into our cat-and-mouse future. If rate-reducing automation is widely adopted by customers, Comcast will have an incentive to spot these chatbots and act accordingly, and they’ll probably want to automate that. This leads quickly to a war of bots.

How many times has Hackaday predicted the future? The coming bot wars were hinted at in an article I wrote back in 2009 on the re-emergence of Tradewars 2002. This is a turn-based BBS game that I loved as a child. The second version added an automation layer — the game had become a challenge to write a better script than your opponent to play the game with maximum efficiency. Of course, it’s only a prediction if you realize it at the time. But this gamification of automation from seven years ago is about to jump into the mainstream.

You win if your automation outperforms your competitors; this is the founding idea of the automation age. There’s no event horizon to mark our slide into the new realm. But we know the financial markets have been playing this game for a long time now (think flash crash and algorithmic trading). Continuing the customer service call example, call centers have been using scripts for years. Automation stems from this, just cutting out the human; you may already be talking to a chatbot and not knowing it — a human takes over when the bot has already verified your account info and gets stumped. The real question is will you take up arms by building your own bots or using those available from startups like Trim? Maybe you already have? We’d love to hear about it in the comments below.

[Image Source: the main and thumbnail images are of course from the United Artists film War Games.]

Characterizing A Cheap 500MHz Counter Module

An exciting development over the last few years has been the arrival of extremely cheap instrumentation modules easily bought online and usually shipped from China. Some of them have extremely impressive paper specifications for their price, and it was one of these that caught the eye of [Carol Milazzo, KP4MD]. A frequency counter for under $14 on your favourite online retailer, and with a claimed range of 500 MHz. That could be a useful instrument in its own right, and with a range that significantly exceeds the capabilities of much more expensive bench test equipment from not so long ago.

Just how good is it though, does it live up to the promise? [Carol] presents the measurements she took from the device, so you can see for yourselves. She took look at sensitivity, VSWR, and input impedance over a wide range, after first checking its calibration against a GPS-disciplined standard and making a fine adjustment with its on-board trimmer.

In sensitivity terms it’s a bit deaf, requiring 0.11 Vrms for a lock at 10 MHz. Meanwhile its input impedance decreases from 600 ohms at the bottom of its range to 80 ohms at 200 MHz, with a corresponding shift in VSWR. So it’s never going to match a high-end bench instrument from which you’d expect much more sensitivity and a more stable impedance, but for the price we’re sure that’s something you can all work around. Meanwhile it’s worth noting from the pictures she’s posted that the board has unpopulated space for an SPI interface header, which leaves the potential for it to be used as a logging instrument.

We think it’s worth having as much information as possible about components like this one, both in terms of knowing about new entrants to the market and in knowing their true performance. So if you were curious about those cheap frequency counter modules, now thanks to [Carol] you have some idea of what they can do.

While it’s convenient to buy a counter module like this one, of course there is nothing to stop you building your own. We’ve featured many over the years, this 100MHz one using a 74-series prescaler or this ATtiny offering for example, or how about this very accomplished one with an Android UI?

Taig Mill Anointed With Ball Screws (at Last!)

Yup, we can hear a crowd full of “not-a-hack” loading their cannons as we speak, but this machine has a special place in the community. For years, the Taig milling machine has remained the go-to micro mill for the light-duty home machine shop. These machines tend to be adorned and hacked to higher standards, possibly because the community that owns these tools tends to enjoy machining for machining’s sake–or possibly because every single component of the mill is available as a replacement part online. For many, this machine has been a starting point to making chips at home. (In fact, Other Machine Co’s CTO, Mike Estee, began his adventure into machining with a Taig.)

For years, Taig has sold their machines with a leadscrew and a brass nut that could be tensioned to cut down the backlash. Backlash still remains an issue for the pickiest machinists, though; so, at long last, Taig has released a backlash-free ball-screw variant in two incarnations: an all-in-one machine pre-fitted with ballscrews and an upgrade kit for customers that already decorated their garage with the lead-screw model.

In the clip below [John] takes us on a tour of the challenges involved in cramming 3, 12-mm ballscrews into the original topology. As we’d expect, a few glorious chunks of metal have been carved away to make space for the slightly-larger ballnut. Despite the cuts, the build is tidy enough to fool us all into thinking that ballscrews landed in the original design from the start.

Confused why ballscrews are such a giant leap from leadscrews? Lend your eyes and ears a few moment to take in [Al]’s overview on the subject.

Continue reading “Taig Mill Anointed With Ball Screws (at Last!)”