Winged Drone Gets Forward Flight Capability

Drones are pretty common in the electoronics landscape today, and are more than just a fun hobby. They’ve enabled a wide array of realtors, YouTubers, surveyors, emergency responders, and other professionals to have an extremely powerful tool at their disposal. One downside to these tools is that the power consumption tends to be quite high. You can either stick larger batteries on them, or, as [Nicholas] demonstrates, just spin them really fast during flight.

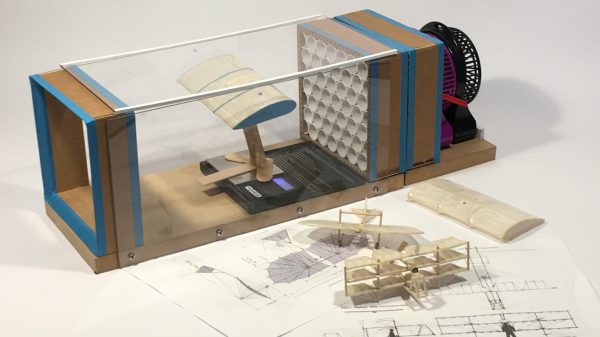
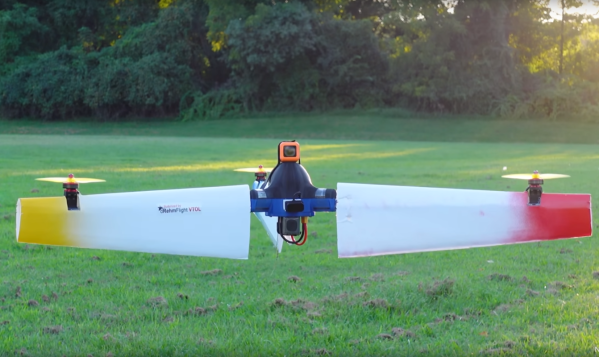
We featured his first tests with this multi-modal drone flight style a while back, but here’s a quick summary: by attaching airfoils to the arms of each of the propellers and then spinning the entire drone, the power requirements for level flight can be dramatically reduced. This time, he’s back to demonstrate another benefit to this unique design, which is its ability to turn on its side and fly in level flight like an airplane. It’s a little bizarre to see it in the video, as it looks somewhat like a stationary propeller meandering around the sky, but the power requirements for this mode of flight are also dramatically reduced thanks to those wings on the arms.

There are a few downsides to this design, namely that the vertical wing only adds drag in level flight, so it’s not as efficient as some bi-wing designs, but it compromises for that loss with much more effective hover capabilities. He also plans to demonstrate the use of a camera during spin-hover mode as well in future builds. It’s an impressive experiment pushing the envelope of what a multi-rotor craft can do, and [Nicholas] still has plans to improve the design, especially when it comes to adding better control when it is in spin-hover mode. We’d expect plenty of other drones to pick up some of these efficiency gains too, except for perhaps this one.

Continue reading “Winged Drone Gets Forward Flight Capability”

Camera-Mounted Stereo Mic Is Fluffy And Capable

Typically, the audio coming out of your camera is not of the greatest quality. An external mic is generally a great upgrade, and this build from [DJJules] aims to be just that.

It’s a stereo mic setup based on the work of the Office de Radiodiffusion Télévision Française, or ORTF. The ORTF stereo technique defines using two cardioid mics pointing left and right at a seperation of 110 degrees and 17 cm apart, which captures a quality stereo field that also sounds good when presented as a mono mixdown.

The build uses a simple wooden frame to hold two electret mic capsules in the required orientation. They’re wired up to a 3.5mm jack so they can be plugged straight into a mic input on a DSLR or other similarly-equipped camera. Hair curlers covered in faux fur are used as a wind shield for the mics, and gives the build a properly professional look. The frame is also given a mount so it can easily sit on a camera’s cold shoe fitting. Alternatively, a screw mount can also be used.

Good audio is absolutely key to making good content, and having quality mics is definitely what you need to achieve that. We’ve featured some other great DIY mic builds over the years, too. Video after the break. Continue reading “Camera-Mounted Stereo Mic Is Fluffy And Capable”

CRT TV screen showing a Super Mario Bros main screen with "Social Media Bros" written on the title screen instead. There's a NES console to the right of it, with a perfboard on top of it, wires going into the console port.

ConnectedNES Brings Twitter Into Super Mario Bros World

Back in 2016, artist and video game historian [Rachel Weil (HXLNT)] was hanging out with her friend and hacking on console stuff, as friends do. [Rachel] was galvanized by the idea of having an iconic game like Super Mario Bros be interrupted by push notifications, and set out to bring a Twitter feed to her NES gaming experience. What she ended up with is ConnectedNES — a charming combination of a custom Twitter modem and a hacked Super Mario Bros ROM, creating a social media experience you have to see for yourself.

The technical side is as immaculate as the visuals. Data is transferred to the NES through the controller port using a Particle Photon that’s emulating a NES controller, and everything is encased in an adorable shell made out of yarn needlework.

The Photon currently taps into the Twitter feed through a proxy server run locally, and listens for tweets with specific keywords, relaying them to the ROM through mimicking controller port inputs. The ROM, now bearing the name Social Media Bros, went through some careful assembly trimming work. In particular, [Rachel] had to sacrifice Green Mario to the bit bucket gods.

Playing this game has to be quite the experience. Thankfully, source code for everything — the proxy server, the Photon firmware and the NES ROM — is on GitHub for all of us NES enthusiasts to hack at. If simply reading the feed is not enough, you can send tweets from your NES as well.

Rib Cage Lamp Kicks It Up A Notch With Party Mode

We think [Michelle]’s sound-reactive rib cage lamp turned out great, and the photos and details around how it was made are equally fantastic. The lamp is made of carved and waxed wood, and inside is a bundle of LED lighting capable of a variety of different color palettes and patterns, including the ability to react to sound. Every rib cage should have a party mode, after all.

The LED strip is fashioned into an atom-like structure.

Turns out that designing good rib cage pieces is a bigger challenge than one might think. [Michelle]’s method was to use an anatomical 3D model as reference, tracing each piece so that it could be cut from a flat sheet of wood.

The resulting flat pieces then get assembled into a stack, with each rib pointed downward at a roughly 20 degree angle. This process is a neat hack in itself: instead of drilling holes all at exactly the same angle, [Michelle] simply made the holes twice the diameter of the steel rod they stack on. The result? The pieces angle downward on their own.

The LED lighting is itself a nice piece of work. The basic structure comes from soldered solid-core wire. The RGB LED strip gets wound around that, then reinforced with garden wire. The result is an atomic-looking structure that sits inside the rib cage. An ESP32 development board drives everything with the FastLED library.

Code for everything, including the sound-reactive worky bits, which rely on an INMP441 I2C microphone module is all available on GitHub. And if you want to make your own sound-reactive art, make sure to check out these arms as well.

Want to see the rib cage in action? A short demo video is embedded below that demonstrates the sound reactivity. Equally applicable to either party or relaxation modes, we think.

Continue reading “Rib Cage Lamp Kicks It Up A Notch With Party Mode”

DIY Wind Tunnel Aims To Educate The Youth

Typically, when we talk about wind tunnels, we think of the big facilities in use by the aerospace and motorsports industries. However, there’s nothing stopping you building a wind tunnel of your very own, and it may even be easier than you think! [Jude Pullen] has whipped up just such a design with DIY in mind.

Intended for high school Design & Technology (D&T) classes, it uses relatively simple materials construction techniques. The airflow straightener is built out of PVC pipes, and the end boxes built out of cardboard. The transparent walls for observation are created out of acrylic, while a simple fan provides the necessary flow. The desk-sized wind tunnel can then be instrumented with a manometer, tachometer, and anemometer to measure pressure, fan speed, and wind speed. [Jude] also explores experiments that can be run in the wind tunnel, such as working with a small balsa wood glider and measuring the lift it generates with a scale.

[Jude] has a very pragmatic and real-world understanding of such projects, too. He notes the difference between making things to measure, and making them to fit, and highlights the values of both approaches. It’s a much more holistic approach than simply berating students to “do it right” or “do it better” when making things in a D&T class.

Use of a basic wind tunnel is often not taught to engineering students until at least the second or third year of an engineering degree, after all the boring math and static analysis has been dealt with. However, there’s no reason high school physics students can’t understand the physics involved, and they’re more than capable of undertaking such a build. Starting such education early often nets huge benefits for individuals and their eventual careers.

Once you’ve got yourself a wind tunnel, you might want to start thinking about some flow visualization, which gets really exciting.

Continue reading “DIY Wind Tunnel Aims To Educate The Youth”

Lamp Flashing Module Is Perfect For Automotive Use

Modern cars tend to have quite advanced lighting systems, all integrated under the control of the car’s computer. Back in the day, though, things like brake lights and indicators were all done with analog electronics. If your classic car needs a good old-fashioned flasher module, you might find this build from [DIY Guy Chris] useful.

It’s an all-analog build, with no need for microcontrollers or other advanced modern contrivances. Instead, a little bipolar PNP transistor and a beefier NPN MOSFET as an oscillator, charging and discharging a capacitor to create the desired flashing behavior. Changing the size of the main capacitor changes the flash rate. The MOSFET is chosen as running 12 volt bulbs requires a decent amount of current. The design as drawn is intended to run up to eight typical automotive bulbs, such as you might find in indicator lamps. However, [Chris] demonstrates the circuit with just four.

Flasher circuits were in regular use well into the 1990s. The original Mazda Miata has a very similar circuit tucked up under the dashboard to run the turn signals. These circuits can be hard to find for old cars, so building your own may be a useful workaround if you’re finding parts hard to come by. Video after the break.

Continue reading “Lamp Flashing Module Is Perfect For Automotive Use”

Hackaday Podcast 187: The Sound Of Gleeful Gerbils, The Song Of The Hard Drive, And A Lipstick Pickup Lullaby

This week, Editor-in-Chief Elliot Williams and Assignments Editor Kristina Panos gushed about NASA’s live obliteration of minor planet Dimorphos using a probe outfitted with a camera. Spoiler alert: the probe reaches its rock-dappled rocky target just fine, and the final transmitted image has a decidedly human tinge.

Kristina brought the mystery sound again this week, much to Elliot’s sonic delight. Did he get it? Did he figure it out? Well, no. The important thing is one of you is bound to get it.

We kick off the hacks with a really neat 3D printed linkage that acts as an elevator for a marble run, and then we discuss a mid-century hack that helps you decide whether it’s time to emerge from the fallout shelter using the contents of your typical 1950s pockets. We spent a few minutes comparing our recent radiation exposure levels  — Kristina wins with about a dozen x-rays so far this year, but no full-body CT scans. Then we talk guitars for a bit, remember a forgotten CPU from TI, and spend a few cycles talking about a tone-wheel organ that sounds like a chorus of gleeful gerbils.

Finally, we talk toner transfer for 3D prints, argue in defense of small teams versus large committees, and get all tangled up in cursive.

Direct download.

Check out the links below if you want to follow along, and as always, tell us what you think about this episode in the comments!

Continue reading “Hackaday Podcast 187: The Sound Of Gleeful Gerbils, The Song Of The Hard Drive, And A Lipstick Pickup Lullaby”