Like [Brad], we’ve seen a number of PCB rulers out there. [Brad] was looking to take the idea and run with it. His DigiRule is a ruler with a logic gate simulator. What he built is a mash-up between PCB rulers, and the concept of electronic business cards.
All told it simulates seven logic gates, four flip-flops, and includes a four-bit counter. On one end of the ruler a CR1220 battery feeds the 18F43K20 which is performing the logic operations using buttons and LEDs. Of course the truth tables are printed on the back silk-screen, but playing with the lights is a lot more fun. We do find it fairly amusing that the centimeters on the bottom of the ruler are notated in binary.
It makes a lot more sense to hand out rulers than business cards; people might actually use them after you leave and you can still include contact info. This form-factor also breaks the mold. You can have a lot more space on a ruler and you’re not constrained by thickness (although [Limpkin] solved that problem). While we’re on the topic of business cards [ch00f’s] USB etch-a-sketch style card and this logic-based information delivery device top our favorites list.
Historically when hams built low power (QRP) transmitters, they’d use a crystal to set the frequency. Years ago, it was common to find crystals in all sorts of radios, including scanners and handheld transceivers. Crystals are very stable and precise and it is relatively easy to make a high quality oscillator with a crystal and a few parts.
The big problem is you can’t change the frequency much without changing crystals. Making a high quality variable frequency oscillator (VFO) out of traditional components is quite a challenge. However, today you have many alternatives ranging from digital synthesis to all-in-one IC solutions that can generate stable signals in a wide range of frequencies.
[N2HTT] likes to build radio projects and he decided to take an Si5351 clock generator and turn it into a three frequency VFO for his projects. The Si5351 uses a crystal, so it is very stable. However, you can digitally convert that crystal frequency into multiple frequencies over a range of about 8kHz to 160MHz.
Browsing though the junk store one day [Alec] spotted an old school 8mm film editor. For those who weren’t around, video used to be shot on film and editing it was a mechanical task of cutting (with a sharp implement) and pasting (with special tape) back together. It’s sad to see these in junk stores, but great for [Alec] who thought it begged to have an LCD and a single board computer implanted in it. Once the editor was in hand, the machine was gutted of its very simple parts: a lamp, some mirrors and a couple of lenses. He took measurements of the hollowed out enclosure and got down to business.
The hunt for a 4:3 aspect ratio LCD was on. Through a little bit of research, an LCD security screen was ordered from Alibaba. For the brains of the build an OLinuXino A13 board was chosen due to its native VGA output perfect for the LCD screen, a decent 1GHz Allwinner CPU, and the physical size which would fit in the editor housing.
With some haggling, Linux was installed on the SBC along with some games and the system was buttoned back up. A neat touch was added to the arms where you would originally place your film reals in the form of some fold out speakers, making the whole thing look like something direct out of a classic Sci-fi film. Check out the name of the project: PCsr, pronounced PC Senior… nice!
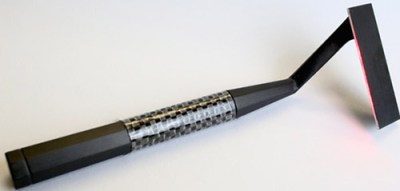
An irritation-free razor that gives a close shave has been a dream for thousands of years. [Gillette] came close, and with multiple blades came even closer, but all razors today are still just sharpened steel dragged across the skin. This is the 21st century, and of course there’s a concept for a laser razor pandering for your moola. We recently covered the Skarp laser razor and its Kickstarter campaign, and today the campaign has been shut down.
The email sent out to all contributors to the Skarp campaign follows:
Hello,
This is a message from Kickstarter’s Integrity team. We’re writing to notify you that the Skarp Laser Razor project has been suspended, and your pledge has been canceled.
After requesting and reviewing additional material from the creator of the project, we’ve concluded that it is in violation of our rule requiring working prototypes of physical products that are offered as rewards. Accordingly, all funding has been stopped and backers will not be charged for their pledges. No further action is required on your part. Suspensions cannot be undone.
We take the integrity of the Kickstarter system very seriously. We only suspend projects when we find evidence that our rules are being violated.
Regards, Kickstarter Integrity Team
It only took eight hours for the Skarp team to relaunch their crowdfunding campaign on Indiegogo. As of this writing, over 900 people (ostensibly from the 20,000 backers of the original Kickstarter campaign) have pledged to the new campaign.
Although we will never know exactly why Kickstarter suspended the original Skarp campaign, the reason given by the Kickstarter Integrity Team points to the lack of a working prototype, one of the requirements for technology campaigns on Kickstarter. Interestingly, Skarp did post a few videos of their razor working. These videos were white balanced poorly enough to look like they were filmed through green cellophane, a technique some have claimed was used to hide the actual mechanism behind the prototype’s method of cutting hair. A few commenters on the Skarp Kickstarter campaign – and here on Hackaday – have guessed the Skarp prototype does not use lasers, but instead a heated length of nichrome wire. While this would burn hair off, the color of the wire would be a dull red when filmed in any normal lighting conditions. It is assumed the poor quality of the Skarp prototype videos is an attempt to hide the fact they do not have a working prototype.
The Skarp laser razor. Source
Skarp’s move to Indiegogo has been lauded by some – mostly in the comments section of the Indiegogo campaign – and has been derided on every other forum on the Internet. Indiegogo is commonly seen as the last refuge of crowdfunding scam artist, but there are a few legitimate reasons why a campaign would choose to go to Indiegogo. Kickstarter is not available for campaign founders in all countries, and for some, debiting a card immediately, instead of after the campaign end like Kickstarter does, is a legitimate crowdfunding strategy.
But for a crowdfunding campaign to be suspended on Kickstarter and immediately move to Indiegogo? This almost never ends well. One of the most famous examples, the Anonabox, had its Kickstarter campaign suspended after it was found the creator was simply rebadging an off-the-shelf router. The Anonabox then moved over to Indiegogo where it raised over $80,000. Already the campaign for the Skarp Laser Razor has raised $135,000 USD from Indiegogo, after having its Kickstarter campaign raised over $4 Million. No, Skarp won’t be one of the most successful technology Kickstarter campaigns of all time. We can only hope it won’t be one of Indiegogo’s most successful campaigns.
The most vulnerable part of any secure information system is the human at the controls. Secure passwords, strong encryption, and stringent protocols are all worthless if that human can be coerced to give away the keys to the kingdom. The techniques of attacking a system through the human are collectively known as social engineering. While most of us don’t use social engineering in our day-to-day jobs, anyone can fall victim to it, so it’s always good to see this stuff in action. Some of the best examples of social engineering come from unlikely places. One of those is [Matthew Pitman].
[Matt] is one of those people we all hope we never to meet in real life. He’s a repo man. For those not familiar with the term, [Matt] is the guy who comes to pick up your car, boat or other asset when you fall behind on your loan payments. Generally, these repossession agents are contractors, working for the bank or loan agency who holds the loan on the collateral. As you might expect, no one is happy to see them coming.
[Matt] uses plenty of high-tech gadgetry in his line of work, everything from GPS tracking devices to drones. He calls his tow truck the Repo Ninja, and the interior is decked out with an internet connection, laptop, and tons of cameras. Even so, his greatest asset is social engineering. His 26 years of experience have taught him how to work people to get what he needs: their cars.
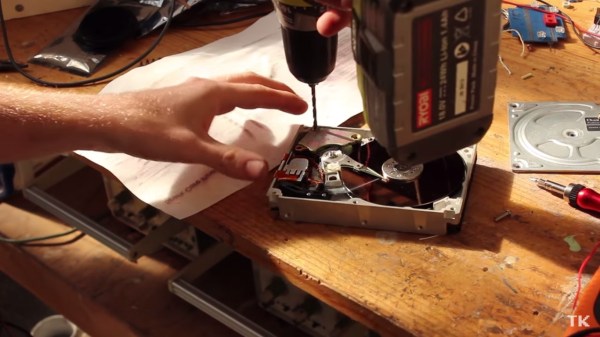
The Macintosh II was a popular computer in the era before Apple dominated the coffee shop user market, but for those of us still using our Mac II’s you may find that your SCSI hard drive isn’t performing the way that it should. Since this computer is somewhat of a relic and information on them is scarce, [TheKhakinator] posted his own hard drive repair procedure for these classic computers.
The root of the problem is that the Quantum SCSI hard drives that came with these computers use a rubber-style bump stop for the head, which becomes “gloopy” after some time. These computers are in the range of 28 years old, so “some time” is relative. The fix involves removing the magnets in the hard drive, which in [TheKhakinator]’s case was difficult because of an uncooperative screw, and removing the rubber bump stops. In this video, they were replaced with PVC, but [TheKhakinator] is open to suggestions if anyone knows of a better material choice.
This video is very informative and, if you’ve never seen the inside of a hard drive, is a pretty good instructional video about the internals. If you own one of these machines and are having the same problems, hopefully you can get your System 6 computer up and running now! Once you do, be sure to head over to the retro page and let us know how you did!
Before the modern notion of the citizen scientist lies the earlier ideal of the independent scientist. Scientists outside of the academic community but engaging with it. These days citizen scientists are often seen as valuable assistants in the scientific process, helping collect and process data in a quantity which would be otherwise intractable.
In the past however, independent scientists had a far more central role. Galileo, Kepler, Darwin and Hooke were all self funded at various points in their careers. More recently independent scientist Peter Mitchell won the Nobel prize for Chemistry in 1978 for his foundational research into cell biochemistry and the development of the chemiosmotic hypothesis.
Sadly, peer-reviewed scientific contributions by scientists un-sponsored by a research organization are now few and far between. In this short series we hope to highlight the efforts of these lone researchers with particular reference to the tools they’ve had to hack together on a budget in their scientific quests (if you know an independent researcher you think we should feature, please comment below!).
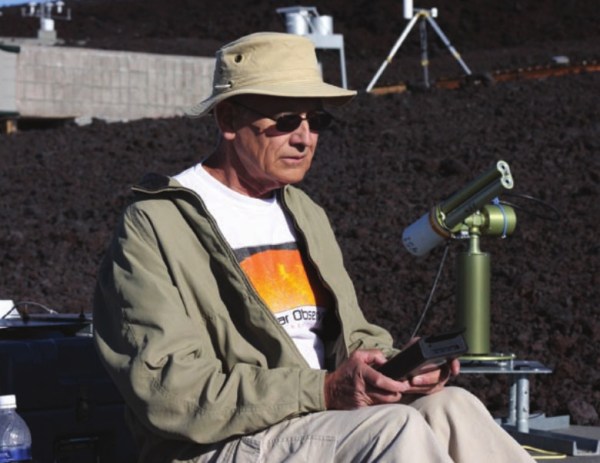
In Hacker circles Forrest Mims is perhaps best known for his series of electronics books and the unforgeable Atari Punk Console. But it’s his ability to engage with the scientific community as an independent researcher through a series of well thought out scientific articles that interests us here. Contributions made all the more significant by his lack of formal scientific training.


 [Matt] is one of those people we all hope we never to meet in real life. He’s a repo man. For those not familiar with the term, [Matt] is the guy who comes to pick up your car, boat or other asset when you fall behind on your loan payments. Generally, these repossession agents are contractors, working for the bank or loan agency who holds the loan on the collateral. As you might expect, no one is happy to see them coming.