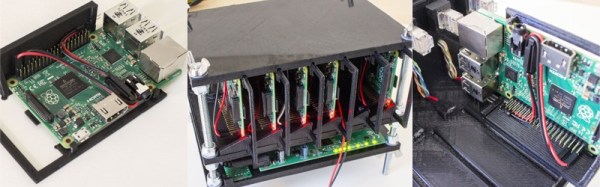
The Raspberry Pi has inspired many a hacker to take the inexpensive (~$35) microcomputer to the enterprise level. From bitcoin miners to clusters, the Raspberry Pi has found itself at the heart of many large-scale projects.
On hackaday.io [Dave] served up his own contribution with his Raspberry Pi Rack. Inspired by enterprise blade servers, he wanted to house multiple Raspberry Pi boards in a single enclosure providing power and Ethernet. The spacing between the blades and the open sides allow for each Pi to cool without the additional power and cost of fans.
Starting with an ATX power supply and Ethernet switch, Dave created a base that housed the components that would be shared by all the Pis. Using a 3D model of a Pi he found online, he began working on the hotswap enclosures. After “dozens of iterations” he created a sled that would hold a Pi in place with clips rather than screws and slide into his rack to connect to power and Ethernet.
Like most projects, some mistakes were made along the way. In his write up [Dave] describes how after printing the bottom plate he realized he hadn’t accounted for the holes for the Ethernet cable runs. Instead the cables run along the back wall in a way he now prefers.
You can find all the details and download the 3D models on his project page.
Intel, CPU manufacturer we all know and love, will buy Altera, makers of fine FPGAs, for $16.7 Billion.
While most of the news about this deal focuses on the future of FPGAs in the datacenter, getting Altera IP into Intel fab houses is equally interesting. Intel is the current king of putting transistors on a piece of silicon, and Intel’s ability to put a massive amount of transistors on a chip means FPGAs will become even more capable – more gates, more blocks, and more memory. The most capable Altera FPGAs are being made with a 28nm process; Intel could theoretically double the number of gates with the 14nm process used on the new Broadwell CPUs. There is most likely someone at Xilinx tearing their hair out right now, chain-smoking next to a pot of coffee.
A few years ago, Roombas — everyone’s favorite robotic trash can — graced the pages of Hackaday with reverence. There was nothing this little robot couldn’t do, save for going up stairs. Roomba hacks have died off since then, and these little trash cans have been swallowed up by dumpsters. It’s all very sad, really.
[Mike] has had one of these Roombas around for a while, sitting in a closet, waiting for someone to make use of it. He recently dug it out, looked it over, and watched the LEDs light up after troubleshooting a problem with the batteries. Then the problem was how to control it.
He had wanted to connect it to a VIC-20, but the handy serial port on the Roomba only accepted baud rates between 19.2k and 57.6k. The VIC-20, with the ancient 6522 VIA, could only bitbang a serial port up to 2400bps. Then the idea hit him. In his closet of ancient technology, [Mike] had a Tandy 102, a slightly upgraded TRS-80 Model 100 that could easily drive a serial port at 19.2k.
When it comes to a mobile retro robotics platform, [Mike] couldn’t have found a better computer. The Tandy 102 has a display, a BASIC interpreter, enough RAM to run a Roomba, and is powered by a few AA batteries. He did need a little bit of level conversion for the serial port, but a MAX232 took care of that easily.
With everything put together, [Mike] had a robot and a computer that is at least as good as the old Heathkit HERO robot. You can check out a video of the Tandy bot below.
I usually see retro-gaming projects using tiny screens with a fair number of pixels (64×64) but what I really like is the look of making every pixel count. With this in mind I built 1-Pixel Pac-Man, the classic coin-op experience but with characters that consist of just one pixel. Playing a throw-back like this wouldn’t be the same without some vintage controls so I picked up an Atari joystick, patched it into a microcontroller, and started coding. Check it out:
Smartmatrix Bundle
32×32 RGB panel with acrylic diffuser
Back of the Smartmatrix
This piece of hardware made the project build really easy: the Smartmatrix. [Louis Beaudioin] developed the Smartmatrix and it’s been in the Hackaday Store for a while now. The display module itself is a commodity item that is used in LED billboards. There are shrouded headers on the back of the panels, to the left and right sides, which allow them to be daisy chained. The Smartmatrix PCB plugs into one of these shields, provides a soldering footprint for the Teensy 3.1 which drives the display, and gives you the wiring to connect screw terminals from the PCB to the power terminals on the module. Why the need for beefy power jumpers? At full white the thing can draw about 3.5A — don’t worry there’s a power supply included in the bundle.
Also integral to making this look good is the diffuser panel which is frosted acrylic. The Smartmatrix is designed to be housed in a shadowbox frame; it even includes a frame backer board with a cut-out for the Teensy 3.1 so it can be programmed without opening the thing up. I like looking at the guts so I’m leaving my free floating until I come up with an interesting way to mount everything as one unit.
Programming Pac-Man from the Ground Up
If you haven’t looked into it before, the ghost AI and gameplay details for Pac-Man are absolutely brilliant. [Toru Iwatani] did a masterful job with the original, and you should take a look at all of the analysis that has been done over the years. The best collection I could find was the Pac-Man Dossier and I based most of my code on the rules described there.
Basically the ghosts have two modes, chase and scatter. The modes set the enemy targets differently; to points at the four corners of the board in scatter, and to points relative to the player in chase. The relative part is key; only the red enemy actually chases you. Another one of them looks at the red enemy’s distance and angle, and targets the reflection of that vector. Really easy, really clever, and results in enemy behavior that’s believable. It isn’t just the enemy movement, little touches like a speed penalty (1/60 of a second) for each dot the player gobbles up means the enemies can catch up if you continuously eat, but you can escape by taking the path already-eaten.
Library, DMA, and Extra Hardware
Teensy 3.1
DB9 Connector for Joystick
Extras in the Bundle
Kickstarter remote and RTC Module
The hardware and software running the Smartmatrix made the display portions of the project really simple. First off, the Teensy 3.1 is fast, running at 96MHz in this case. Second, it has Direct Memory Access (DMA) which [Louis] used in the Smartmatrix library. This means that driving the display takes almost no CPU time at all, leaving the rest for your own use. This example of a game is under-utilizing this power… it’s totally capable of full-motion video and calculating amazing visualizations on the fly.
The PCB hosting the Teensy 3.1 breaks out several pins to one side. I’m not sure what I’ll add in the future so I actually used the extra surface-mount IO pins on the bottom of the Teensy to connect the Atari joystick (which is simply a set of switches). The are enough pads for two joysticks so I used pin sockets to interface the Teensy to the PCB so that I can get to it again later.
The kit also includes an IR receiver and remote, and also a microSD card to loading animations (there’s an SD socket on the PCB). The bundle in the Hackaday Store is a kit you solder yourself, but [Louis’] company, Pixelmatix, has a Kickstarter running for fully-assembled versions that come with a black remote and sound-visualization hardware.
Future Improvements
The game is fully working, but there are a few key things that I really want to add. The Teensy 3.1 has a single DAC pin available. I’m fairly certain the original coin-op game had mono audio. It should be possible to reproduce the sound quite accurately with this board. That would really make the project pop.
There are also a bunch of touch-ups that need to happen. I’d like to add an animation when the player is eaten by an enemy, and a countdown before the level restarts. The score, shown in binary on the right column, should be scrolled out in decimal when the game ends, and what’s a coin-op recreation without a high-score screen?
[Vlad] wrote in to tell us about his latest project—an RC boat that autonomously navigates between waypoints. Building an autonomous vehicle seems like a really complicated project, but [Vlad]’s build shows how you can make a simple waypoint-following vehicle without a background in autonomy and control systems. His design is inspired by the Scout autonomous vehicle that we’ve covered before.
[Vlad] started prototyping with an Arduino, a GPS module, and a digital compass. He wrote a quick sketch that uses the compass and GPS readings to control a servo that steers towards a waypoint. [Vlad] took his prototype outside and walked around to make sure that steering and navigation were working correctly before putting it in a boat. After a bit of tweaking, his controller steered correctly and advanced to the next waypoint after the GPS position was within 5 meters of its goal.
Next [Vlad] took to the water. His first attempt was a home-built airboat, which looked awesome but unfortunately didn’t work very well. Finally he ended up buying a $20 boat off of eBay and made a MOSFET-based motor controller to drive its dual thrusters. This design worked much better and after a bit of PID tuning, the boat was autonomously navigating between waypoints in the water. In the future [Vlad] plans to use the skills he learned on this project to make an autopilot for the 38-foot catamaran his dad is building (an awesome project by itself!). Watch the video after the break for more details and to see the boat in action.
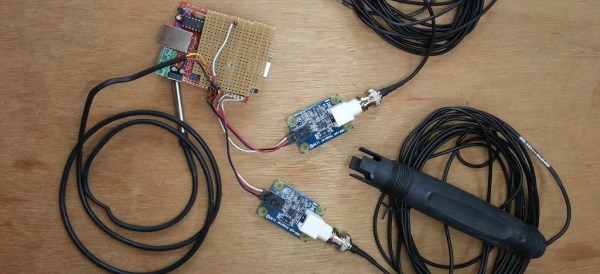
Pools and hot tubs, although enjoyable, require monitoring and maintenance to keep the water clean and clear. [bhuebner] didn’t like having to constantly testing his hot tub’s vitals using test strips and water test kits. In an effort to autonomously monitor his hot tub’s water, he came up with a project he’s calling SpaSitter that records and tracks water quality indicators.
The hardware is based on a Nanode (think Arduino with on-board Ethernet). Three sensors are connected to the Nanode and placed in his hot tub’s water. The sensors measure pH, ORP and Temperature. That data is then uploaded to xively.com where the data is not just stored, but tracked over time and displayed in graph-form. Checking the vitals on your phone can also get a bit tedious so [bhuebner] set up an email notification if one of the measured data streams go outside of a predetermined range. He still has to add chemicals manually and hopes to see some automation added to the next project revision.
[bhuebner] made his code available and also posted detailed instructions, including how to calibrate the sensors, for anyone wanting to do the same thing.
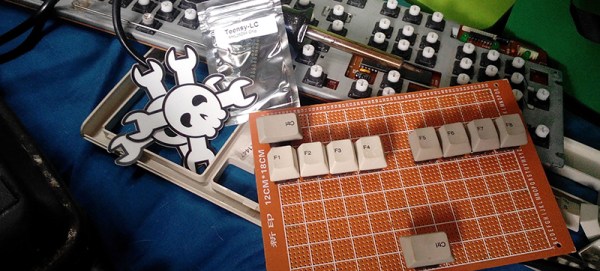
As with all devices meant for a very small percentage of the population, computing equipment for the blind is very, very expensive. A Braille typewriter – a relatively simple machine that puts dots on a piece of paper – costs about $700 USD. Need a Braille interface for a computer? You can buy a 16-cell wide Braille output for $1600, and high-end models with an integrated keyboard go up to $5000.
For his Hackaday Prize entry, [Haydn Jones] is building a simpler and cheaper Braille computer. It’s not just a single line of text at a time; this computer will have a display that will output an entire page of Braille at a time.
The current solutions for a computer to Braille interface use small electromechanical cells for each character. That’s six individual pins for each character, multiplied by the number of cells on the display. Doing a full-page display with this type of mechanism, but [Haydn] has another idea. Instead of controlling each pin individually, all of the pins on the display will be controlled by a CNC-like mechanism. The pins themselves will be mechanical SR latches, better known as the mechanism in a ball point pen.
A display is only half of the IO of a computer, and for the input portion of his build, [Haydn] is also building a Braille keyboard. This doubles as a binary or hexadecimal keyboard, but the idea is very similar to a proper chorded Braille keyboard. It’s a simple enough build; just a few key switches and a microcontroller.


 Next [Vlad] took to the water. His first attempt was a home-built airboat, which looked awesome but unfortunately didn’t work very well. Finally he ended up buying a $20 boat off of eBay and made a MOSFET-based motor controller to drive its dual thrusters. This design worked much better and after a bit of PID tuning, the boat was autonomously navigating between waypoints in the water. In the future [Vlad] plans to use the skills he learned on this project to make an autopilot for the