A Year Long Time Lapse Camera

All [val3tra] wanted was an RF-accessible camera. A camera that would take pictures, save them to an SD card, and occasionally send them over an RF link to a computer. This project has grown out of control, and now it has become an open-source camera that’s able to take year-long time-lapse movies.

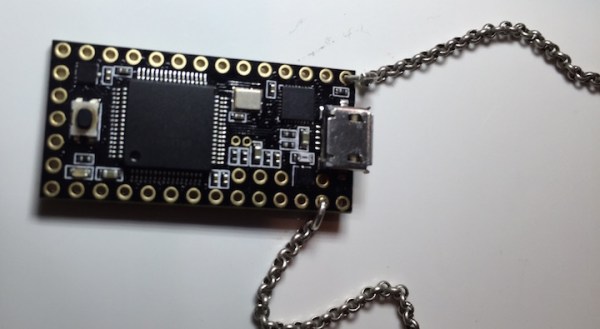
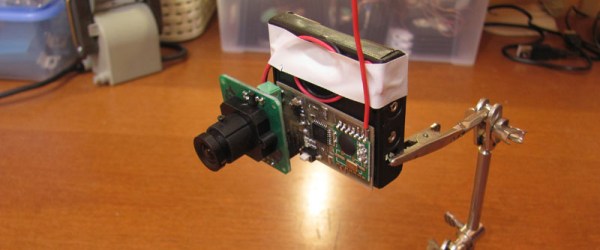
The build started as a low power camera using an eBay JPEG camera modified for 3.3V. That’s only 640×480, but each frame averages only 48kb – small enough to store a few thousand pictures on a FAT16 formatted SD card. A $4 RF module, an ATMega, and an RTC make up the rest of the build that has a power draw of about 100 Joules per hour. A D-cell has about 60,000 Joules, and a pessimistic estimate of a battery of four in series, two in parallel gives a run time of 200 days.

This build was then improved, bringing the total battery consumption down to about 3.5-4 Joules per frame, or at one frame every 10 minutes, about 24 Joules an hour. That’s impressive, and getting this camera to run longer than a dozen or so months raises some interesting challenges. The self-discharge of the battery must be taken into account, and environmental concerns – especially when leaving this camera to run in a Moscow winter, seen in the video below – are significant.

If you don’t want to go equipment-lite you could seal your DSLR, Pi, and some serious batteries in a weatherproof enclosure.

Continue reading “A Year Long Time Lapse Camera”

A device that reads sheet music and outputs MIDI

Sheet Music To MIDI Converter

Learning to read sheet music is a challenge for new musicians, so a group of Cornell students decided to make a robot do it instead. For their final project, they built a robotic sheet music reader (link warning: this page seems to automatically start a .mov file download when loaded).

As an input, the robot takes a piano roll. This is a long strip of paper with music printed on it, which can easily be fed through the reader. A rotational servo keeps the strip feeding at a constant speed, and passes it through the reader.

The reader is based on a Melexis MLX75306 linear optical array. This IC is a 142 x 1 array of photodiodes, which is designed for fuel quality sensing in cars. In this project, it’s been repurposed as a camera to read the music as it passes by. An array of LEDs illuminates the piano roll, providing a more accurate reading.

The components are connected to an Atmel ATmega1284P, which does all the required control and processing. It creates a MIDI output of the piano roll, which can be connected to any hardware or software synthesizer.

Old Timey MP3 Player

Old-Timey MP3 Player Blends Old Styling With New Technology

No, this isn’t the first commercial MP3 player ever produced. It’s a blend of the old and the new, old time looks with modern electronics. [viscomjim] recently made this MP3 Player from the ground up for the noble reason to give as a Christmas present.

[viscomjim] started by laying out a circuit using a solder-less breadboard to test his circuitry. He’s using PIC microcontroller to control the unit. There is an 20×4 LCD display, two rotary encoders with push buttons, a serial MP3 player module, real time clock and an infrared receiver. A wires-all-over mess wasn’t acceptable for this Christmas gift so [viscomjim] put on his learning cap and tried out Autotrax Dex PCB layout software. This was his first project with the software and everything went well. After the design was done, the board files were sent out to a fab shop. A few weeks later they were delivered. All the parts were wired up and tested and… it worked!

Next up was building a cabinet, this one was built out of wood and stained to give it a feeling of yesteryear. A pair of 4″ car speakers are responsible for sharing the tunes and are powered by a small amplifier and power supply mounted inside the enclosure. The front panel is laser cut clear acrylic and backed with a nicely prepared Photoshop’d parchment paper graphic. And those fancy grill covers, also laser cut acrylic, this time opaque brown in color.

There are only two knobs for control, the left is the volume and the right is the program changer. Push the left knob inward and the unit turns on or off, the right plays and pauses. This MP3 player plays music off the internal SD card on the MP3 module. [viscomjim] also went one step further and implemented some code to work with an Apple remote he had kicking around, hence the IR receiver mentioned above.

If you’d be interested in making something similar, you’re have-way there as [viscomjim] made his schematics available but, unfortunately, not his code. Want to build your own MP3 Player but want something a little smaller? Check this tiny one out.

roomba

IRobot Releases Hackable Roomba — Without The Vacuum

We love forward thinking companies that take a risk and do something different. iRobot, the company behind the iconic Roomba, just released the newest version of their Roomba Create — a programmable Roomba (minus the vacuum) that can be hacked and programmed to do all sorts of things.

The company developed the Create with STEM students in mind — a robotics learning platform. It came out originally back in 2007, and we’ve covered many hacks that have made use of it. Many. Like, a lot. One of our favorites has got to be this data center monitoring robot that makes use of the platform!

Anyway, the newest version of the Create features the typical hardware upgrades you’d expect, and with some special emphasis on 3D printing. In fact, the CEO of iRobot [Colin Angle] thinks that 3D printing is going to make a big difference in a few years:

“Your Roomba could be a software file that you print at home,” he says. He says the Create’s new features are a way for the company to get ready for that day, while also providing a platform that educators and hobbyists can use to tinker.

Kudos to you guys, iRobot! We just wish people would stop giving Roomba’s knives…

[Thanks PSUbj21!]

Hackaday Links Column Banner

Hackaday Links: December 21, 2014

Most of the incredible flight simulator enthusiasts with 737 cockpits in their garage are from the US. What happens when they’re from Slovenia? They built an A320 cockpit. The majority of the build comes from an old Cyprus Airways aircraft, with most of the work being wiring up the switches, lights, and figuring out how to display the simulated world out of the cockpit.

Google Cardboard is the $4 answer to the Oculus Rift – a cardboard box and smartphone you strap to your head. [Frooxius] missed being able to interact with objects in these 3D virtual worlds, so he came up with this thing. He adapted a symbol tracking library for AR, and is now able to hold an object in his hands while looking at a virtual object in 3D.

Heat your house with candles! Yes, it’s the latest Indiegogo campaign that can be debunked with 7th grade math. This “igloo for candles” will heat a room up by 2 or 3 degrees, or a little bit less than a person with an average metabolism will.

Last week, we saw a post that gave the Samsung NX300 the ability to lock the pictures taken by the camera with public key cryptography. [g3gg0] wrote in to tell us he did the same thing with a Canon EOS camera.

The guys at Flite Test put up a video that should be handy for RC enthusiasts and BattleBot contenders alike. They’re tricking out transmitters, putting push buttons where toggle switches should go, on/off switches where pots should go, and generally making a transmitter more useful. It’s also a useful repair guide.

[Frank Zhao] made a mineral oil aquarium and put a computer in it. i7, GTX 970, 16GB RAM, and a 480GB SSD. It’s a little bigger than most of the other aquarium computers we’ve seen thanks to the microATX mobo, and of course there are NeoPixels and a bubbly treasure chest.

Boxing Trainer

Boxing Trainer Uses DIY Force Sensors

A team of Cornell students have designed and built their own electronic boxing trainer system. The product of their work is a game similar to Whack-A-Mole. There are five square pads organized roughly into the shape of a human torso and head. Each pad will light up based on a pre-programmed pattern. When the pad lights up, it’s the player’s job to punch it! The game keeps track of the player’s accuracy as well as their reaction time.

The team was trying to keep their budget under $100, which meant that off the shelf components would be too costly. To remedy this, they designed their own force sensors. The sensors are basically a sandwich of a few different materials. In the center is a 10″ by 10″ square of ESD foam. Pressed against it is a 1/2″ thick sheet of insulating foam rubber. This foam rubber sheet has 1/4″ slits cut into it, resulting in something that looks like jail bars. Sandwiching these two pieces of foam is fine aluminum window screen. Copper wire is fixed the screen using conductive glue. Finally, the whole thing is sandwiched between flattened pieces of corrugated cardboard to protect the screen.

The sensors are mounted flat against a wall. When a user punches a sensor, it compresses. This compression causes the resistance between the two pieces of aluminum screen to change. The resistance can be measured to detect a hit. The students found that if the sensor is hit harder, more surface area becomes compressed. This results in a greater change in resistance and can then be measured as a more powerful hit. Unfortunately it would need to be calibrated depending on what is hitting the sensor, since the size of the hitter can throw off calibration.

Each sensor pad is surrounded by a strip of LEDs. The LEDs light up to indicate which pad the user is supposed to hit. Everything is controlled by an ATMEGA 1284p microcontroller. This is the latest in a string of student projects to come out of Cornell. Make sure to watch the demonstration video below. Continue reading “Boxing Trainer Uses DIY Force Sensors”

The Teensy Development Board

Plug Into USB, Get A Reverse Shell

Computers blindly trust USB devices connected to them. There’s no pop-up to confirm a device was plugged in, and no validation of whether the device should be trusted. This lets you do some nefarious things with a simple USB microcontroller.

We’ve recently seen two examples of this: the USBdriveby and the Teensyterpreter. Both devices are based on the Teensy development board. When connected to a computer, they act as a Human Interface Device to emulate a keyboard and mouse.

The USBdriveby targets OS X. When connected, it changes the DNS server settings to a custom IP, to allow for DNS spoofing of the victim’s machine. This is possible without a password through the OS X System Preferences, but it requires emulating both keystrokes and clicks. AppleScript is used to position the window in a known location, then the buttons can be reliably clicked by code running on the Teensy. After modifying DNS, a reverse shell is opened using netcat. This allows for remote code execution on the machine.

The Teensyterpreter gives a reverse shell on Windows machines. It runs command prompt as administrator, then enters a one-liner to fire up the reverse shell using Powershell. The process happens in under a minute, and works on all Windows versions newer than XP.

With a $20 microcontroller board you can quickly fire up remote shells for… “support purposes”. We’d like to see the two projects merge into a single codebase that supports both operating systems. Bonus points if you can do it on our Trinket Pro. Video demos of both projects after the break.

Continue reading “Plug Into USB, Get A Reverse Shell”