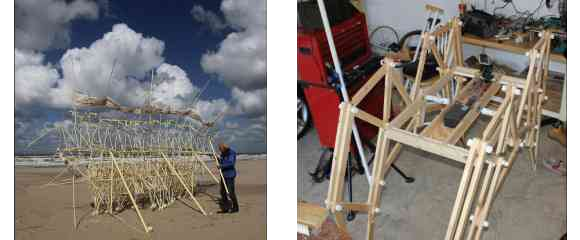
3D Printering: Making A Thing With OpenSCAD

This week, we’re starting off with OpenSCAD, a 3D modelling program that’s more like programming than drawing. A lot of useful 3D printable objects – including the parts for a lot of RepRaps – are designed in OpenSCAD, so hopefully by the end of this you’ll be able to design your own parts.

This isn’t meant to be a complete tutorial for OpenSCAD; I’m just demoing SCAD enough to build a simple part. Next week I’ll most likely be designing a part with AutoCAD, but if you have an idea of what software tools I should use as a tutorial to make a part, leave a note in the comments. Check out the 3D Printering guide to making a part with OpenSCAD below.

Continue reading “3D Printering: Making A Thing With OpenSCAD”

A Really Big Extruder For Exotic Filaments

extruder

Even with ABS, PLA, Nylon, HIPS, and a bunch of Taulman filaments, the world of 3D printers is missing out on a great supply of spools of plastic filament. Plastic welding rod is available from just about every plastics supplier, and in more variety than even the most well-stocked filament web shop.

This Kickstarter hopes to put all those exotic plastic welding rods to good use. Instead of being designed to only use 1.75 and 3mm filaments, this guy will extrude welding rods up to 4.76mm in diameter. This opens the door for 3D printed objects made out of PDPF, PVC, Polypropylene, Polyethylene and other high molecular weight plastics.

Because these welding rods are much bigger than the usual plastic filament, this extruder also has the option for a very beefy NEMA 23 motor. It’s the perfect solution if you’re planning on building a homebrew ludicrous-sized printer, or you just to show off just how awesome you are.

Digitally Controlled Dual Power Supply

[Kerry] set out to build a digitally controlled dual supply for his bench. He’s already built a supply based on the LM338 linear regulator, but the goal this time was to build it without a linear regulator IC, and add digital control over both the current and voltage.

In part one of the build, [Kerry] explains the analog design of the device. He had an extra heatsink kicking around, which can dissipate enough heat from this linear supply to let it run at 10 A. A NE5532 opamp is used to track a reference voltage, which can be provided by a DAC. The current is measured by a LT6105 shunt sense amplifier, then compared to a reference provided by another DAC.

Part two focuses on the digital components. To interface with the analog circuitry, two MCP4821 DACs are used. These are controlled over SPI by an ATmega328P.

Fortunately, [Kerry] also has his own DC load project to test the supply with.

Internet-Enabling A Lamp With The Raspberry Pi

lampcontrol

[Jack] sent in his writeup for internet enabling a home lamp. While we will certainly have some comments saying this is too simple, it does a great job of breaking things down to the basics. For those that aren’t confident in their electronic skills, this is an easy hack to a commercial device that greatly expands it’s capabilities. [Jack] started with a cheap wireless outlet controller. By opening the remote and wiring each switch to a 2N222A transistor, you can very easily control the remote from the GPIO pins on the Raspberry Pi. In [Jack’s] case, he set up a web page using Flask that allows quick on/off control.

Of course, this method can be used in any number of instances where you have a wireless controller, from small lamps to garage doors. Given it’s simplicity, anyone can do it with even basic skills. If you’re a beginner who’s been itching to do some home automation, follow [Jack’s] writeup and check an item off your todo list!

Xbox One Headset 2.5 Mm Plug Adapter

In all of Microsoft’s grand wisdom they found it necessary to make the new Xbox One headset adapter without a standard 2.5 mm headset jack. People have invested great amounts of money in quality headsets for previous game platforms that now cannot jack into the Xbox One controllers. This may seem like a déjà vu hack from a week ago but it is different and adds more solutions for the annoying Xbox One headset compatibility problem.

[Jon Senkiw] A.K.A [Xandrel] wasn’t having any of this Microsoft nonsense so he cracked open the headset adapter case that plugs into the Xbox One controller. He photographed the PCB and wiring and realized he could fit a 2.5 mm headset jack from an old donor cellphone into the case. A dap of hot glue, some AWG 30 jumper wires and a bit of plastic trimming was all it took to get a jack inside the headset adapter just the way Microsoft should have done from the factory.

Previously when [octanechicken] added a 2.5 mm female phone adapter at the end of the cable he did not connect the black wire to anything being it was the 2nd side of a push-pull speaker. However, from looking at [Jon’s] photos he connected the speaker output wire to a solder pad on the PCB where the black wire originally connected, marked HPL, and he had nothing connected to the HPR pad. This seemed to work for [Jon] just fine, but is the opposite of what [octanechicken] did last week when he connected the blue wire to the speaker output which would have traced back to the HPR pad on the PCB.

This hack makes these controllers backwards compatible without too much issue being reported. If you have issues please report here or on [Jon’s] SE7ENSINS thread. He has also made comments on the thread that he is willing to help mod headsets, so if you’re not able to hack this yourself [Jon] might be willing to help.

Hidden Reed Switches For DIY Home Security

01-Before

[Rhys] wanted to secure his home against burglars, but didn’t want to go the normal route of using those bulky plastic magnet and reed switch deals. So he sourced some glass reed switches and made his own completely hidden security system.

By using small glass reed switches [Rhys] was able to mount them flush to the wood paneling just above the window frames. To do this he drilled and then chiseled two slots for the reed switches to go in, with the wires routed into the house. A bit of bondo or drywall filler and some paint later and they are completely invisible! To finish it off he glued small neodymium magnets to the top of the window frame which close the switches. It’s a very clean build and quite inexpensive to do — the possibilities for wiring up your entire home like this are quite tempting!

He’s got the switches installed already… why not couple it all to a complete home security setup? We shared a project last year that does just that!

E-volo VC200 Makes Maiden Flight. Flying Cars Incoming

The e-volo VC200 has made it’s maiden unmanned flight. Does the craft above look a bit familiar? We first reported on the e-volo team back in 2011. Things have been going great for the team since then. They’ve created an 18 motor (Octadecacopter?) prototype dubbed the VC200. The group has taken a smart approach to building their craft. Rather than try to keep everything in-house, they’ve created a network by partnering with a number of companies who are experts in their fields. A sailplane company laid up the carbon fiber composite frame for the EC200. Junkers Profly, a German aviation company, developed a ballistic parachute system in case something goes wrong in flight.

From the outside, the VC200 looks like a grown up version of the Quadcopters we’ve seen here on Hackaday. Even the control system used for the test flight looks like a modified Radio Control Transmitter. The motors are outrunner brushless motors. Props are carbon fiber. We’re hoping the control system is a bit more evolved (and redundant) than the systems used in R/C quads though. Just like in smaller scale models, batteries are still the limiting factor. The VC200 will only fly for about 20 minutes on a charge. However, e-volo says that new technology should allow it to extend that time to around an hour. Not very much for a cross country flight, but plenty to pioneer a new type of aircraft. Where do we sign for the beta program?

Continue reading “E-volo VC200 Makes Maiden Flight. Flying Cars Incoming”