Seven-Segment Shelves Do Double Duty

[Lewis] of [DIY Machines] was always on the lookout for that perfect something to hang above the couch. After spending a lot of time fruitlessly searching, he designed and built this awesome shelving unit with recessed lighting that doubles as a huge 7-segment clock.

The clock part works as you probably expect — an Elegoo Nano fetches the time from a real-time clock module and displays it on the WS2812B LED strips arranged in 7-segment formations. There’s a photocell module to detect the ambient light level in the room, so the display is never brighter than it needs to be.

Don’t have a 3D printer yet? Then you may need to pass on this one. Aside from the wood back plane and the electronics, the rest of this build is done with printed plastic, starting with 31 carefully-designed supports for the shelves. There are also the LED strip holders, and the sleeve pieces that hide all the wires and give this project its beautifully finished look.

You may have noticed that the far left digit isn’t a full seven segments. If you’re committed to 24-hour time, you’d have to adjust everything to allow for that, but you’d end up with two more shelves. Given the fantastic build video after the break, it probably wouldn’t take too long to figure all that out.

We like big clocks and we cannot lie. If you have room for it, build something like this blinkenlit beauty.

Continue reading “Seven-Segment Shelves Do Double Duty”

Link Coupling Antenna Tuner Wordless Workshop

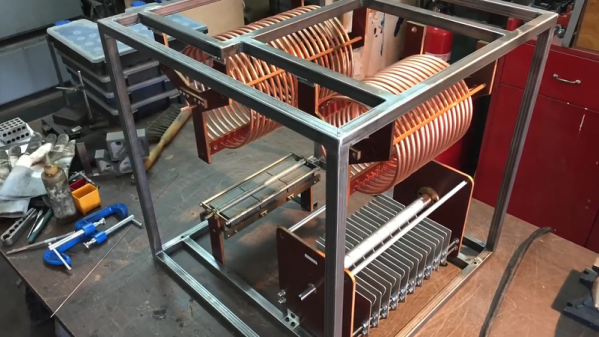
Remember “Wordless Workshop” in Popular Science? [Roy Doty] illustrated a household problem and the solution for it cobbled up in the main character’s garage workshop. We wonder what [Roy] would have done with YouTube? Maybe something like the video from [VE2TAE] and [VE2AEV] showing their link coupling antenna tuning build. You can watch the video after the break, and if you aren’t a fan of Jazz, you can mute the volume.

Like [Doty’s] cartoons, the video presumes you are going to have your own idea about dimensions and component values to fit your needs. But the construction is beautiful in its own right. The tubing wound into giant coils is impressive and brings back memories of the old days. However, the construction of the variable capacitors really got us excited. Big air variable caps may be hard to find, but the video makes them look easy to make.

A couple of nice looking knobs and panel meters make for a great looking tuner. With that spacing, we imagine it would handle full legal power without any difficulty at all. If you want to learn more about this type of tuner, [VK1OD] had a great page about it which seems to be defunct now. But the Internet Archive comes to our rescue, as usual.

The design is quite old, so even a 1934 copy of “Radio” can explain it (look on page 6). If you want to see a more wordy example of making variable capacitors — although they are smaller, the same principles apply — [N4DFP] has a good write up for that.

Of course, these days, most people expect their antenna tuning to be automatic. With some Lego, though, you could refit your manual one, if you like.

Continue reading “Link Coupling Antenna Tuner Wordless Workshop”

Stop ‘n Go DUPLO

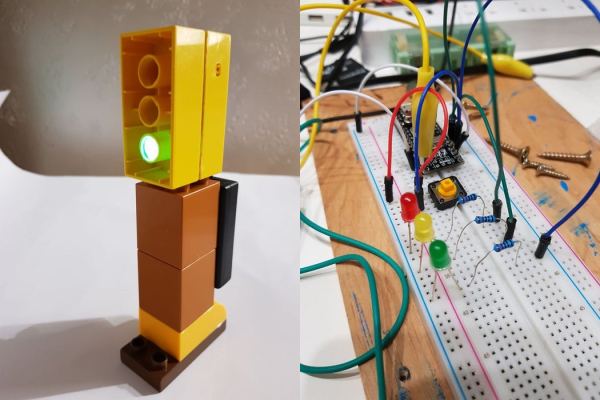
[beshur]’s 2-year-old is obsessed with transportation, so he lifted a few DUPLO blocks from the bin and made this toy traffic light as a birthday present. Hey, might as well get him used to the realities of traffic, right? It also makes for a good early hacker lesson: why buy something when you can make it yourself?

The traffic pattern is determined by an Arduino Nano V3 situated inside the carved-out rear block. There’s a push button on the side in case there’s a spill and the lights need to go blinking red until the issue is dealt with. Instead of trying to solder everything in situ and risk melting the plastic, [beshur] dead-bugged the LEDs and resistors to the Nano with a helping hands and then worked everything into the case. The 5mm LEDs fit perfectly into the drilled-out posts of a second block and produce a nice, soft glow. Proceed with caution and check it out after the break.

Of course, plastic building blocks can do real work, too. This LEGO chocolate pantograph is pretty sweet.

Continue reading “Stop ‘n Go DUPLO”

DIY Monochrome LCD Hack Doesn’t Go As Planned

Manufacturers of low-cost 3D printers that use the masked stereolithography (MSLA) process are able to build their machines so cheaply because they’re using repurposed smartphone or tablet LCD panels to mask off the UV backlight. Considering the quality you get out of even the entry-level MSLA resin printers, we certainly aren’t complaining about this bit of thrift. But as [Jan Mrázek] explains in a recent blog post, there’s certainly room for improvement.

The problem is that those repurposed LCD panels are, as you’d expect, color displays. After all, even the bottom of the barrel mobile devices moved away from monochrome displays decades ago. But in this case, that’s not what you really want. Since the printer operates on a single wavelength of light, the color filters inside the LCD are actually absorbing light that could otherwise be curing the resin. So an MSLA printer with a monochrome screen would use less energy and print faster. There’s only one problem: it’s not very easy to find high-resolution monochrome displays in the year 2020.

So [Jan] decided to see if he could take a replacement screen intended for his Elegoo Mars MSLA printer and convert it from color to monochrome by disassembling it and manually removing the color filters. If this sounds a bit crazy, that’s because it is. Turns out taking apart an LCD, modifying its internal layout, and putting it all back together in working order is just as difficult as you’d think.

But it was still worth a try. [Jan] pulls the display apart, removes the liquid crystals, scrapes off the color filters, and then puts it all back together again. His first attempt got him a monochrome display that actually worked, but with debris trapped inside the screen, the image was too poor to be useful. He tried again, this time trying harder to keep foreign material out of the crystals. But when he got it back together a second time, he found it no longer functioned. He thinks it’s possible that his attempt to clean up the inside of the display was too aggressive, but really there are so many things that could go wrong here it’s hard to pin down just one.

Long story short, manually creating monochrome displays for low-cost MSLA printers might not be a viable option. Until a better solution comes along, you might be interested in seeing some slightly less invasive ways of improving your resin print quality.

Levitating Starship Model Comes In For A Landing

If everything goes according to plan, Elon Musk says the first generation of SpaceX’s massive Starship will make an orbital flight before the end of 2020. That’s a pretty bold claim, but when you’ve made landing rockets on their tails as in the old science fiction pulp magazines seem routine, we suppose you’ve earned the right to a bit of bravado. We’re excited to see the vehicle evolve over the next several months, but even if the real one stays grounded, we’ll gladly take this “flying” Starship model from [Chris Chimienti] as a consolation prize.

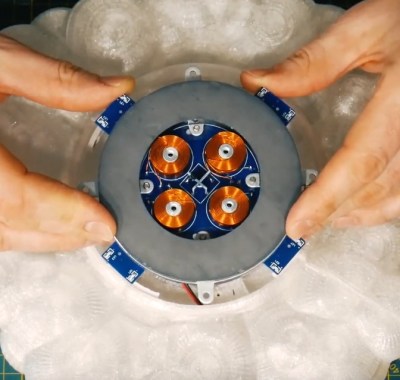
A magnetic levitation module, we’re officially in the future.

Feeling a bit let down by the 3D printable models of the Starship he found online, [Chris] set out to build his own. But it wasn’t enough to just make his bigger, stronger, and more accurate to Starship’s current design; he also wanted to make it a bit more exciting. Some RGB LEDs an Arduino embedded in the “cloud” stand the rocket sits on was a good start, and the landing pad inspired by SpaceX’s real autonomous spaceport drone ship Just Read the Instructions looks great all lit up.

But this is Starship we’re talking about, a vehicle that could literally push humanity towards being a multi-planet species. To do it justice, you’ve really got to knock it out of the park. So [Chris] found a magnetic levitation module online that could support a few hundred grams, and set to work on making his plastic Starship actually hover over the landing pad.

As you might imagine, it was a bit tricky. The first versions of the rocket looked great but came out too heavy, so he switched over to printing the model in so-called “spiral vase mode” which made it entirely hollow. Now far lighter and with a magnetic plate fit into the bottom, it was stable enough to float on its own. For the final touch, [Chris] added some red LEDs and a coin cell battery to the base of the Starship so it looks like the sleek craft is performing a last-second landing burn with its “impossible” full-flow staged combustion engines.

This isn’t the first time we’ve seen a model rocket with an electronic glowing cloud under it, but it’s certainly the first one we’ve seen that could levitate in mid-air. While this little rocket might not make it all the way to Mars, we wouldn’t be surprised to see it touching down on the desks of other hackers and makers in the near future.

Continue reading “Levitating Starship Model Comes In For A Landing”

$200 Resin Printer Reviewed

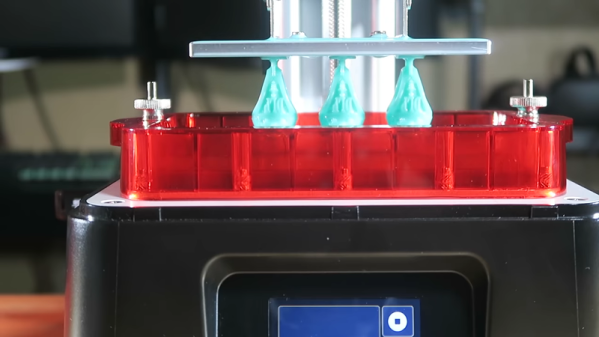
[3DPrintFarm] got an early version of the Phrozen Sonic Mini resin printer. If you look at the video below, he was very impressed with its build quality and results. The price is reported to be $200, although we have seen it on some web sites for a bit more. The build quality does look good, although you have to admit, the motion mechanism on a resin printer is pretty simple, since you just need to move up and down.

The printer uses a monochrome LCD which allows it to cure layers very fast (apparently, monochrome panels pass more ultraviolet light through). The panel also has a higher-rated lifetime than color LCDs

Continue reading “$200 Resin Printer Reviewed”

Automatic Component Tape Cutter For When Your Electronics Kit Hits The Big Time

Even for the simplest of products, production at scale can be big challenge. For example, you might find yourself spending many hours manually counting and cutting strips of component tape to go with the DIY electronics kit your selling on Tindie. [Tom Keddie] found himself in similar position some time ago, and built himself an automated component counter and tape cutter.

[Tom] posted the video of his old machine (see it after the break) after a call for help from another Twitter user who found himself with a lot of component strips to cut. The frame of the machine is made from 20×20 aluminium extrusions and laser cut plexiglass. The tape is pulled off the reel by a stepper motor using a 3D printed sprocket, with the tape held on by Lego wheel and tension spring. A second idler sprocket with tensioner is used to guide the tape through two photo-interrupters that can count holes in opaque tape or the components in clear tape. The cutter itself it an Exacto blade mounted on a wooden block in a guillotine-like arrangement, driven by another stepper motor and a threaded rod as lead screw. Everything is of course controlled by an Arduino. Although not used any more, [Tom] says it worked very well in its day.

The availability of cheap laser cutting, 3D printing and components like aluminium extrusions and stepper motors have really made it possible for anyone to add some automation to production in the home workshop. You won’t be surprised that we’ve seen something like this before, but we’ve also seen similar machines for wiring prep and through-hole resistors. Let us hear your production hacks in the comments, or drop us a tip if you’ve documented it!

Continue reading “Automatic Component Tape Cutter For When Your Electronics Kit Hits The Big Time”