Solar-powered pendant chirps like a bird.

BEAM Bird Pendant Really Chirps

[NanoRobotGeek] had a single glorious weekend between the end of the term and the start of exams. Did they buy a keg and party it up? No, in fact, quite the opposite — they probably gained a few brain cells by free-form soldering this beautiful chirping bird pendant at 0603 instead.

Three versions of basically the same circuit.
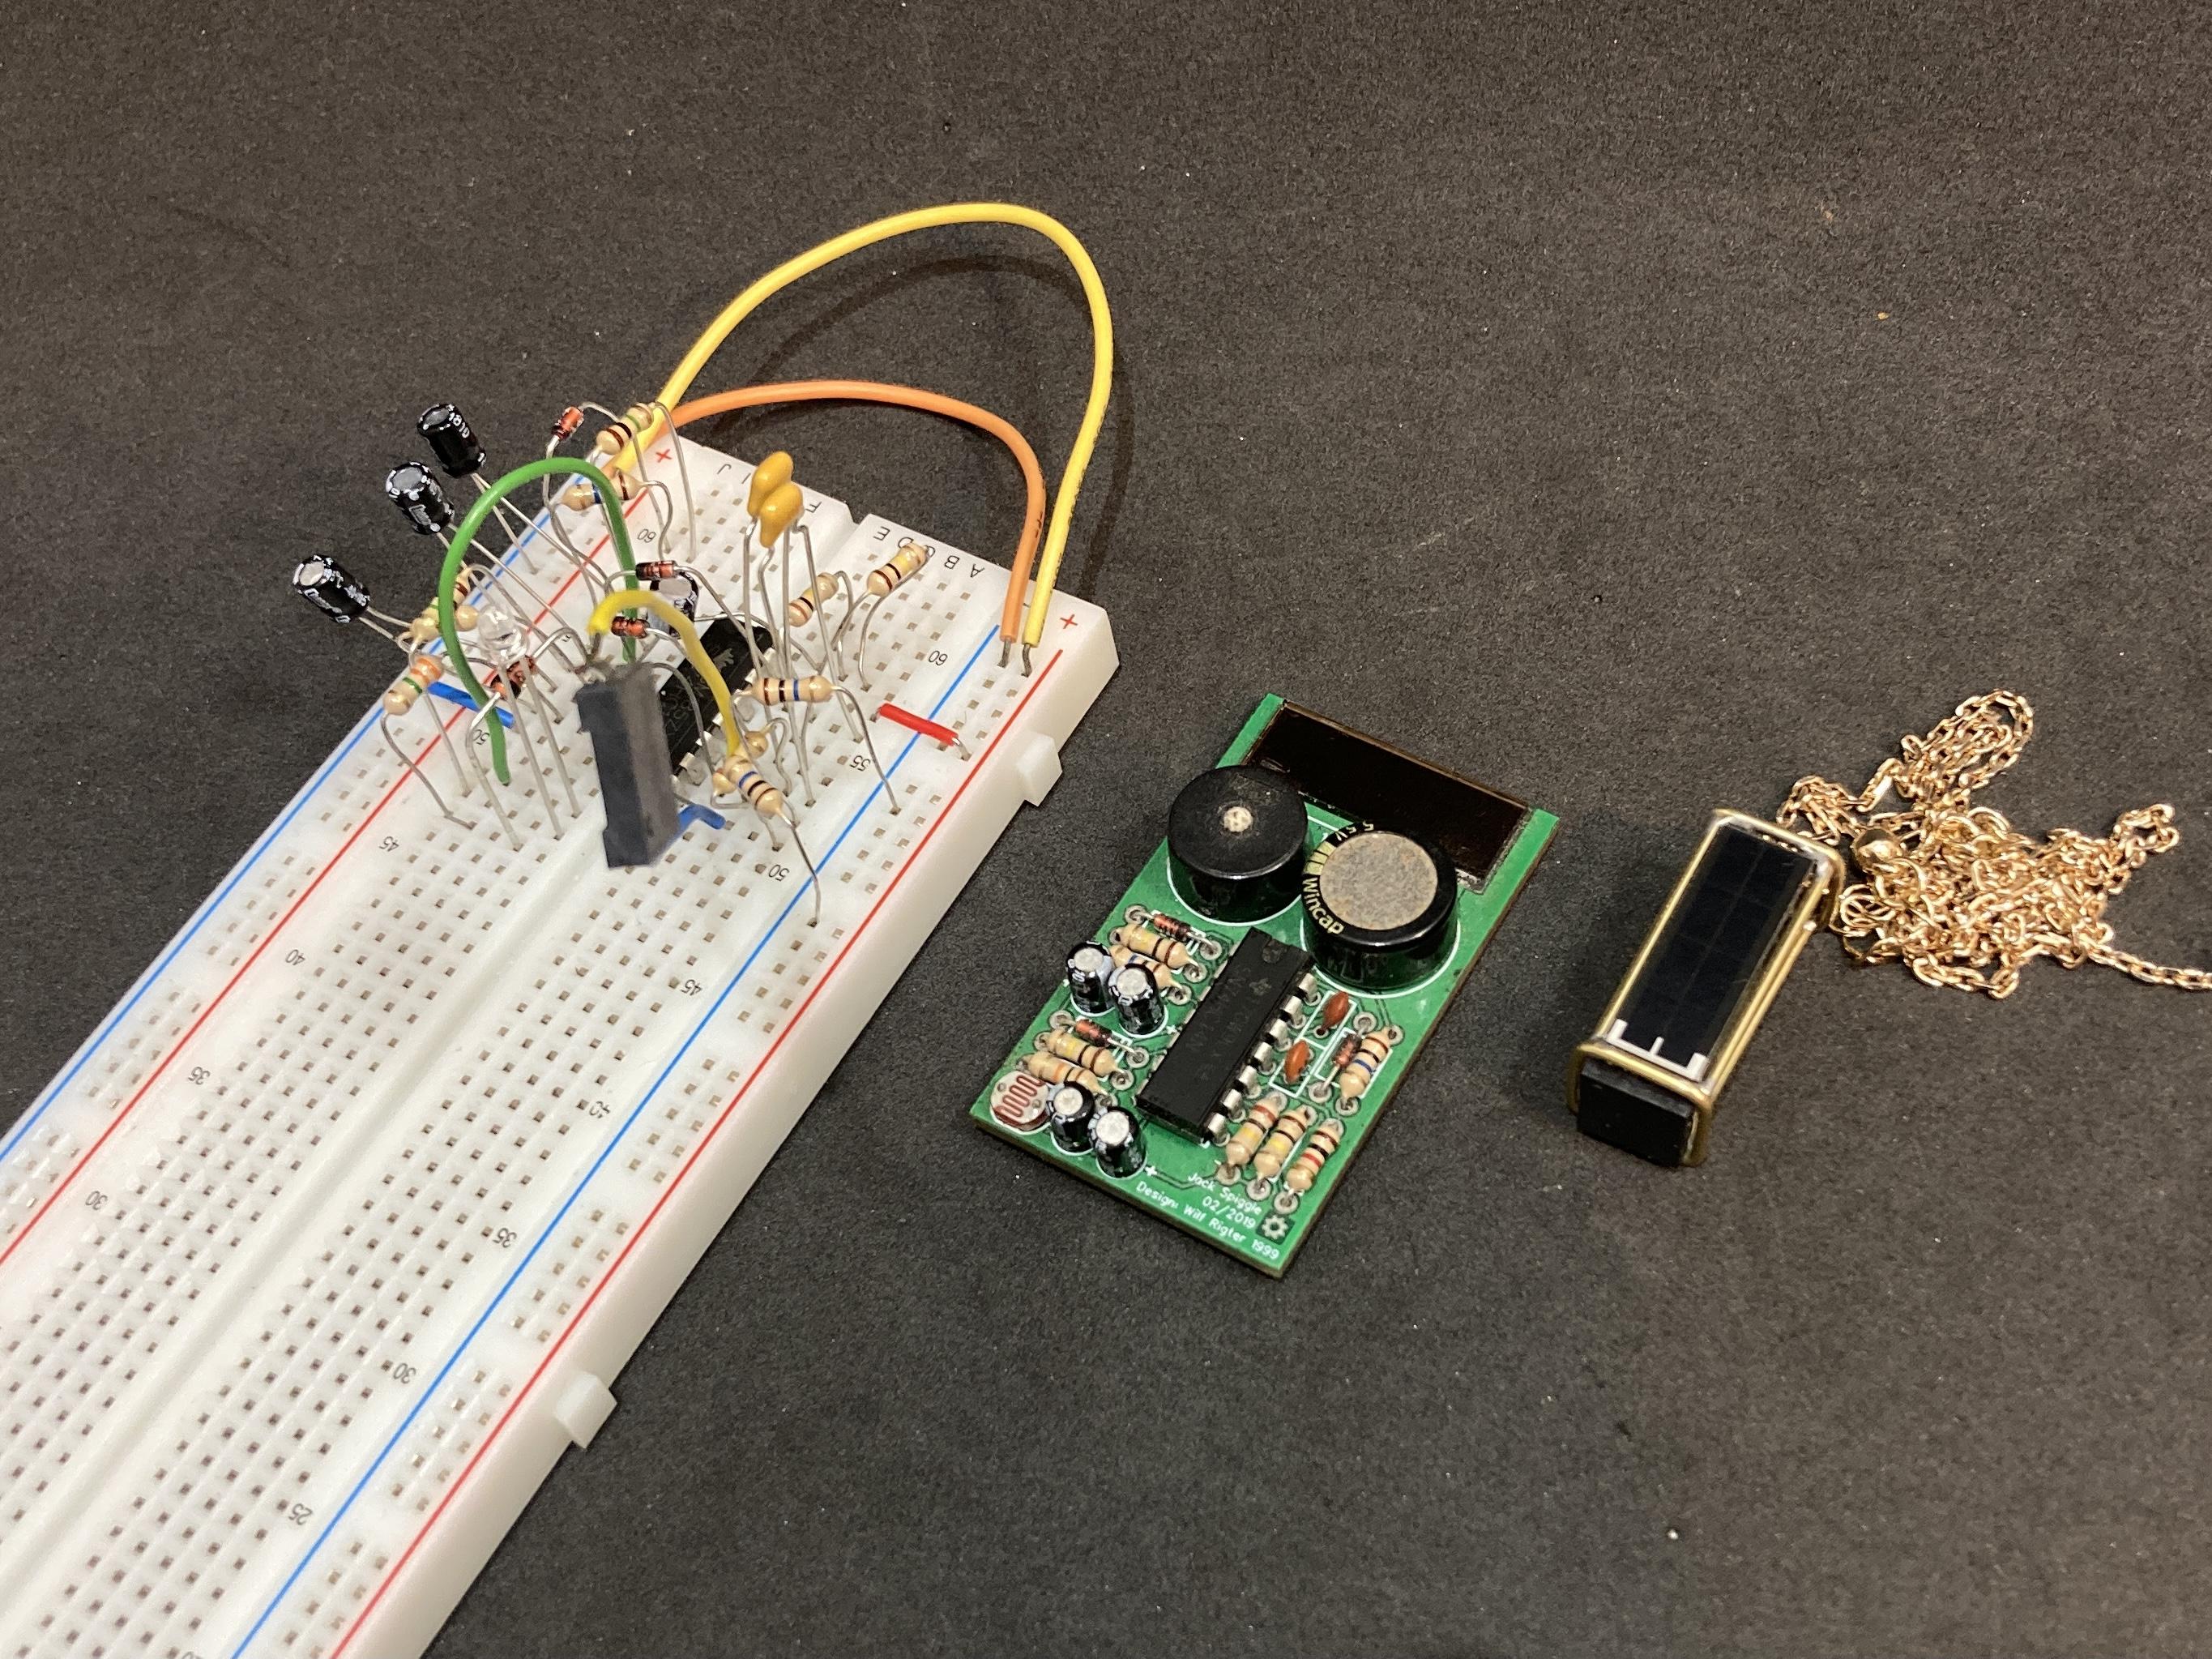
The circuit is a standard BEAM project built around a 74HC14, but [NanoRobotGeek] made a few changes to achieve the ideal chirp sound. As you can see in the video after the break, it chirps for around 30 seconds and then shuts off for 1-2 minutes before starting up again.

What is better than a BEAM project? A portable one, we say. Although the chirping would probably get old pretty quickly, there’s just no substitute for working so small that you can carry it around your neck and show it off.

This one is kind of a long time coming, because [NanoRobotGeek] started by breadboarding the circuit and then made a PCB version way back in 2019, which they were attempting to miniaturize with this project. We think they did a fantastic job of it, and the documentation is stellar if you are crazy enough to attempt this one. You will need a lot of blu tack and patience, and pre-tinning is your friend. Be sure to check out the demo after the break.

The name checks out, and this isn’t [NanoRobotGeek]’s first foray into tiny circuit sculpture — just take a look at all we’ve covered.

Continue reading “BEAM Bird Pendant Really Chirps”

Light-Tracking BEAM Robot Can See The Light

BEAM robotics, which stands for Biology, Electronics, Aesthetics, and Mechanics, is an ethos that focuses on building robots with simple analog circuits. [NanoRobotGeek] built a great example of the form, creating a light-tracking robot that uses no batteries and no microcontrollers.

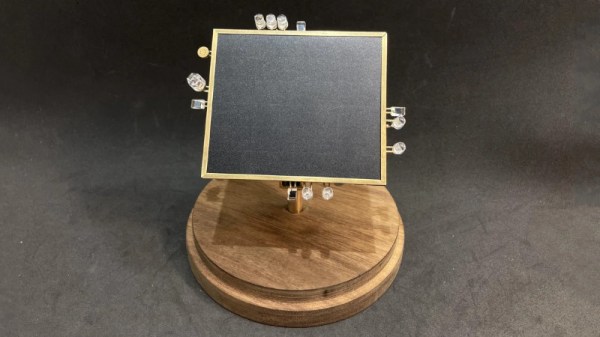
The robot aims to track the brightest source of light it can see. This is achieved by feeding signals from four photodiodes into some analog logic, which then spits out voltages to the two motors that aim the robot, guiding it towards the light. There’s also a sound-detection circuit, which prompts the robot to wiggle when it detects a whistle via an attached microphone.

The entire circuitry is free-formed using brass wire, and the result is an incredibly artful build. Displayed in a bell jar, the build looks like some delicate artifact blending the past and future. Neither steampunk nor cyberpunk, it draws from both with its combination of vintage brass and modern LEDs.

It’s a great build that reminds us of some of the great circuit sculptures we’ve seen lately. Video after the break.

Continue reading “Light-Tracking BEAM Robot Can See The Light”

Three-Dimensional Design Yields Compact Seven-Segment Hex Displays

Computers, from the simplest to the most complex, aren’t very useful if they can’t provide feedback to a user. Whether that interface takes the form of a monitor, a speaker, or a simple LED, there’s almost always some kind of output. One of the most ubiquitous is the ever-present seven-segment display. They’re small, they’re easy to use, and, perhaps most important, they’re cheap.

While the displays themselves are relatively compact, they often require some sort of driver circuitry — something that translates a digit into voltage at the correct pins. These drivers can take up valuable space, especially on a breadboard, and can sometimes make using seven-segment displays cumbersome. Thankfully, [John Lonergan] has a great solution: driver boards that sit completely beneath the displays. His dual seven-segment hex display project was born out of necessity — he needed it for the breadboard CPU SPAM-1, which was getting a bit too bulky. Each module is two seven-segment displays atop a small PCB. Beneath the displays lives an 8-bit PIC microcontroller, which acts as a driver for both of the displays.

It’s so easy to restrict ourselves to thinking in two dimensions when working on electronic design — even designing multilayer PCBs often feels like working on several, distinct two-dimensional areas rather than one three-dimensional one. The concept of stacking components to save space, while fairly straightforward to implement, is a great example of the kind of problem-solving we love to see here at Hackaday. Of course, if you like the idea of 3D circuit design, you have to check out some of these incredible circuit sculptures we’ve featured in the past.

Continue reading “Three-Dimensional Design Yields Compact Seven-Segment Hex Displays”

Copper tubes formed by 3D printed press dies

Can 3D Printed Press Tools Produce Repeatable Parts?

When we think of using a press to form metal we think of large stamps with custom made metal dies under unimaginable hydraulic pressure. It’s unlikely we’d e think of anything 3D printed. And in a commercial environment we’d be right. But your average garage hacker is far more likely to have access to a bench vise and a 3D printer. It’s in this context that [The Shipping Container Garage] has spent considerable time, effort, and money perfecting a process for pressing copper parts with 3D printed dies, which you can watch below the break.

In the quest to make a custom intake manifold for his project car, [The Shipping Container Garage] first made 3D printed jigs for cutting out a manifold flange that bolts to the cylinder head. It’s a process he calls Analog CNC, as all the cutting is done by hand.

Buoyed by his success, he proceeded with the next step: making manifold runners. His metal of choice was copper. While softer than many metals such as steel, he found it too hard. In the video, he describes his method for annealing the copper. Once cooled, two 3D printed dies are pressed into the copper tubes to progressively shape them. Watch the video to find out one of the neatest details of the die itself: how he gets it out!

Of course no matter how clever this all is, it’s useless if it produces poor results. And that’s where the most astounding part of the build is: The parts are all the same within 0.006 inches (0.15mm) of each other, and the parts fit the manifold flange they were made for. Additionally, the die can be used for the duration of the project at hand. For low volume production, this appears to be a viable method. It’ll be interesting to see what others do to iterate these processes to even more advanced stages.

You may also like to see 3D printing used in leather working and in jigs for beautiful circuit sculptures. A big thanks to [JapanFan] for the tip! If you have your own pressing hacks to share, let us know via the Tip Line!

Continue reading “Can 3D Printed Press Tools Produce Repeatable Parts?”

Hackaday Links Column Banner

Hackaday Links: September 26, 2021

Dealing with breakdowns is certainly nothing new for drivers; plenty of us have had our ride die in mid-flight, and experienced the tense moment when it happens in traffic. But the highly integrated and instrumented nature of the newest generation of electric vehicles can bring an interesting twist to the roadside breakdown, if the after-action report of a Tesla driver is any indication.

While driving on a busy road at night, driver [Pooch] reports that his Tesla Model S started beeping and flashing warnings to get to the side of the road right away. [Pooch] tried to do so, but the car died, coasted to a stop in the middle of the road, and engaged the parking brakes. The bricked Tesla would have been a sitting duck in the middle of the road but for a DOT crew who happened to be nearby and offered to provide some protection while [Pooch] waited for help. The disturbing part was the inability to get the car into any of the service modes that might let it be pushed off to the shoulder rather than stuck in traffic, something that’s trivial to do in ICE vehicles, at least older ones.

In other electric vehicle news, Chevy Bolt owners are turning into the pariahs of the parking garage. General Motors is telling Bolt EV and EUV owners that due to the risk of a battery fire, they should park at least 50 feet (15 meters) away from other vehicles, and on the top level of any parking structures. There have been reports of twelve battery fires in Bolts in the US recently, which GM says may be due to a pair of manufacturing defects in the battery packs that sometimes occur together. GM is organizing a recall to replace the modules, but isn’t yet confident that the battery supplier won’t just be replicating the manufacturing problem. The social distancing rules that GM issued go along with some fairly stringent guidelines for charging the vehicle, including not charging overnight while parked indoors. With winter coming on in the northern hemisphere, that’s going to cause a bit of inconvenience and probably more than a few cases of non-compliance that could end in tragedy.

Fans of electronic music might want to check out “Sisters with Transistors”, a documentary film about some of the pioneering women of electronic music. Electronic music has been around a lot longer than most of us realize, and the film reaches back to the 1920s with Theremin virtuoso Clara Rockmore, and continues on into the 1980s with Laurie Spiegel, whose synthesizer work has been speeding away from Earth for the last 44 years on the Golden Records aboard the Voyager spacecraft. Hackaday readers will no doubt recognize some of the other women featured, like Daphne Oram and Delia Derbyshire, who cobbled together the early Dr. Who music with signal generators, tape loops, and random bits of electronics in the pre-synthesizer days of the early 60s. We’ve watched the trailer for the film and it looks pretty good — just the kind of documentary we like.

We’re big fans of circuit sculpture around here, and desperately wish we had the patience and the skill to make something like Mohit Bhoite or Jiri Praus can make. Luckily, there’s now a bit of a shortcut — Geeek Club’s Cyber Punk PCB Construction Kit. These kits are a little like the love child of Lego and PCBWay, with pieces etched and cut from PCB stock. You punch the pieces out, clean up the mouse bites, put Tab A into Slot B, and solder to make the connection permanent. Each kit has some components for the requisite blinkenlight features, which add to the cool designs. Looks like a fun way to get someone started on soldering, or to build your own skills.

And finally, another nail was driven into the coffin of Daylight Savings Time this week, as the island nation of Samoa announced they wouldn’t be “springing ahead” as scheduled this weekend. Daylight Savings Time has become a bone of contention around the world lately, and mounting research shows that the twice-yearly clock changes cause more trouble than they may be worth. In Europe, it’s due to be banned as soon as all the member nations can agree on normal time or summer time.

In the case of Samoa, DST was put into effect in 2010 on the assumption that it would give plantation workers more productive hours in the field and save energy. Instead, the government found that the time change just gave people an excuse to socialize more, which apparently upset them enough to change the rule. So there you have it — if you don’t like Daylight Savings Time, start partying it up.

Wood And Brass Drink Temperature Monitor Looks Good, Has Class

We’ve all been there. Your current project has hit a wall, or the next step will take days to complete, and you need something to do in the meantime. So you start a project that you envision will fit nicely in the gap, and then, inevitably, it doesn’t. Maybe it even takes so long that the original project gets finished first. So what? There’s nothing wrong with that, especially when the filler project turns out as well as this drink temperature monitor disguised as a circuit sculpture (video, embedded below). Just put your mug on the coaster, and the weight of it activates a hidden switch, which causes the sculpture to display its secret LEDs.

[MakeFunStuff] wanted to make something that looked less like a circuit and more like art, while building a tool that could determine the relative hotness of a beverage. Such a a useful circuit sculpture sounds like a tall order to us, but [MakeFunStuff] pulled it off with finesse and style.

The circuit is based around this Sputnik-looking standalone IR temperature sensor which, as [MakeFunStuff] aptly describes, is “a single-pixel infrared camera that picks up everything in a 90° cone starting at the sensor.”

[MakeFunStuff] paired this easy-to-use sensor with an Arduino Nano and five LEDs that show how hot a beverage is on a scale from 1 to 5. The sensor is hidden in plain sight, suspended from the top of the brass rod sculpture and blending in perfectly. We love that the LEDs are hidden behind a thin layer of carefully-drilled wood and agree that a drill press would have been much easier.

The code is set up for just about every temperature scale from Celsius to Rømer, so that solves that argument. [MakeFunStuff] went with the Kelvin scale because science. Our favorite thing about this video is that [MakeFunStuff] shared their failures and fixes as they built their way toward answering the questions of how to suspend the sensor over the drink, and how best to display the heat level while hiding the electronics. Go grab a hot cup of something and check it out after the break while you let it cool off the normie way.

We admit that we would likely zone out while waiting for the LEDs to disappear. Here’s a smart coaster that uses an ESP8266 to send a message to Discord when your beverage has reached the perfect drinking temperature.

Continue reading “Wood And Brass Drink Temperature Monitor Looks Good, Has Class”

BEAM-Powered, Ball-Flinging Beam Has Us Beaming

We have a soft spot for BEAM projects, because we love to see the Sun do fun things when aided by large capacitors. [NanoRobotGeek]’s marble machine is an extraordinary example — once sufficiently charged, the two 4700 μF capacitors dump power into a home-brew solenoid, which catapults the ball bearing into action toward the precipice of two tracks.

[NanoRobotGeek] started with the freely-available Suneater solar circuit. It’s a staple of BEAM robotics, slightly modified to fit the needs of this particular project. First up was verifying that the lever (or beam, if you will) principle would work at all, and [NanoRobotGeek] just built it up from there in admirable detail. The fact that it alternates between the swirly track and the zigzag track is entrancing.

There are several disciplines at play here, and we think it’s beautifully made all around, especially since this was [NanoRobotGeek]’s first foray into track bending. We love the way it flings the ball so crisply, and the track-changing lever is pretty darn satisfying, too. You can check it out in action in the video after the break.

Although this was [NanoRobotGeek]’s maiden marble track, it’s not their first circuit sculpture — check out this flapping, BEAM-powered dragonfly.

Continue reading “BEAM-Powered, Ball-Flinging Beam Has Us Beaming”