A LIDAR Scanner Build In Glorious Detail

LIDAR is a very exciting technology that is only just now starting to become accessible to the DIY market. Think radar, but with lasers. There’s a few different modules starting to pop up for just a few hundred dollars. But what is one to do with a LIDAR module? Well, [David] decided to build a room scanner with his Garmin LIDAR Lite, and it’s a wonderful sight to behold.

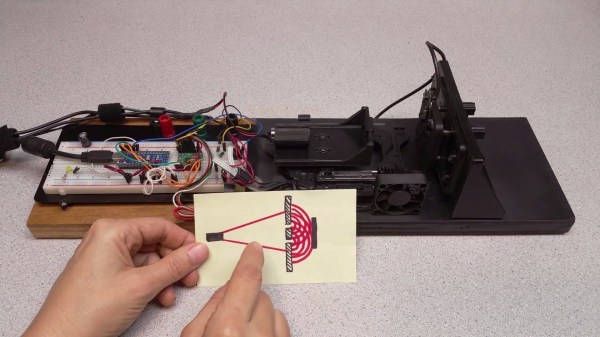
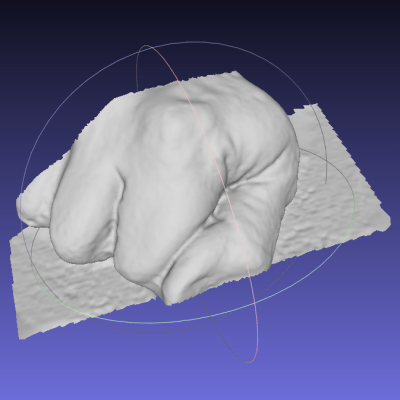
The scanner consists of a rotating platform, which is driven by a stepper motor. The platform then contains a second motor which runs a tilt axis, upon which the LIDAR is mounted. By aiming the LIDAR in various directions, and recording the detected range, it’s possible to build a point cloud representation of the surrounding area.

The build uses a couple of STM32 chips to do motor control and interface with the LIDAR, but where this build really shines is the mechanical side of things. [David] goes into serious detail about the machining of the parts that make up the rotating system, and there’s plenty of cool bits and pieces like slip rings to make it all work. There’s even some home casting going on here! Be warned, though: there’s some rather juicy close-ups of lathes in action, so put the kids to bed before watching this one all the way through.

We love to see a well-executed build, and even more so when we get to watch the intricate details of how it came together. If you’re still looking for some more inspiration, we’ve seen other LIDAR room scanners before, too.

Bargain Bin Barcode Scanner Keeps Track Of Shopping Needs

For most people, a Post-It note or dry-erase board suffices to ensure that household consumables are replenished when they’re used up. But hackers aren’t like most people, so this surplus barcode scanner turned kitchen inventory manager comes as little surprise. After all, if something is worth doing, it’s worth overdoing.

[Brian Carrigan]’s project began with a chance discovery of an old barcode scanner in his local scrap store. Questions as to why we can never find bargains like a $500 scanner for six bucks aside, [Brian] took the scanner home for a bit of reverse engineering. He knew it used RS-232 but it had been unceremoniously ripped from its connectors, so identifying pins took some detective work. With power and data worked out and the scanner talking to a Raspberry Pi, [Brian] set about integrating it into Wunderlist,  a cloud-based list management app. Now when someone eats the last Twinkie, a quick scan of the package looks up the product name via an API call to the UPC database and posts it to Wunderlist. And we’ll bet the red laser beams bouncing around the kitchen make a great nightlight too.

With smartphone barcode reading apps, this might seem a bit like overkill, but we like it just the same. And if barcodes leave you baffled, check out our introduction to these studies in black and white that adorn just about everything.

Visible Light CT Scanner Does Double Duty

If you’ve ever experienced the heartbreak of finding a seed in your supposedly seedless navel orange, you’ll be glad to hear that with a little work, you can protect yourself with an optical computed tomography scanner to peer inside that slice before popping it into your mouth.

We have to admit to reading this one with a skeptical eye at first. It’s not that we doubt that a DIY CT scanner is possible; after all, we’ve seen examples at least a couple of times before. The prominent DSLR mounted to the scanning chamber betrays the use of visible light rather than X-rays in this scanner — but really, X-ray is just another wavelength of light. If you choose optically translucent test subjects, the principles are all the same. [Jbumstead]’s optical CT scanner is therefore limited to peeking inside things like slices of tomatoes or oranges to look at the internal structure, which it does with impressive resolution.

This scanner also has a decided advantage over X-ray CT scanners in that it can image the outside of an object in the visible spectrum, which makes it a handy 3D-scanner in addition to its use in diagnosing Gummi Bear diseases. In either transmissive or reflective mode, the DSLR is fitted with a telecentric lens and has its shutter synchronized to the stepper-driven specimen stage. Scan images are sent to Matlab for reconstruction of CT scans or to Photoscan for 3D scans.

The results are impressive, although it’s arguably more useful as a scanner. Looking to turn a 3D-scan into a 3D-print? Photogrammetry is where it’s at.

Continue reading “Visible Light CT Scanner Does Double Duty”

Four Pi Zeros, Four Cameras, One Really Neat 3D Scanner

Sometimes when you walk into a hackerspace you will see somebody’s project on the table that stands so far above the norm of a run-of-the-mill open night on a damp winter’s evening, that you have to know more. If you are a Hackaday scribe you have to know more, and you ask the person behind it if they have something online about it to share with the readership.

[Jolar] was working on his 3D scanner project on just such an evening in Oxford Hackspace. It’s a neatly self-contained unit in the form of a triangular frame made of aluminium extrusions, into which are placed a stack of Raspberry Pi Zeros with attached cameras, and a very small projector which needed an extra lens from a pair of reading glasses to help it project so closely.

The cameras are arranged to have differing views of the object to be scanned, and the projector casts an array of randomly created dots onto it to aid triangulation from the images. A press of a button, and the four images are taken and, uploaded to a cloud drive in this case, and then picked up by his laptop for processing.

A Multi-view Stereo (MVS) algorithm does the processing work, and creates a 3D model. Doing the processing is VisualSFM, and the resulting files can then be viewed in MeshLab or imported into a CAD package. Seeing it in action the whole process is quick and seamless, and could easily be something you’d see on a commercial product. There is more to come from this project, so it is definitely one to watch.

Four Pi boards may seem a lot, but it is nothing to this scanner with 39 of them.

Old Scanner Finds New Life In DIY PCB Fab

Cheap, high-quality PCBs are truly a wonder of our age. That a professionally fabricated board with silkscreen and solder mask can be ordered online and delivered to your door has lowered the bar between a hobbyist project and a polished product. But the wait can be agonizing, and it can throw a wrench into the iterative design process. What to do?

[Andras Kabai] knows the answer to that, and this former flatbed scanner turned into a UV exposer is the centerpiece of his DIY board fab. The old Mustek scanner was a couple of bucks secondhand, and provided not only the perfect form-factor for a board scanner but a trove of valuable parts to reuse. [Andras] replaced the original fluorescent light bar with a long, narrow PCB stuffed with UV LEDs, and added an Arduino Mega to control the original stepper drive. The project looks like it went through a little feature creep, with an elaborate menu system and profiles that include controls for exposure time, the brightness of the LED array via PWM, and the length of board that gets exposed. It’s clearly a work in progress, but early results are encouraging and we’ll be watching to see how [Andras]’ in-house fab shapes up.

This approach to PCB fab is only one of many, of course. You can turn a budget 3D-printer into a PCB machine, or even use an LCD to mask the boards during exposure. The latter intrigues us — an LCD mask and a scanning UV light source could make for a powerful PCB creation tool.

Poor Man’s Laser Scanner Probably Won’t Shoot Your Eye Out, Kid

Yes, laser cutters that come off the slow boat from China are more affordable than ever, and with some tweaks and hacks they can turn out some decent results. But if you just want a laser lightshow that’ll draw boxes on your living room ceiling, this simple X-Y laser scanner might be a good platform to build.

Let’s say right up front that there are more than a few safety issues with [ThingEngineer]’s 3D-printed two-axis scanner. He’s well aware of these potential retina-cooking issues and duly notes that a good pair of laser safety goggles is a must and that the cheap anti-lawsuit glasses that laser module manufacturers often include with their products don’t count.

[Editor’s Note: Glasses are really only intended for alignment operations. Pros enclose lasers beyond a certain power to prevent anyone going blind. Know where your beam terminates, kids.]

With that in mind, there’s a lot to be said for this poor man’s scanner build. Yes, it would be faster with real galvos and low-mass mirrors, but time is money, and the steppers and craft store mirror discs do the job, albeit slowly. We like that everything is so simple, even the method for turning a regular mirror into a front-surface mirror.

[ThingEngineer] proves you don’t need galvanometers to have some simple laser fun. And if steppers don’t do it for you, you can try little brushed DC hobby motors or even 3D-printed cams.

Continue reading “Poor Man’s Laser Scanner Probably Won’t Shoot Your Eye Out, Kid”

Interference Scanner With Clear Instructions

Meticulous. Thorough. Exacting. These are all words we’d use to describe this video by [BrendaEM] about her Homemade 3D Optical Interference Scanner which can be seen after the break. The scanner uses 3D-printed parts and repurposed materials you might find lying around in your spare parts bin. An old optical drive tray acts to move the laser-wielding sled while a stripped-out webcam is an optical sensor. Links to relevant files such as 3D models and Arduino sketches will be found in the video’s author section.

The principle of operation is demonstrated with a water analog in the video at 2:00 with waves in a plastic container. By creating two small apertures between a light source and a sensor, it’s possible to measure the light waves which make it through. [BrendaEM] uses some powerful visualization software to convert her samples into 3D models which look really cool and simultaneously demonstrate the wave nature of light.

On the left side of her device are the control electronics which don’t need any special coatings since light won’t pass over this area. For the right side, where coherent light is measured, to borrow a Rolling Stones lyric: no colors anymore, I want them to turn black. Even the brass strips with apertures are chemically darkened.

Most of the laser hacks here use lasers rather than measure them, like this Laser Clock and a Laser Projector.

Continue reading “Interference Scanner With Clear Instructions”