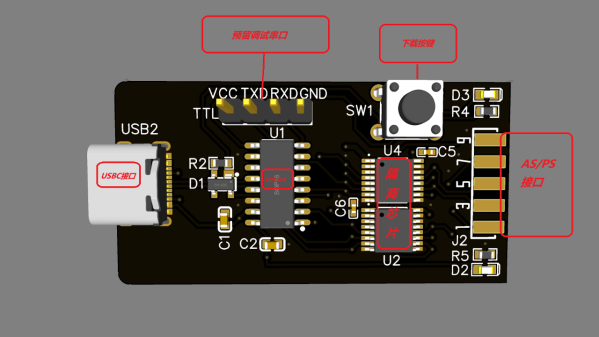
3D Printing With Clay, Thanks To Custom Extruder

When it comes to 3D printing clay, there are a lot of challenges to be met. An extruder capable of pushing clay is critical, and [davidsfeir] has an updated version suitable for an Ender 3 printer. This extruder is based on earlier designs aimed at delta printers, but making one compatible with an Ender 3 helps keep things accessible.

Lightly pressurized clay comes in via the clear tube. Air escapes out the top (motor side) while an auger homogenizes the clay and pushes it out the nozzle.

What’s special about a paste extruder that can push clay? For one thing, clay can’t be stored on a spool, so it gets fed into the extruder via a hose with the help of air pressure. From there, the clay is actually extruded with the help of an auger that takes care of pushing the clay down through the nozzle. The extruder also needs a way to deal with inevitable air bubbles, which it does by allowing air to escape out the narrow space at the top of the assembly while clay gets fed downward.

[davidsfeir] was greatly inspired by the work of clay-printing pioneers [Piotr Waśniowski] and his de-airing clay extruder, and [Jonathan Keep], who has documented 3D printing with clay comprehensively in a freely-available PDF. You can check out more of [david]’s designs on his Instagram page.

There are so many different aspects to printing with clay or clay-like materials that almost every part is ripe for innovation. For example, we’ve seen wild patterns result from sticking a thumping subwoofer under a print bed.

Start Your Semiconductor Fab With This DIY Tube Furnace

Most of us are content to get our semiconductors from the usual sources, happily abstracting away the complexity locked within those little epoxy blobs. But eventually, you might get the itch to roll your own semiconductors, in which case you’ll need to start gearing up. And one of the first tools you’ll need is likely to be something like this DIY tube furnace.

For the uninitiated, [ProjectsInFlight] helpfully explains in the video below just what a tube furnace is and why you’d need one to start working with semiconductors. Perhaps unsurprisingly, a tube furnace is just a tube that gets really, really hot — like 1,200° C. In addition to the extreme heat, commercial furnaces are often set up to seal off the ends of the tube to create specific conditions within, such as an inert gas atmosphere or even a vacuum. The combination of heat and atmospheric control allows the budding fabricator to transform silicon wafers using chemical and physical processes.

[ProjectsInFlight]’s tube furnace started with a length of heat-resistant quartz glass tubing and a small tub of sodium silicate refractory cement, from the plumbing section of any home store. The tube was given a thin coat of cement and dried in a low oven before wrapping it with nichrome wire. The wrapped tube got another, thicker layer of silicate cement and an insulating wrap of alumina ceramic wool before applying power to cure everything at 1,000° C. The cured tube then went into a custom-built sheet steel enclosure with plenty of extra insulation, along with an Arduino and a solid-state relay to control the furnace. The video below concludes with testing the furnace by growing a silicon dioxide coating on a scrap of silicon wafer. This was helped along by the injection of a few whisps of water vapor while ramping the furnace temperature up, and the results are easily visible.

[ProjectsInFlight] still needs to add seals to the tube to control the atmosphere in there, an upgrade we’ll be on the lookout for. It’s already a great start, although it might take a while to catch up to our friend [Sam Zeloof].

Continue reading “Start Your Semiconductor Fab With This DIY Tube Furnace”

Cyberdeck on a table

2023 Cyberdeck Challenge: Modular Cyberdeck Creation Kit

We were fortunate to run into [Sp4m] at DEFCON31 and see his Modular Cyberdeck Creation Kit in person. In fact, he was wearing it around the hallways like a rogue decker in search of fellow runners. Holding the unit feels like a serious tool because of its weight, mainly from the battery. Everything hangs from a single-point sling on a metal handle, probably from the cabinetry aisle, and we could move silently and comfortably. The sling is firearm-rated, which is appropriate since he has a printed Weaver rail on top. It just needs a flashlight/laser combo.

[Sp4m] aims to create printable parts that combine any on-hand materials into a usable cyberdeck. In this iteration, he uses a wired Apple keyboard and trackpad he found in the trash, so we have to assume he works in IT. Most of the trackpad is covered, but enough is accessible to scroll and maneuver the mouse, saving almost six inches. The Steam deck is the current head but is removable so that this hardware collection can work for many USB-C tablets without fuss.

The eye-catching white/orange is no accident and may earn it a top spot in the Icebreaker category of the 2023 Cyberdeck Contest. The judges are currently deliberating, so keep an eye out for an announcement about the winners shortly.

Decompiling Sonic Runners

Usually, when you hear about games being decompiled and rebuilt, the games are often decades-old relics, loving and saved from the ravages of time. [MattKC] recently set out to decompile the 2015 game Sonic Runners.

The game was a 2D endless runner released on mobile platforms. Despite getting praise for the gameplay, it received mixed reviews for the pop-up ads and pay-to-play elements. A little over a year later, the game was discontinued. However, the game required a constant online connection, so once the servers were offline, it rendered the over five million downloads unplayable.

A team of developers worked to reverse engineer the server, and with a little bit of binary hacking, the client could be patched to connect to a community-hosted server instead. However, as phones with notched displays came out and suggestions for improvements stacked up, the community realized a new client would bring immense benefits. Compared to many decompilation projects, Sonic Runners was pretty easy as it uses Unity, which means most of the code is in C#. Unfortunately, the build of Unity used by the game is from 2012, meaning many of the tools designed for much later versions of Unity were inoperable.

However, one native code library called UnmanagedProcess was designed to confuse reverse engineering efforts. The library handled AES encryption and communication with the server. Luckily, the library was a later addition, and earlier versions of its functions still lingered in the C# code. Since an open source server already existed, it was trivial to validate the changes. Additionally, all the shaders were in OpenGL Shading Language (GLSL), which meant rewriting them in High-Level Shading Language (HLSL) and checking that they matched the original GLSL when building for Android.

Now the client has new game modes, no ads, and a proper offline mode. The community continues adding new features and refining the game, which is very satisfying. If you’re curious about reverse engineering, [Matthew Alt] can help you get started.

Continue reading “Decompiling Sonic Runners

Liberté, égalité, Fraternité: France Loses Its Marbles On Internet Censorship

Over the years we’ve covered a lot of attempts by relatively clueless governments and politicians to enact think-of-the-children internet censorship or surveillance legislation, but there’s a law from France in the works which we think has the potential to be one of the most sinister we’ve seen yet.

It flew under our radar so we’re grateful to [0x1b5b] for bringing it to our attention, and it concerns a proposal to force browser vendors to incorporate French government censorship and spyware software in their products. We’re sure that most of our readers will understand the implications of this, but for anyone not versed in online privacy and censorship  this is a level of intrusion not even attempted by China in its state surveillance programme. Perhaps most surprisingly in a European country whose people have an often-fractious relationship with their government, very few French citizens seem to be aware of it or what it means.

It’s likely that if they push this law through it will cause significant consternation over the rest of the European continent. We’d expect those European countries with less liberty-focused governments to enthusiastically jump on the bandwagon, and we’d also expect the European hacker community to respond with a plethora of ways for their French cousins to evade the snooping eyes of Paris. We have little confidence in the wisdom of the EU parliament in Brussels when it comes to ill-thought-out laws though, so we hope this doesn’t portend a future dark day for all Europeans. We find it very sad to see in any case, because France on the whole isn’t that kind of place.

Header image: Pierre Blaché CC0.

Random Access Memory From A Rotating Drum In A Bendix G15

When it’s the 1950s and you are tasked to design a computer system that features not only CPU registers but also a certain amount of RAM, you do not have a lot of options. At this point in time, discrete logic was the rule, and magnetic core memory still fairly new and rather expensive. This is where the rotating drum comes in, which is somewhat like a cross between an old-style cylinder record and a hard drive. In a recent [Usagi Electric] video, a 1950s Bendix G15 system is demonstrated, which features such a rotating drum device, alongside both tube-based circuits and newfangled diode-based circuitry.

Simplified diagram of a rotating drum random access memory unit, showing the read-erase-write process as the drum spins.

This particular unit was borrowed from the System Source museum, with the intent to restore it to a working condition. Part of this process involved figuring out the circuitry, which was made easy by the circuit schematic drawings that came with the original machine. According to the official brochure by the manufacturer, the ‘short lines’ that are intended for the CPU registers, the access time was less than 1 millisecond, which is pretty darn fast considering the era and the discrete CPU’s clock speed.

For the drum itself, however, popping the cover off the unit showed that it had suffered some damage that had resulted in the multiple heads contacting the surface. Despite this disappointment, it’s not the end of the restoration, however. The museum has one more Bendix G15 standing around, with a rotating drum unit that looks to be in mint condition. The damaged magnetic coating on the other rotating drum may conceivably be resurfaced, which if successful could provide new hope to a lot of retro systems out there that also use magnetic media, whether in drum or disk format.

Continue reading “Random Access Memory From A Rotating Drum In A Bendix G15”

Where Did Your PCB Go Wrong? KiRI Knows

When working on a PCB design in KiCad, it’s helpful that the files are all text and can easily be checked into Git or other source control. However, stepping back through the revisions to determine where precisely a trace got routed wrong can be tricky. [Leandro] started with a simple script that exported the KiCad project to an image for inspection — over time it grew into a full-blown visual diff tool named KiCad Revision Inspector (KiRI).

The primary mechanism exports the revisions of a KiCad 5, 6, or 7 project to SVG, which can then be compared via a handy onion skin view. As this is a tool written for those using KiCad, shortcuts are a huge part of the experience. A command line interface generates artifacts to view the diff in any web browser. As these outputs have the KiRI tooling baked in, it is relatively easy to archive the output as a build artifact and allow easy access to review design changes.

For the long-time reader, you might remember back in 2018 talked about another diffing tool called plotgitsch (which this KiRI uses for KiCad 5 projects). KiCad has grown significantly in the last five years. It might be time to update our tips to utilize Git better for your PCB designs.

Continue reading “Where Did Your PCB Go Wrong? KiRI Knows”