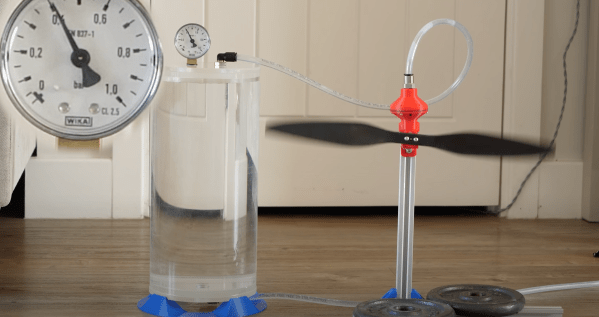
Control Theory Spellcasting Banishes The 3D Printing Ghosts

It seems as though we still can’t hit the ceiling on better control schemes for 3D Printers. Input Shaping is the latest technique to land on our radar, a form of resonance compensation that all but eliminates the ghosting (aka: vertical ringing) artifacts we see on the walls of printed parts. While the technique has been around for decades, only recently did [Dmitry Butyugin] both apply it to 3D printer control and merge their hard work into the open source firmware package Klipper. Once tuned, the results are simply astonishing–especially since this scheme can augment the print quality of even the most budget printer.

A Split A/B Test with and without Klipper’s Input Shaping feature courtesy of [@LukesLaboratory]
Assuming your 3D printer isn’t infinitely stiff, when your nozzle moves from point to point or changes direction, it vibrates in response to having its speed altered. The result is that the nozzle wobbles along the ideal path it’s trying to track. The result is ghosting, an aesthetic blemish that looks like vertical waves on the sides of your printed part.

Input Shaping is a feed-forward controls technique for cancelling the mechanical vibrations that create ghosting. The idea is that, if we wanted to move the machine from point to point, we send it two impulses. The first impulse kicks the machine into moving and the second impulse follows up at a precise time to cancel the vibrations we would see when the machine comes to a stop. Albeit, moving any machine by sending it two impulses is pretty crude, so we take these impulses, adjust their amplitudes so that they sum to 1, and convolve them with a control input signal that we’d actually like to send it. The result is that the resonance cancellation part of the signal seamlessly “mixes” into the control input signal, and the machine moves from point to point with significantly less vibration at the end of the travel move. For more info on the maths behind this process, have a look at the first four pages of this paper from [Singh and Singhose].

The only hiccup is that you need to do some up-front system characterization of your 3D Printer running Klipper before you can take advantage of this technique. Thankfully the Klipper update comes with a set of step-by-step instructions for characterizing your machine up-front. After a couple test prints to measure the periodicity of your ringing, you can simply apply your measurement results to your config file, and you’re set.

Input Shaping is a prime example of “just wrap a computer around it!“–fixing hardware by characterizing and cancelling unwanted behaviors with software. If you’re hungry for more clever, characterized hardware control schemes, look no further than this Anti-Cogging algorithm for BLDC Motors. And for a video walkthrough of the Klipper implementation, have a look at [eddietheengineer]’s breakdown after the break.

Does your 3D Printer run Klipper? We’d love to see some of your Input Shaping results in the comments.

Continue reading “Control Theory Spellcasting Banishes The 3D Printing Ghosts”

XChange Promises Inexpensive Tool Changes For 3D Printers

[Teaching Tech] has been interested in adding a tool changer to his 3D printer. E3D offers a system that allows you to switch print heads or even change out a hot end for a laser or a (probably) light-duty CNC head. The price of the entire device, though, is about $2,500, which put him off. But now he’s excited about a product from PrinterMods called XChange. This is a kit that will allow rapid tool changes on many existing printers and costs quite a bit less. Preorder on KickStarter is about $150, but that probably won’t be the final price.

Not all printers are compatible. It appears the unit attaches to printers that have linear rails and there is an adapter for printers that have V rollers in extrusions. Supposedly, there is an adapter in the works for printers that use rods and bearings.

Continue reading “XChange Promises Inexpensive Tool Changes For 3D Printers”

Watch This Scaly Gauntlet’s Hypnotizing, Rippling Waves

[Will Cogley]’s mechanized gauntlet concept sure has a hypnotizing look to it, and it uses only a single motor. Underneath the scales is a rod with several cams, each of which moves a lever up and down in a rippling wave as it rotates. Add a painted scale to each, and the result is mesmerizing. This is only a proof of concept prototype, and [Will] learned quite a few lessons when making it, but the end result is a real winner of a visual effect.

The gauntlet uses one motor, 3D printed hardware, and a mechanical linkage between the wrist and the rest of the forearm. Each of the scales is magnetically attached to the lever underneath, which provides some forgiveness for when one inevitably bumps into something. You can see the gauntlet without the scales in the video, embedded below the break, which should make clear how the prototype works.

The scales were created with the help of a Mayku desktop vacuum former by making lightweight copies of 3D printed scales. Interestingly, 3D printing each scale with full supports made for a useful mold; there was no need to remove supports from underneath the prints, because they are actually a benefit to the vacuum forming process. When vacuum forming, the presence of overhangs can lead to plastic wrapped around the master, trapping it, but the presence of the supports helps prevent this. 3D prints don’t hold up very well to the heat involved in vacuum forming, but they do well enough for a short run like this. Watch it in action and listen to [Will] explain the design in the video, embedded below.

Continue reading “Watch This Scaly Gauntlet’s Hypnotizing, Rippling Waves”

Lidar House Looks Good, Looks All Around

A lighthouse beams light out to make itself and its shoreline visible. [Daniel’s] lighthouse has the opposite function, using lasers to map out the area around itself. Using an Arduino and a ToF sensor, the concept is relatively simple. However, connecting to something that rotates 360 degrees is always a challenge.

The lighthouse is inexpensive — about $40 — and small. Small enough, in fact, to mount on top of a robot, which would give you great situational awareness on a robot big enough to support it. You can see the device in action in the video below. Continue reading “Lidar House Looks Good, Looks All Around”

Remoticon Video: How To 3D Print Onto Fabric With Billie Ruben

We’re impressed to see the continued flow of new and interesting ways to utilize 3D printing despite its years in the hacker limelight. At the 2020 Hackaday Remoticon [Billie Ruben] came to us from across the sea to demonstrate how to use 3D printing and fabric, or other flexible materials, to fabricate new and interesting creations. Check out her workshop below, and read on for more detail about what you’ll find.

The workshop is divided into two parts, a hands-on portion where participants execute a fabric print at home on their own printer, and a lecture while the printers whirr away describing ways this technique can be used to produce strong, flexible structures.

The technique described in the hands on portion can be clumsily summarized as “print a few layers, add the flexible material, then resume the printing process”. Of course the actual explanation and discussion of how to know when to insert the material, configure your slicer, and select material is significantly more complex! For the entire process make sure to follow along with [Billie]’s clear instructions in the video.

The lecture portion of the workshop was a whirlwind tour of the ways which embedded materials can be used to enhance your prints. The most glamourous examples might be printing scales, spikes, and other accoutrement for cosplay, but beyond that it has a variety of other uses both practical and fashionable. Embedded fabric can add composite strength to large structural elements, durable flexibility to a living hinge, or a substrate for new kinds of jewelry. [Billie] has deep experience in this realm and she brings it to bear in a comprehensive exposition of the possibilities. We’re looking forward to seeing a flurry of new composite prints!

Fancy Filament Joiner Has Promise, But Ultimately Fails

[Proper Printing] has been trying to 3D print rims for his car for quite some time. However, the size of the print has led to problems with filament spools running out prior to completion. This led to endless headaches trying to join several smaller lengths of filament in order to make a single larger spool. After his initial attempts by hand failed, a rig was built to try and bring some consistency to the process. (Video, embedded below.)

The rig consists of a heater block intended to melt the ends of two pieces of filament so that they can be fused together. A cheap set of brass calipers was modified with a tube in order to form a guide for the filament, ensuring that it gets bonded neatly without flaring out to a larger size. Fan coolers are then placed either side of the heating area to avoid turning the whole filament into a hot mess.

Unfortunately, the rig simply didn’t work. The initial design simply never got the filament hot enough, with the suspicion being that heat was instead being dumped into the calipers instead of the filament itself. Modifications to reduce this sadly didn’t help, and in the end, more success was had by simply holding a lighter below a length of brass tube.

While the project wasn’t a success, there’s still value in the learning along the way. We can’t see any fundamental reason why such a rig couldn’t be made to work, so if you’ve got ideas on how it could be improved, sound off in the comments. We’ve seen other successful builds using hair straighteners in a relatively simple setup, too.

Continue reading “Fancy Filament Joiner Has Promise, But Ultimately Fails”

3D Printing With VHS Tape Filament

If you have a pile of old VHS tapes collecting dust in your attic or basement that you know you’ll never watch again, either because all of those movies are available on DVD or a streaming service, or because you haven’t had a working VCR since 2003, there might be a way of putting them to good use in another way. With the miles of tape available in just a few cassettes, [brtv-z] shows us how to use that tape as filament for a 3D printer.

The first step of the build is to actually create the filament. He uses a purpose-built homemade press to spin several tapes into one filament similar to how cotton or flax is spun into yarn. From there the filament is simply fed into the 3D printer and put to work. The tape filament needs to be heated higher than a standard 3D printer filament so he prints at a much slower rate, but the resulting product is indistinguishable from a normal print except for the color. It has some other interesting properties as well, such as retaining its magnetism from the magnetic tape, and being a little more brittle than PET plastic although it seems to be a little stronger.

While the VHS filament might not be a replacement for all plastic 3D prints, it’s still a great use for something that would likely otherwise head straight to the landfill. There are some other uses for this magnetic tape as well, like if you wanted to build a DIY particle accelerator.

Continue reading “3D Printing With VHS Tape Filament”