It’s an unwritten rule that all proper pieces of shop equipment need a nameplate. Otherwise, how are you going to know what name to use when you curse it under your breath? In the old days these would have been made out of something fancy such as brass, but for the modern hacker that doesn’t stand on tradition, you can now easily outfit all your gear with custom 3D printed nameplates using this online tool.
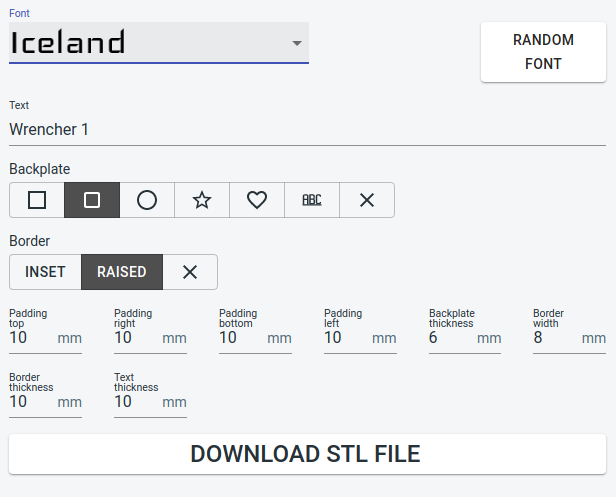 Granted, it wouldn’t be very difficult to throw one of these together in whatever CAD package you happen to have access to. But with the tool [Tobias Weber] has developed, you don’t have to. Simply pick the font, the shape of the border, and fill in a few variables to fine tune things such as padding and base thickness.
Finally, enter your text and marvel at the real-time 3D preview that’s rendered thanks to the magic of modern web technologies. In seconds, you’ll have an STL file that’s ready for the warm liquid goo phase.
The huge collection of fonts are a particularly nice touch, ranging from delicate scripts to military style stencils. Depending on your CAD software, getting arbitrary fonts imported and extruded into a three dimensional shape can be tricky for new players. If we do have one complaint though, it’s that there doesn’t seem to be a clear indicator of how big the nameplate is going to be when exported. First time around, it spit out an STL that would have been 300 mm long if we hadn’t scaled it down in the slicer.
This project is very reminiscent of another web-based tool we featured recently. That one allowed you to make 3D printed QR codes which would whatever entomb in plastic whatever data your cold hacker heart desired.
Continue reading “3D Printable Nameplates From Your Web Browser”