Arduino Pedometer Counts Your Steps

There’s a trend in corporate America that has employees wear a step counter — technically a pedometer — and compete in teams to see who can get the most number of steps. We wonder how many people attach the device to an electric drill and win the competition easily. However if you want to do your own measurements, [Ashish Choudhary] has plans for making a pedometer with an Arduino. The device isn’t tiny, but as you can see in the video below it seems to work.

For the extra size, you do get some features. For one, there is a 16×2 LCD display and an ADXL335 accelerometer, and you can probably imagine some other cool features for such a device.

Continue reading “Arduino Pedometer Counts Your Steps”

Space-Saving Servo Tester Console Looks Space-Worthy

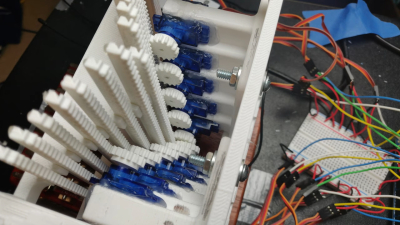
You know how it goes — sometimes you just have to stop in the middle of a project and build yourself a tool that vastly improves your workflow as soon as it’s completed. [Ikkalebob] aka [Will Cogley] on YouTube is working on some super secret project that requires a whole bunch of servos. And since all of them have to be tested and set, he built this adorable servo tester as a time-saving gift to himself.

This tester revolves around an Adafruit 16-channel servo driver and an Arduino Uno. The servos show up on the screen in groups of four, and can be tested four at a time with the pots. The buttons let [Ikkalebob] move up and down between the groups. The SainSmart LCD proved to be more difficult to set up than others, but [Ikkalebob] did you a solid and tweaked the library. It’s available along with his code and STLs.

Speaking of STLs, we really dig the mini NASA console look and the folding enclosure. Leveraging the print process to build hinges and other things is awesome, and so is getting away with using fewer fasteners. You can see a bit of how [Ikkalebob] designed it in the video after the break.

Depending on what you’re doing with servos, you might want a different kind of testing suite. Here’s one that’s geared toward RC pilots.

Continue reading “Space-Saving Servo Tester Console Looks Space-Worthy”

Arduino Wristwatch Has LED Hands

When you read “Arduino wristwatch”, you fall into the trap of envisioning an Arduino UNO clumsily strapped to someone’s wrist. [Marijo Blažević’s] creation is much more polished than that. A round circuit board holds two surface mount ICs and 12 LEDs. The whole thing looks nice fit snugly inside of a watch body. It isn’t a Rolex, but it does have considerable geek cred without being unwearable in polite company.

One IC is an AVR micro, of course. The other is a DS3231 real time clock with built-in crystal. A CR2032 keeps it all running. The main body, the outer ring, the bottom, and the buttons are 3D printed in PLA. The crystal and the band are the only mechanical parts not printed. The bill of materials shows a 36mm crystal and even provides links for all the parts.

You don’t want to run LEDs all the time because it is bad on the battery. When you press the button once, you get one of the LEDs to light to show the hours. Another press reads the minutes in units of 5 minutes. A third press shows you one of five LEDs to show how many minutes to add. For example, if the time is 9:26 you’d get LED 9 (hours), LED 5 for 25 minutes, and the third press would show LED 1 for 1 extra minute. If either of the minute indicators show 12 o’clock, that indicates zero minutes.

The exciting thing, of course, is that you can program it beyond the code on GitHub. Already it can tell time and display the temperature. You don’t have a lot of I/O, but you ought to be able to get some more options and maybe some flashy LED blinking patterns in if you try.

Baby’s First Jukebox Is Fun For Parents, Too

Believe it or not, there’s a $400 toy mp3 player out there for kids. It looks pretty nice, with colorful buttons and a wood console and all, but those features don’t really justify the price tag. [DerThes] wanted one for his 2-year-old anyway, so he made his own ruggedized version for a whole lot less.

The simple and kid-friendly interface lets [DerThes Jr.] choose from one of nine albums to play by pushing one of the candy-colored buttons. The bottom row of buttons handle play/pause and moving through the track list. When mom and dad get tired of listening to whatever the kids are into these days, they can enter the special god mode code to access 99 of their favorite albums.

This baby boombox is built with an Arduino Uno and an Adafruit music maker shield. [DerThes] etched his own PCB to hold the buttons and the pair of shift registers needed to interface them with the Uno. If you’ve never etched before, here’s a good chance to dip your toe in the ferric chloride, because [DerThes] has the transparency in his repo and a line on a nice instructional video.

If you don’t think your toddler is ready to respect a field of momentaries, you could make a jukebox with NFC blocks.

[via Arduino blog]

Hacking An Arduino NFC Reader With WebUSB

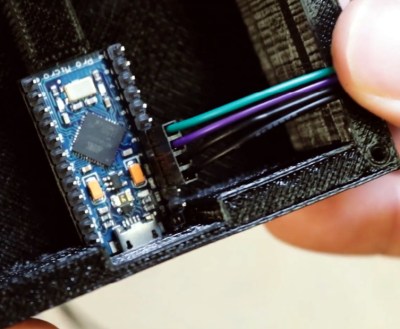
When [gdarchen] wanted to read some NFC tags, he went through several iterations. First, he tried an Electron application, and then a client-server architecture. But his final iteration was to make a standalone reader with an Arduino and use WebUSB to connect to the application on the PC.

This sounds easy, but there were quite a few tricks required to make it work. He had to hack the board to get the NFC reader’s interrupt connected correctly because he was using a Leonardo board. But the biggest problem was enabling WebUSB support. There’s a library, but you have to change over your Arduino to use USB 2.1. It turns out that’s not hard, but there’s a caveat: Once you make this change you will need the WebUSB library in all your programs or Windows will refuse to recognize the Arduino and you won’t be able to easily reprogram it.

Once you fix those things, the rest is pretty easy. The PC side uses node.js. If you back up a level in the GitHub repository, you can see the earlier non-Arduino versions of the code, as well.

If you want to understand all the logic that went into the design, the author also included a slide show that discusses the three versions and their pros and cons. He did mention that he wanted a short-range solution so barcodes and QR codes were out. He also decided against RFID but didn’t really say why.

NFC business cards are a thing. You can also use them to catch some public transportation.

LED Flame Illuminates The Beauty Of Noise

Have you ever wrapped up a nice blinky project only to be disappointed by the predictability of the light or the color patterns? When it came to lighting this LED candle, so was [fungus amungus]. But there’s a better way, and it involves noise.

Perlin noise was created in the early 80s by Ken Perlin while he was working on the movie Tron. Frustrated by the current state of computer graphics and too limited on space to use images, he devised an algorithm for generating natural-looking textures. Basically, you generate a bunch of numbers between 0 and 1, then assign values to those numbers, such as a range of greyscale values from black (0) to white (1), or the values from the color wheel. The result is much prettier than random numbers because the neighboring values for any given number aren’t radically different. You get nice randomness with hardly any overhead.

[fungus amungus] is using the FastLED’s noise function to generate the numbers, but there’s a whole lot more going on here. As he explains in the excellent video after the break, if you want to animate these values, you just add another dimension of them. Although [fungus amungus] is using a Trinket Pro and a NeoPixel ring, we think a simplified version could be done with a Circuit Playground Express using the built-in LEDs.

If you want to do it the hard way, start by making your own NeoPixel ring.

Continue reading “LED Flame Illuminates The Beauty Of Noise”

Circuit Sculpture Teaches Binary, Plays PONG

We sure wish we’d had a teacher like [Danko Bertović]. He built this beautiful circuit sculpture to teach his students how to count in binary and convert it to decimal and hexadecimal. If you don’t already know binary, you get to learn it on DIP switches and a dead-bugged ATMega328 in his latest Volos Projects video after the break. Lucky you!

Once the students have the hang of entering binary input on the switches, they can practice it on the four-banger calculator. This educational sculpture can also take text input and scroll it, but it takes a bit of work. You have to look up the ASCII value of each character, convert the decimal to binary, and program it in with the switches. There’s one more function on the menu — a one-player PONG game to help the students relax after a long day of flipping switches.

Funny enough, this project came to be after [Danko] came upon the DIP switch in his parts box and wasn’t quite sure what it was called. How great is it that he learned something about this part, and then used that knowledge to build this machine that uses the part to teach others? It’s surely the best fate that parts bin curiosities can hope for.

Don’t have the patience for circuit sculpture? You can make a pretty nice binary calculator with a bit of paper and a lot of compressed air.

Continue reading “Circuit Sculpture Teaches Binary, Plays PONG”