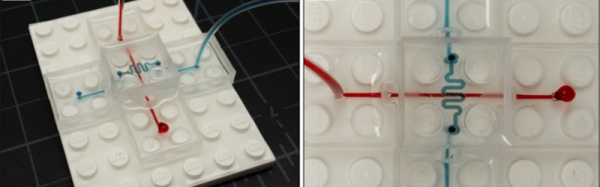
[Nurdrage] puts out a lot of neat videos, mostly about home chemistry. For the home chemist it is occasionally desirable to pull a vacuum. For example, a potentially dangerous chemical can be boiled and distilled at a much lower temperature than at atmospheric pressures.
However, there’s a problem with just going to the local import store and buying the first vacuum pump on the shelf. They are primarily designed for atmospheric gasses and tend to melt when exposed to solvents. If you’re a big university or a commercial lab this is no problem. You just drop three grand on a Teflon diaphragm pump or a liquid nitrogen trap. For the home chemist who’s already having enough trouble just buying the chemicals needed for neat experiments, this is not an option.
[Nurdrage] demonstrates the proper usage of a much cheaper option: an aspirator vacuum pump. You might remember something similar from high school chemistry. School pumps generally use flowing tap water to produce the vacuum. [Nurdrage] is saving water by using a fluid pump and a reservoir to drive his aspirator.
Aspirator pumps use the Venturi effect to create a vacuum. These devices are cheap because there are no moving parts. We looked it up and the one he is using costs ten US dollars on fleabay. It can pull enough vacuum to boil water below room temperature.
The video is really good and provides a lot of useful information. It also seems like a really useful device for other hacking tasks outside of home chemistry. Video after the break.
Film photography began with a mercury-silver amalgam, and ended with strips of nitrocellulose, silver iodide, and dyes. Along the way, there were some very odd chemistries going on in the world of photography, from ferric and silver salts to the prussian blue found in Cyanotypes and blueprints.
Cyanotypes are made by applying potassium ferricyanide and ferric ammonium citrate to some sort of medium, usually paper or cloth. This is then exposed via UV light (i.e. the sun), and whatever isn’t exposed is washed off. Instead of the sun, [David] is using a common UV laser diode to expose his photographs. he already has the mechanics of this printer designed, and he should be able to reach his goal of 750 dpi resolution and 8-bit monochrome.
Digital photography will never go away, but there will always be a few people experimenting with light sensitive chemicals. We haven’t seen many people experiment with these strange alternative photographic processes, and anything that gets these really cool prints out into the world is great news for us.
“I wasted a weekend learning why elemental bismuth is not commonly used for metal parts.“
It’s a fair assessment of his time spent growing unspectacular bismuth crystals, casting a bismuth cylinder that cracked, and machining bismuth only to be left with a very rough finish. But even though he admits the exercise was unsuccessful, he does provide us with a fascinating look at the physical properties of the element.
This is what [David] wanted to make. Alchemist-hp + Richard Bartz with focus stack. (Own work) [CC BY-SA 3.0], via Wikimedia Commons
Bismuth is one of those elements you pass by in your school chemistry lessons, it has applications in machining alloys and as a lead replacement but most of us have never knowingly encountered it in the real world. It’s one of the heavy metals, below antimony and to the right of lead on the Periodic Table. Curious schoolchildren may have heard that like water it expands on solidifying or that it is diamagnetic, and most of us have probably seen spectacular pictures of its crystals coated in colourful iridescent oxides.
It was a Hackaday story about these crystals that attracted [David] to the metal. It has a low enough melting point – 271.5 °C – that it can be liquified on a domestic stove, so mindful of his marital harmony should he destroy any kitchen appliances he bought a cheap electric ring from Amazon to go with his bismuth ingot. and set to work.
His first discovery was that cheap electric rings outdoors aren’t very effective metallurgy furnaces. Relocating to the kitchen and risking spousal wrath, he did eventually melt his bismuth and pick off the top layer once it had resolidified, to reveal some crystals.
These are the bismuth crystals he made.
Unfortunately for him, instead of spectacular colors and huge crystals, the sight that greeted him was one of little brilliance. Small grey crystals with no iridescence. It seems the beautiful samples are made by a very slow cooling of the liquid bismuth, followed by a quick pouring off of the remaining molten metal. Future efforts, he assures us, will involve sand-insulated molds and careful temperature monitoring.
Undeterred, he continued with his stock of bismuth and embarked on the creation of a cylinder. Early efforts with a clay mold resulted in cracked cylinders, so in desperation he cast the entirety of the metal in an aluminium baking tray and cut the resulting ingot to a rough piece of stock for turning.
Poor finish on machined bismuth.
With the bismuth in the lathe, he then came face to face with what he alluded to in his conclusion above, why machined bismuth parts aren’t something you’ll encounter. His cylinder came out with significantly rough patches on the surface, because bismuth is both crystalline and brittle. He suggests improvements could be made if the metal could be solidified with fewer crystals, but it’s obvious that elemental bismuth on its own is not a winner in the turning stakes.
We suggest you take a look at [David]’s write-up. It may be presented as a Fail of The Week here, but in fact it’s more of a succession of experiments that didn’t work than an unmitigated disaster. The result is an interesting and well-documented read that we’re sure most Hackaday readers will gain something from.
Fail of the Week is a Hackaday column which celebrates failure as a learning tool. Help keep the fun rolling by writing about your own failures and sending us a link to the story -- or sending in links to fail write ups you find in your Internet travels.
The blocks, which are called Multifluidic Evolutionary Components (MECs) appeared in the journal PLOS ONE. Each block in the system performs a basic lab instrument task (pumping fluids, making measurements or interfacing with a user, for example). Since the blocks are designed to work together, users can build apparatus — like bioreactors for making alternative fuels or acid-base titration tools for high school chemistry classes — rapidly and efficiently. The blocks are especially well suited for resource-limited settings, where a library of blocks can create a variety of different research and diagnostic tools.
The build is based on the designs described in the book “Build an EDM” by Robert Langolois. An EDM works by creating lots of little electrical discharges between an electrode in the desired shape and a material underneath a dielectric solvent bath. This dissolves the material exactly where the operator would like it dissolved. It is one of the most precise and gentle machining operations possible.
His EDM is built mostly out of found parts. The power supply is a microwave oven transformer rewired with 18 gauge wire to drop the voltage to sixty volts instead of the oven’s original boost to 1.5kV. The power resistor comes from a dryer element robbed from a unit sitting beside the road. The control board was etched using a hand traced schematic on the copper with a Sharpie.
The linear motion element are two square brass tubes, one sliding inside the other. A stepper motor slowly drives the electrode into the part. Coolant is pumped through the electrode which is held by a little 3D printed part.
The EDM works well, and he has a few example parts showing its ability to perform difficult cuts. Things such as a hole through a razor blade., a small hole through a very small piece of thick steel, and even a hole through a magnet.
Copenhagen Suborbitals just launched their latest amateur liquid fuel rocket. Why? Because they want to strap someone to a bigger amateur liquid fuel rocket and launch them into space.
We’ve covered them before, but it’s been a while. While they make a big deal of being amateurs, they are the least amateurish amateurs we’ve come across. We’ll forgive a lot as long as they keep making great videos about their projects. Or posting great pictures of the internals of their rockets.
The Nexø I rocket they recently launched claims to be the first guided, amateur, liquid-fueled rocket. There is a nice post on the guidance system. It was launched from a custom built barge off the shore of Denmark, which allows them to escape quite a few legal hurdles around the launch. The rocket flew beautifully. That is, it went only away from the ground; no other directions. Also, it didn’t explode, which is a lot to expect from even the biggest players in the field.
Copenhagen Suborbitals continues to do amazing work. Hopefully their next rocket will be even more impressive… for amateurs, that is.
Want to bring your fine antique furniture into the 21st century? Make it clear with transparent wood. That’s what [blorggg] is doing over on Hackaday.io, and it looks cool enough to have a some interesting and novel applications besides small, clear test pieces.
The recipe for transparent wood is surprisingly simple, and all the ingredients are readily available from a drug store or home supply store. First, the wood is soaked in a bath containing lye and sodium sulfite for several hours. The wood is then bleached in a bath of hydrogen peroxide. After this, the wood is transparent, but very weak. Infusing the wood with epoxy resin strengthens the wood.
We first heard about this process back in May when the the paper [blorggg] based his recipe on came to light. the lye and sodium sulfite are frequently used in the paper industry to dissolve the lignin in wood. By removing the lignin, the microscopic structure of a piece of wood becomes just a series of tubes and thin cell walls. After bleaching, adding the epoxy shores up the now exceptionally weak structure of a block of wood.
While the original researchers only made two pieces of transparent wood – end grain and cross grain basswood, inexplicably referred to as R-wood and L-wood – [blorggg] is taking this much further. He’s using plywood to great effect, and the process is simple enough to expand to woods a bit weirder than basswood. If you have some scrap walnut, burl, or some exotic wood, this might be something to try out.