AT-ST High Chair Elevates Lucky Jedi Youngling

As a new parent, there’s lots you have to do. You have to buy a car seat, get the baby’s room ready, figure out daycare; all the boring but unavoidable minutiae of shepherding a tiny human. But for the more creative types, that list might include warming up the 3D printer or putting a fresh bit in the CNC, as there’s no better way to welcome a little one into the world than giving them some custom gear to get started with.

That’s certainly been the plan for [Matthew Regonini], who’s been showering his son with DIY playthings. He recently wrote in to tell us about his awesome AT-ST high chair build that manages to turn the drudgery of getting a baby to eat into an epic worthy of a John Williams score.

This isn’t the first time [Matthew] has turned dead trees into Imperial hardware. Last year we covered his fantastic AT-AT rocker which utilized the same construction techniques. The parts are cut out of plywood with his CNC, separated, cleaned up on a spindle sander, and finally assembled with wood glue and a few strategic fasteners. The depth and level of detail he’s able to achieve when the individual pieces are stacked up is exceptionally impressive. If builds like these don’t get you thinking about adding a CNC to your workshop, nothing will.

As with the AT-AT, the finish on the high chair is simply a healthy application of polyurethane. This keeps the wood from being porous (important as this build will be seeing its fair share of food and liquids) while retaining a natural look. Some might be tempted to paint it up in appropriate Imperial colors, but that might be a bit imposing considering its intended occupant.

Really, the only downside with this build is how quickly his son will outgrow it. The obvious solution to the problem is a constant supply of fresh babies to pilot it, but that’s one type of creation that we don’t generally detail here on Hackaday. If you have questions, ask your parents.

Incidentally, it’s starting to look like we’ve got a plywood arms-race going on. We’re excited to see somebody take it to the next level. A little scared, but mainly excited.

Continue reading “AT-ST High Chair Elevates Lucky Jedi Youngling”

Flood Damaged 386 Gets A Modern Rebuild

Until a flood claimed its life, the 386 tower [Tylinol] found on the side of the road served him well as a DOS gaming rig. In the aftermath of the flood, the machine was left with ruined internals and a rusted case; it ended up being tossed in storage where it was slowly rotting away. But a recent idea got him to drag this old dinosaur back out into the light of day and give it a new lease on life with some modern gear.

For our viewing pleasure [Tylinol] documented the restoration of the computer, dubbed SErEndIPITy, from start to finish. The rebuild starts with tearing the machine down to the steel frame and sanding all the rust off. Luckily it looks like no structural damage was done, and a coat of engine enamel got the frame looking more or less like new. The original motherboard mounting solution wouldn’t work for his modern board, so he ended up riveting a piece of sheet metal in and drilling new holes for standoffs to thread into.

A nice element of this rebuild is that [Tylinol] didn’t want to drastically change the outward appearance of the machine. The customary yellowed plastic was left alone, and wherever possible the original hardware was reused. Rather than blow a hole in the case, he took his Dremel to the decorative ribbed design of the front panel and turned it into a stock-looking vent.

The real star of this rebuild is the LED CPU “Speed” display on the front of the case. In its original form, this was a fake display that simply cycled through predefined digits when you pressed the “Turbo” button on the front panel. By grounding them one at a time, [Tylinol] figured out which lines on the PCB controlled each segment of the display and wired it up to a Teensy 3.5. He was then able to write a C# plugin for CoreTemp to display the temperature.

The rebuilt machine is packing an i5-6500 processor, GTX 970 video card, and 8 GB of DDR4 RAM. Not exactly a speed demon compared to some of the modern desktops out there, but it certainly beats the original hardware. Incidentally, so does the Teensy 3.5 controlling the front panel display. There’s a certain irony there…

Cramming modern hardware into the carcass of an outdated computer is nothing new, of course. But we especially like the builds that take the time to make it all look stock.

[via /r/DIY]

Membership Ring Of The Electronic Illuminati

When the cabal of electronic design gurus that pull the invisible strings of the hardware world get together, we imagine they have to show this ring to prove their identity. This is the work of [Zach Fredin], and you’re going to be shocked by the construction and execution of what he calls Cyborg Ring.

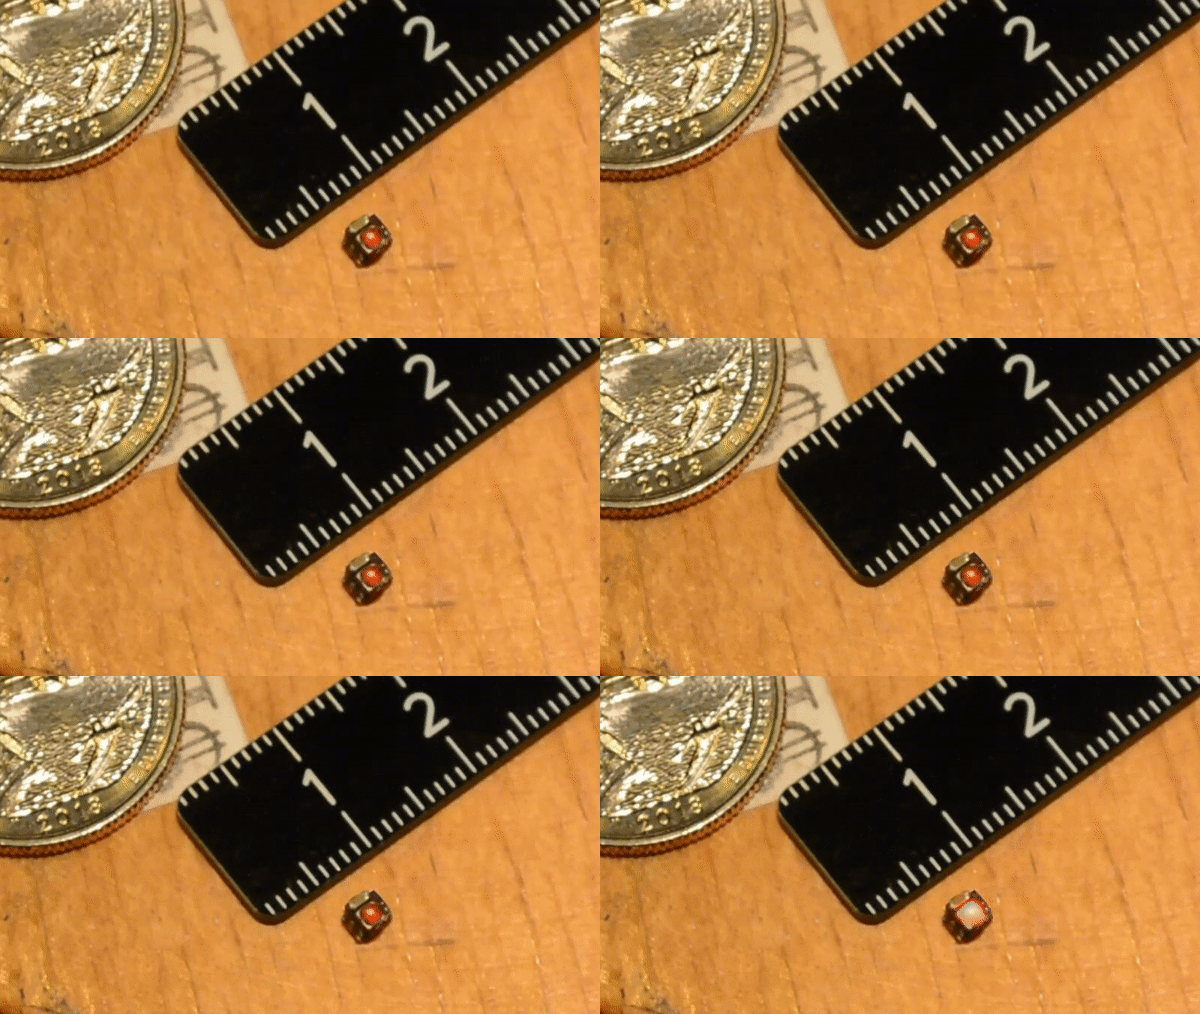
The most obvious feature of the Cyborg Ring is the collection of addressable LEDs that occupy the area where gems would be found on a ring. What might not be so obvious is that this is constructed completely of electronic components, and doesn’t use any traditional mechanical parts like standoffs. Quite literally, the surface mount devices are structural in this ring.

They are also electrical. Here you can see a detail of how [Zach] pulled this off. We are looking at the underside of the ring, the part that goes below your knuckle. One of the two PCBs that are sized to fit your finger has been placed in a Stick Vise while the QFN processor is soldered on end, and the pairs of SMD resistors are put in place.

The precise measurements of each part make it possible to choose components that will perfectly span the gap between the two boards. In the background of the image you can see SMD resistors on their long ends — a technique he used to allow the LEDs themselves to span between one resistor on each of the two PDBs to complete the circuit. Incredible, right?

But it gets better. [Zach] ended up with a working prototype, but has continued to forge ahead with new design iterations. These updates are a delight to read! Make sure you follow his project and check in regularly; if you’ve already looked at this now’s the time to go back and see the new work. The gold pads for the minuscule coin cells which power the ring are being reselected as the batteries didn’t fit well on the original. Some layout problems are being tweaked. And the new spin of boards should be back from fab in a week or so.

Don’t miss the demo video found below. We really like seeing projects that build within the wearble ring form factor. It’s an impressive constraint which [Zach] seems to have mastered. Another favorite of ours is [Kevin’s] Arduboy ring.

Continue reading “Membership Ring Of The Electronic Illuminati”

Ride Bike, Charge Phone

Spring is coming to the northern hemisphere, and soon it’ll be nice enough outside to tool around town on your bicycle. But bikes don’t have power outlets, so phone charging on the go will require forethought and charged-up battery packs. It doesn’t have to be that way. You’re working to make the bike move, so why not make the bike work for you?

If you’ve ever used a motor as a generator, then you can see where this is going. That’s the underlying principle behind [Creativity Buzz]’s bike-powered phone charger. As the bike wheel turns, the rim comes in contact with a small wheel attached to the output shaft of a DC motor. Cranking the output shaft of a motor with permanent magnets inside will induce a small voltage, and here it is amplified with a DC-DC boost converter and output to a USB jack.

As long as you can find a way to secure the phone to the bike frame, or use a long cord and good cable management, you’re in business. Wheelie past the break to watch [Creativity Buzz] build it and give it a stationary test run. While you wait for bike-riding weather, you can still use this kind of charger by turning a crank.

Continue reading “Ride Bike, Charge Phone”

Build A Tiny Hot Wire Foam Cutter

Let’s face it: cutting foam with a knife, even a serrated plastic knife meant for the job, is a messy pain in the ass.  This is as true for insulation board as it is for the ubiquitous expanded polystyrene kind of foam used for everything from coffee cups to packaging material.

Those stick-type hot wire cutters from the craft store that plug into the wall aren’t much better than a knife. The actual cleaving of foam is easier, but dragging a long, hot flexible wand through rigid foam just right, without making burn marks, is pretty frustrating. It’s not like you can hold the other end to keep it steady. A foam cutter built like a coping saw but held parallel to the wire would offer much better control.

[Techgenie]’s handheld hot wire foam cutter is a simple build based on a single 18650 and a piece of nichrome wire. While this is probably not the most Earth-shattering hack you’ll see today, it’s a useful tool that can be made in minutes with items on hand. Laptop chargers are full of 18650s, and nichrome wire can be sourced from old toasters, hair dryers, or space heaters.

You shouldn’t use just any old wire for this, though, or the battery will get hot and potentially explode. Nichrome wire has a high resistance, and that’s exactly what you want in a tool that essentially shorts a battery to make heat. [Techgenie] used a momentary button instead of a switch, which is a good way to stay safe while using it. It wouldn’t hurt to add some protection circuitry and take the battery out when you’re done. Burn past the break to watch him build it and cut a few tight turns with ease.

If you have bigger, more complicated foam-cutting jobs in mind, why not build a CNC version out of e-waste?

Continue reading “Build A Tiny Hot Wire Foam Cutter”

Cat Plays The Silver Ball For Treats

It’s pretty easy to train a dog to do things for treats. They’re eager to please. But a cat? Most cats have better things to do than learn tricks no matter how many treats are involved. But if you make an autonomous game out of learning a trick, they just might go for it.

That’s the idea behind Touchy Fishy, a pinball machine for cats. It’s the newest iteration of treat-dispensing machines that [Kim] made for his cat, MIDI. The previous version was shaped like a dog’s head with a joystick for a nose. MIDI was so adept at pulling the joystick toward herself that [Kim] decided to try a new design using a lever.

Humans like challenges, too, and [Kim] wanted to make something purely mechanical this time around. The final product is mostly springs and laser-cut acrylic. MIDI pulls the spring-loaded lever downward, launching a pinball upward in an arc. At the top of its trajectory is a spinner enclosed in a circle. When the pinball hits the spinner, it sweeps a treat toward an opening, and the treat falls down where MIDI can eat it. The best part? The spinner also returns the captive pinball to its starting point, so MIDI can play until [Kim] gets tired of dropping treats into the hole. Watch MIDI claw her way to the high score after the break.

Most of the cat-related projects we’ve seen were built to keep hungry cats from sitting on their owner’s chests at 3AM, demanding to be fed. Here’s one that goes a step further by putting the cat to work collecting wiffle balls which it uses to pay for small amounts of kibble.

Continue reading “Cat Plays The Silver Ball For Treats”

Discrete Pong Project Goes Big, Adds A Player

Some projects just take on a life of their own. What started as a pleasant diversion or a simple challenge becomes an obsession, and the next thing you know you’ve built a two-player color Pong game with audio completely from discrete components.

If this one seems familiar, it’s because we were dazzled by its first incarnation last year. As impressive as version 1.0 was, all the more so since it was built using the Manhattan method and seemingly over the course of a weekend, it did have its limitations. [GK] has been refining his design ever since and keeping accurate track of the process, to the tune of 22 pages on the EEVblog forum. We haven’t pored through it all yet, but the state of the project now is certainly worth a look. The original X-Y output to an oscilloscope was swapped out to composite video for a monitor, in both mono and color. This version also allows two people to play head-to-head instead of just battling the machine. It looks like [GK] had to add a couple of blocks worth of real estate to his Manhattan board to accommodate the changes, and he tidied the wiring significantly while he was at it.

It’s a project that keeps on giving, so feast your eyes and learn. We suspect [GK] doesn’t have any plans to finish this soon, but if he does, we can’t wait to see what’s next.

Thanks to [David Gustafik] for reminding us to check back on this one.