Arduino Wristwatch Has LED Hands

When you read “Arduino wristwatch”, you fall into the trap of envisioning an Arduino UNO clumsily strapped to someone’s wrist. [Marijo Blažević’s] creation is much more polished than that. A round circuit board holds two surface mount ICs and 12 LEDs. The whole thing looks nice fit snugly inside of a watch body. It isn’t a Rolex, but it does have considerable geek cred without being unwearable in polite company.

One IC is an AVR micro, of course. The other is a DS3231 real time clock with built-in crystal. A CR2032 keeps it all running. The main body, the outer ring, the bottom, and the buttons are 3D printed in PLA. The crystal and the band are the only mechanical parts not printed. The bill of materials shows a 36mm crystal and even provides links for all the parts.

You don’t want to run LEDs all the time because it is bad on the battery. When you press the button once, you get one of the LEDs to light to show the hours. Another press reads the minutes in units of 5 minutes. A third press shows you one of five LEDs to show how many minutes to add. For example, if the time is 9:26 you’d get LED 9 (hours), LED 5 for 25 minutes, and the third press would show LED 1 for 1 extra minute. If either of the minute indicators show 12 o’clock, that indicates zero minutes.

The exciting thing, of course, is that you can program it beyond the code on GitHub. Already it can tell time and display the temperature. You don’t have a lot of I/O, but you ought to be able to get some more options and maybe some flashy LED blinking patterns in if you try.

City Clock Is Beautiful Tribute To Parisian Architecture

Binary clocks are often created as a programming exercise, or to display the time in a project with the minimal practical components. Displaying the time in binary needn’t always be for practicalities sake, however. The City Clock shows that it can be applied quite artfully, too.

The electronic side of things is simple – an Arduino Nano runs 13 LEDs, with a digital IO pin for each. Including a real time clock module is optional, though we imagine pretty essential if you wish the clock to keep accurate time. The LEDs are fitted into a grid, which is fitted behind the windowed facade of the building. This helps block light leaks between adjacent segments, giving a more polished look to the final design. The whole assembly is built out of lasercut wood, making it a quick and easy build if you’ve got such a tool handy.

It’s a simple concept, but one that is particularly striking in action. Even to those unaware of its horological abilities, it presents the appearance of a living building, with inhabitants switching lights on and off throughout the day. It would make an excellent bookshelf or coffee table piece, and we’re highly tempted to give building our own a go. Video after the break.

Continue reading “City Clock Is Beautiful Tribute To Parisian Architecture”

Voltmeter Clock Looks Great On Display

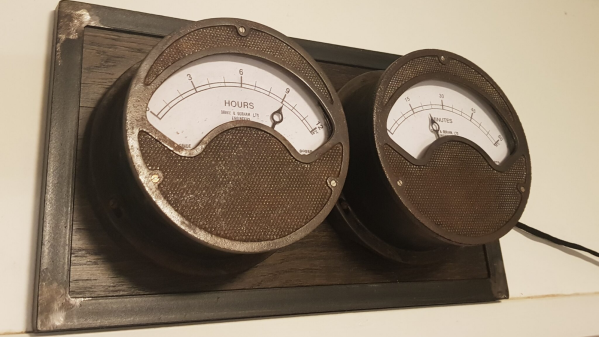
Voltmeters are cheap, and have a great industrial aesthetic about them. This makes them prime candidates for hackers looking to do a clock build. [Brett Oliver] went down this very road, and built a very stylish timepiece along the way.

[Brett] initially wanted to go with 240-degree voltmeters, however the cost was prohibitive, so settled for the more common 90-degree models. New dials were produced by first sanding down the old dials, repainting in an old-fashioned off-white, and then applying the new graphics with inkjet transfer paper.

The attention to detail continues with the case. [Brett] aimed to build the clock with an old-school lab equipment aesthetic. A large piece of mahogany was crafted into the base.  A clear plastic cover was sourced from eBay, which really makes the piece. Large buttons and toggle switches were chosen to complete the look.

On the electronic side of things, it’s all run by a PIC16F628A, which controls the voltmeters via PWM. Running with a 20MHz crystal, the PIC is not a great timekeeper. Instead, the whole show is synchronized to [Brett]’s master clock we featured a few years back.

Building a clock is a rite of passage for a hacker, and [Brett]’s example goes to show how craftsmanship can really pay off in this pursuit. Video after the break.
Continue reading “Voltmeter Clock Looks Great On Display”

Happy 50th Birthday To All You Epoch Birthers

Good morning everyone, and what a lovely start to the new year it is, because it’s your birthday! Happy birthday, it’s your 50th! What’s that you say, you aren’t 50 today? (Looks…) That’s what all these internet databases say, because you’ve spent the last decade or so putting 1970-01-01 as your birth date into every online form that doesn’t really need to know it!

It’s been a staple for a subset of our community for years, to put the UNIX epoch, January 1st 1970, into web forms as a birth date. There are even rumours that some sites now won’t accept that date as a birthday, such is the volume of false entries they have with that date. It’s worth taking a minute though to consider UNIX time, some of its history and how its storage has changed over the years.

Continue reading “Happy 50th Birthday To All You Epoch Birthers”

Building A Giant Meta-Clock Made Of Smaller Clocks

Have any last-minute projects you finished just before the end of the decade? To help pass the time, [Erich Styger] decided to build a meta digital clock made up of 24 individual analog clocks, the perfect item to help welcome in the new year. The stepper clock is controlled by a network of LPC microcontrollers, displaying the time and room temperature, as well as several aesthetically pleasing loading animations.

Each clock operates from a 5 V USB power bank drawing less than 2 A for the full 24-clock setup. The meta-clock resides in a laser cut enclosure, with 3D printed hands telling the time. While having one board per clock would be easier to implement, [Erich] decided to use one board per four clocks arranged in rows to save on costs. The arrangement fixes the distance between clocks, though [Erich] also made the clock size slightly smaller to compensate.

The ‘stepper’ part of the stepper clock uses a 360 degree version of the VID28 stepper motor to reduce the height of the design and the cost of the project. Apart from the X12.017 driver silently driving the motors, the stepper motors also conveniently only need a ‘direction’ and ‘step’ pin, reducing the pin count needed for the microcontroller. Neodymium magnets and hall effect sensors are used for tracking the position of the hands as the clocks move, with the magnets embedded into the clock hands.

As for communication, rather than use the common I2C protocol, the more robust RS-485 was selected. A master coordinates all of the clocks using the bus, providing a command line interface. The master is also able to communicate with the host PC over USB to maintain RTC time.

During the software development phase, [Erich] made use of the SEGGER J-Link EDU mini CLI for keeping track of information about the driver and each individual stepper motor. The software controlling the motors is written in C, with boards running FreeRTOS. The stepping is handled with a timer interrupt, but because the LPC845 doesn’t have enough timer channels, all of the functionality is done within a single channel. This results in plenty of interrupt handlers, flags, and callbacks across the code, which makes for some good fun.

Speaking of clocks, check out some of our other past clock hacks, including this mini-VFD clock and this fun LED matrix clock (it lets you play Tetris!)

Continue reading “Building A Giant Meta-Clock Made Of Smaller Clocks”

Analog Meter Clock Uses Parts From A Simpler Time

Clocks with hands that turn are all well and good for the common folk, but hacker types prefer something different. [Sjm4306] is one such person, and developed this analog dial clock with parts we’d almost consider retro by modern standards.

The microcontroller at the heart of the build is a PIC16F886. An 8-bit micro from the Microchip brand, it features no Arduino bootloader or USB interface, being flashed via a dedicated programmer. This is combined with a DS1302 real-time clock to keep accurate time, and a MCP4922 DAC which is responsible for generating the output to drive the dials. The dials themselves are sourced from eBay, being simple voltmeters. They’re given a new backing to display hours and minutes instead of volts, and backlit with LEDs for style.

In this day and age, we’re more used to seeing high-end micros used with integrated DACs and USB programming, but it’s nice to see the parts of yesteryear being used, too. It’s not the first clock we’ve seen from [sjm4306], either. Video after the break.

Continue reading “Analog Meter Clock Uses Parts From A Simpler Time”

Word Clock Does The Job With Laser-Etched Acrylic

As far as telling the time, word clocks go out of their way to spell it out for you. As long as you know the language, they’re a stylish and effective way to get the message across. [Simon] built an elegant, stripped-back word clock of his own, with a laser cutter helping to get the job done.

The core of the build is an Arduino Nano, hooked up to a string of 22 WS2812B LEDs, driven via the FastLED library. An NXP PCF8563T serves as the real-time clock, to ensure stable and accurate timekeeping. The electronics are all housed inside an enclosure that appears to be constructed from PCBs, with instructions on operating the clock printed on the base.

The actual display is via laser-cut and laser-etched acrylic. The display piece slides into the top of the clock, with the LEDs edge lighting various segments to display the relevant words that make up the current time. The clock is designed in such a way that these display slides can be easily switched out to change the look of the clock, with different fonts and designs.

It’s a quick and clean take on the popular word clock design, and one any makerspace could whip up in a weekend. As far as word clocks go, however, the sky really is the limit when it comes to complexity. Video after the break.

Continue reading “Word Clock Does The Job With Laser-Etched Acrylic”