Wooden Word Wristwatch Wows Woomies

[HakuG] wanted to make a watch for his roommates, and had a design project due. He killed two birds with one stone, and then some. The result is a classic word clock, but with a refined all-wood look that’s also small enough to wear on your wrist.

Nothing good ever comes out right the first time, and the log of [HakuG]’s different versions is full of different attempts, all of them just fine in their own right, but none of them “perfect”. Kudos to [HakuG] for sticking with it and refining the project far past the initial prototype stage to something that really looks like a finished product.

Of course we’ve covered word clocks before. Heck, we’ve even seen a beautiful wooden one. But we’re pretty sure that this is the first wooden word-clock watch we’ve ever written up, and it’s surely one of the nicest.

Thanks [Paul Hein] for the link!

“The Alarm Clock Ate My Duvet Cover, That’s Why I’m Late!”

Some people just won’t wake up. Alarm clocks don’t cut it, flashing lights won’t work, loud music just becomes the soundtrack of an impenetrable dream. Maybe an alarm clock that rudely yanks the covers off the bed will do the trick.

Or not, but [1up Living] decided to give it a go. His mechanism is brutally simple — a large barrel under the foot of the bed around which the warm, cozy bedclothes can wind. An alarm clock is rigged with a switch on the bell to tell an Arduino to wind the drum and expose your sleeping form to the harsh, cold world. To be honest, the fact that this is powered by a 2000-lb winch that would have little trouble dismembering anyone who got caught up in the works is a bit scary. But we understand that the project is not meant to be a practical solution to oversleeping; if it were, [1up Living] might be better off using the winch to pull the bottom sheet to disgorge the sleeper from the bed entirely.

Something gentler to suit your oversleeping needs might be this Neopixel sunrise clock to coax you out of bed naturally.

Continue reading ““The Alarm Clock Ate My Duvet Cover, That’s Why I’m Late!””

Tell Time With A Reverse-Sundial Watch

[Xose Pérez] set out to make a sundial wristwatch by combining a magnetometer a small nylon bolt for the gnomon, but it doesn’t work like you’d think. Instead of using the magnetometer to point the sundial north, you angle the watch until the bolt’s shadow matches the white line on the PCB, and the ATmega328P computes the azimuth of the sun and determines the time thereby. To display the time he used one of those QDSP-6064 bubble displays, because sundials are retro.

His description of the project build includes a lot of fun anecdotes, like him attempting to solder the LCC connections of the HMC5883 magnetometer before giving up and making use of Seeedstudio’s PCBA service. He got 10 boards back with the ATmega and magnetometer populated while leaving the rest for [Xose] to fill in.

One fun detail of the project? You can’t tell what time it is without the sun, but you can’t read the bubble display in bright sunlight.

If you’re looking for more watch projects we’ve published, check out this wrist-controlled watch, the Chronio DIY watch, and this cool nixie-tube watch.

Slimline Nixie Clocks

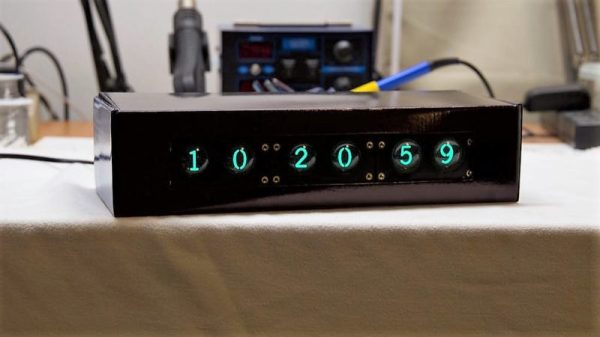
Everyone needs to build a Nixie clock at some point. It’s a fantastic learning opportunity; not only do you get to play around with high voltages and tooobs, but there’s also the joy of sourcing obsolete components and figuring out the mechanical side of electronic design as well. [wouterdevinck] recently took up the challenge of building a Nixie clock. Instead of building a clock with a huge base, garish RGB LEDs, and other unnecessary accouterments, [wouter] is building a minimalist clock. It’s slimline, and a work of art.

The circuit for this Nixie clock is more or less what you would expect for a neon display project designed in the last few years. The microcontroller is an ATMega328, with a Maxim DS3231 real time clock providing the time. The tubes are standard Russian IN-14 Nixies with two IN-3 neon bulbs for the colons. The drivers are two HV5622 high voltage shift registers, and the power supply is a standard, off-the-shelf DC to DC module that converts 5 V from a USB connector into the 170 V DC the tubes require.

The trick here is the design. The electronics for this clock were designed to fit in a thin base crafted out of sheets of bamboo plywood. The base is a stackup of three 3.2mm thick sheets of plywood and a single 1.6 mm piece that is machined on a small desktop CNC.

Discounting the wristwatch, this is one of the thinnest Nixie clocks we’ve ever seen and looks absolutely fantastic. You can check out the video of the clock in action below, or peruse the circuit design and code for the clock here.

Continue reading “Slimline Nixie Clocks”

Steampunk-Inspired Art Clock!

Getting paid to do what you enjoy is a special treat. A machinist and fabricator by trade — hobbyist hacker by design — [spdltd] was commissioned to build a mechanical art installation with a steampunk twist. Having complete creative control, he convinced his client to let him make something useful: a giant electro-mechanical clock.

Pieced together from copper, brass, steel, aluminium, and stainless steel, this outlandish design uses an Arduino Yun — a combination Linux and Arduino microcontroller board — to control the stepper motor and query the internet for the local time. Upon boot, the clock auto-calibrates by rotating the clock face until a sensor detects an extra peg and uses that to zero on twelve o’clock; the Yun then grabs the local time over the WiFi and sends the stepper motor a-spinning ’till the correct time is displayed.

At first glance, you may find it hard to get an accurate read of what time it is, but an accent piece’s pegs denote the quarter hour once it lines up with the notch above each hour. At least this one doesn’t require you to match colours or do much math to check the time.

Continue reading “Steampunk-Inspired Art Clock!”

Copper, Brass, Mahogany, And Glass Combine In Clock With A Vintage Look

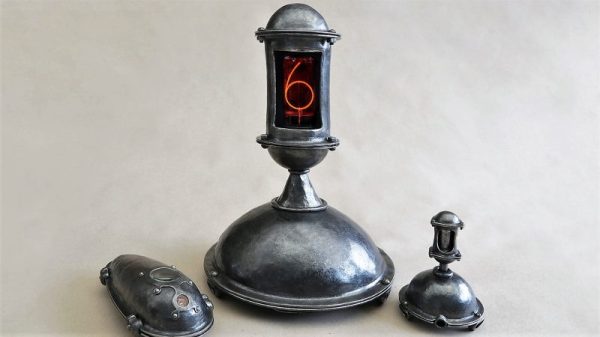
No two words can turn off the average Hackaday reader faster than “Nixie” and “Steampunk.” But you’re not the average Hackaday reader, so if you’re interested in a lovely, handcrafted timepiece that melds modern electronics with vintage materials, read on. But just don’t think of it as a Nixie Steampunk clock.

No matter what you think of the Steampunk style, you have to admire the work that went into [Aeon Junophor]’s clock, as well as his sticktoitiveness –he started the timepiece in 2014 and only just finished it. We’d wager that a lot of that time was spent finding just the right materials. The body and legs are copper tube and some brass lamp parts, the dongles for the IN-12A Nixies are copper toilet tank parts and brass Edison bulb bases, and the base is a fine piece of mahogany. The whole thing has a nice George Pal’s Time Machine vibe to it, and the Instructables write-up is done in a pseudo-Victorian style that we find charming.

If you haven’t had enough of the Nixie Steampunk convergence yet, check out this Nixie solar power monitor, or this brass and Nixie clock. And don’t be bashful about sending us tips to builds in this genre — we don’t judge.

Continue reading “Copper, Brass, Mahogany, And Glass Combine In Clock With A Vintage Look”

Towards DIY Flip Digit Clocks

Seven segment displays and Nixies are one thing, but the king of all antique display technologies must be electromechanical flip dots. These displays, usually found in train stations or rarely on old bus lines, are an array of physical disks, black on one side, light on the other, that ‘flip’ back and forth with the help of an electromagnet. They’re expensive and impressive, driving them is a pain, but oh man do they look awesome.

While flip dot displays can be bought new if you know where to look, [sjm4306] had the idea to build his own out of inexpensive materials. It might just be a prototype, but we’re saying he’s succeeded. He has the workings of a seven flip-segment display, and the techniques he’s using mean it shouldn’t be too expensive to build your own.

Instead of building a matrix of flip dots, [sjm] is building a mechanical seven-segment display. Each of the segments are 3D printed in black PLA, and mounted to a piece of cardboard via a thin wire ‘axel’ going through the length of the segment. Where normal flip dots use an electromagnet to change each dot from one state to another, [sjm] mounted a very small vibrating pager motor to one end of the segment. When one half of a tact switch h-bridge is activated, the segment flips to the front. When the other half of the h-bridge is activated, the segment flips back.

Right now, this hardware is in the ‘extreme prototype’ stage, but results so far are encouraging. [sjm] has already designed a single-segment ‘module’. Plans for the electronics include optocouplers for two microcontroller pins for each segment and reed relays for each individual digit. For a four-digit display, these flip digits will only require 18 I/O pins.

You can check out [sjm4306]’s video for this project below. It’s a little bit long, but watch those things flip!

Continue reading “Towards DIY Flip Digit Clocks”