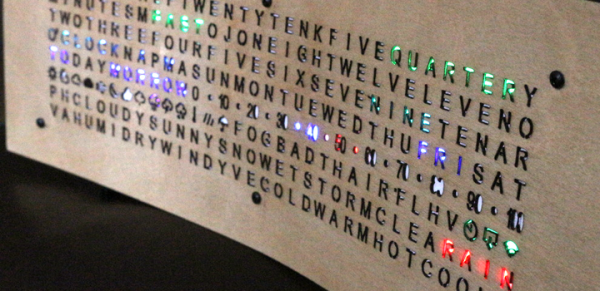
Fibonacci Clock Is Hard To Read, Looks Good

Artists have been incorporating the golden ratio in their work for many hundreds of years, and it is thought that when proportions are in line with this ratio, it tends to be more aesthetically pleasing. With that in mind, the clock that [Philippe] created must mathematically be the best looking clock we’ve ever featured, even if it is somewhat difficult to tell time from it.

The clock is made up of squares which represent the first five numbers of the Fibonacci sequence. The squares are backlit with LEDs, which will illuminate red for the hour, green for the minute, and blue representing the overlap of hours and minutes. Simply add up the red and blue squares to get the hour, and add the green and blue squares to get the minutes. The minutes are displayed in 5 minute increments since there aren’t enough blocks though, so you’ll also have to multiply. Confused yet? If not, it turns out that there are several ways to display certain times using this method, any of which can be randomly selected by the clock. [Philippe] reports that there are 16 different ways to represent 6:30, for example.

The clock is driven by an ATmega328P and is housed in a wooden case. There are schematics and code available on [Philippe]’s site if you want to build your own, there are detailed descriptions of how to tell time with this clock. You’ll probably need those. If you like getting confused by clocks, you might also like this one as well.

Continue reading “Fibonacci Clock Is Hard To Read, Looks Good”

Building A Transistor Clock From Scrap

[Phil] has already built a few clocks with Nixies, VFDs, and LED matrices. When his son requested his own clock, he wanted to do something a little different. Inspired by the dead bug style of [Jim Williams]’ creations, [Phil] set out to build a clock made entirely out of discrete components. That includes the counters, driver circuits, and an array of LED.

There are a few inspiration pieces for [Phil]’s clock, starting with the Transistor Clock, a mains-powered clock that uses 194 transistors, 566 diodes, and exactly zero integrated circuits. Design patterns from a clock so beautiful it’s simply called The Clock are also seen, as is a Dekatron emulator from [VK2ZAY].

[Phil]’s creation has no PCB, and all the components are soldered onto tiny wires arranged into something resembling the clocks circuit. It’s a fantastic contraption, and while we’ll still have to give the design award to the clock, [Phil]’s creation shows off the functional circuits; great if he’ll ever need to debug anything.

An RGB Word Clock, Courtesy Of WS2812s

A word clock – a clock that tells the time with illuminated letters, and not numbers – has become standard DIY electronics fare; if you have a soldering iron, it’s just what you should build. For [Chris]’ word clock build, he decided to build an RGB word clock.

A lot has changed since the great wordclock tsunami a few years back. Back then, we didn’t have a whole lot of ARM dev boards, and everyone’s grandmother wasn’t using WS2812 RGB LED strips to outshine the sun. [Chris] is making the best of what’s available to him and using a Teensy 3.1, the incredible OctoWS2812 library and DMA to drive a few dozen LEDs tucked behind a laser cut stencil of words.

The result is blinding, but the circuit is simple – just a level shifter and a big enough power supply to drive the LEDs. The mechanical portion of the build is a little trickier, with light inevitably leaking out of the enclosure and a few sheets of paper working just enough to diffuse the light. Still, it’s a great project and a great way to revisit a classic project.

Apple II Watch

Strapping An Apple II To Your Body

Now that the Apple wristwatch is on its way, some people are clamoring with excitement and anticipation. Rather than wait around for the commercial product, Instructables user [Aleator777] decided to build his own wearable Apple watch. His is a bit different though. Rather than look sleek with all kinds of modern features, he decided to build a watch based on the 37-year-old Apple II.

The most obvious thing you’ll notice about this creation is the case. It really does look like something that would have been created in the 70’s or 80’s. The rectangular shape combined with the faded beige plastic case really sells the vintage electronic look. It’s only missing wood paneling. The case also includes the old rainbow-colored Apple logo and a huge (by today’s standards) control knob on the side. The case was designed on a computer and 3D printed. The .stl files are available in the Instructable.

This watch runs on a Teensy 3.1, so it’s a bit faster than its 1977 counterpart. The screen is a 1.8″ TFT LCD display that appears to only be using the color green. This gives the vintage monochromatic look and really sells the 70’s vibe. There is also a SOMO II sound module and speaker to allow audio feedback. The watch does tell time but unfortunately does not run BASIC. The project is open source though, so if you’re up to the challenge then by all means add some more functionality.

As silly as this project is, it really helps to show how far technology has come since the Apple II. In 1977 a wristwatch like this one would have been the stuff of science fiction. In 2015 a single person can build this at their kitchen table using parts ordered from the Internet and a 3D printer. We can’t wait to see what kinds of things people will be making in another 35 years.

Continue reading “Strapping An Apple II To Your Body”

Enigma Machine Wristwatch

We don’t find smartwatches to be supremely usable yet. This one sets a definition for usefulness. The Enigma machine is of course the cipher process used by the Germans during World War II. This Enigma Machine wristwatch is not only functional, but the appearance is modelled after that of the original machine. With the speckled gray/black case and the Enigma badge branding [Asciimation] has done a fine job of mimicking the original feel.

Driving the machine is an Arduino Pro Mini. We’ve seen Arduino Enigma Machines in the past so it’s not surprising to see it again here. The user interface consists of an OLED display at 128×64 resolution, three buttons, with a charging port to the right and on/off switch on the left.

The device is demonstrated after the break. Quite a bit of button presses are used to set up each of the three encoder wheels. But that’s hardly avoidable when you’re not committing to a full keyboard. We’re pretty impressed by the functionality of [Asciimation’s] interface considering it’s hardware simplicity.

This seems perfect for kids that are proving to have an interest in engineering. They learn about ciphers, embedded programming, and mechanical design and crafting (this is a hand-sewn leather wristband). Of course if you build one and start wearing it into the office we won’t judge.

Continue reading “Enigma Machine Wristwatch”

Binary Wristwatch

Open Source Binary Wristwatch Is Professional Quality

If you want to proclaim to the world that you’re a geek, one good way to go about it is to wear a wristwatch that displays the time in binary. [Jordan] designs embedded systems, and he figured that by building this watch he could not only build up his geek cred but also learn a thing or two about working with PIC microcontrollers for low power applications. It seems he was able to accomplish both of these goals.

The wristwatch runs off of a PIC18F24J11 microcontroller. This chip seemed ideal because it included a built in real-time clock and calendar source. It also included enough pins to drive the LEDs without the need of a shift register. The icing on the cake was a deep sleep mode that would decrease the overall power consumption.

The watch contains three sets of LEDs to display the information. Two green LEDs get toggled back and forth to indicate to the user whether the time or date is being displayed. When the time is being displayed, the green LED toggles on or off each second. The top row of red LEDs displays either the current hour or month. The bottom row of blue LEDs displays the minutes or the day of the month. The PCB silk screen has labels that help the user identify what each LED is for.

The unit is controlled via two push buttons. The three primary modes are time, date, and seconds. “Seconds” mode changes the bottom row of LEDs so they update to show how many seconds have passed in the current minute. [Jordan] went so far as to include a sort of animation in between modes. Whenever the mode is changed, the LED values shift in from the left. Small things like that really take this project a step further than most.

The board includes a header to make it easy to reprogram the PIC. [Jordan] seized an opportunity to make extra use out of this header. By placing the header at the top of the board, and an extra header at the bottom, he was able to use a ribbon cable as the watch band. The cable is not used in normal operation, but it adds that extra bit of geekiness to an already geeky project.

[Jordan] got such a big response from the Internet community about this project that he started selling them online. The only problem is he sold out immediately. Luckily for us, he released all of the source code and schematics on GitHub so we can make our own.

Laser-Cut Clock Uses Planetary Gear

[wyojustin] was trying to think of projects he could do that would take advantage of some of the fabrication tech that’s become available to the average hobbyist. Even though he doesn’t have any particular interest in clocks, [wyojustin] discovered that he could learn a lot about the tools he has access to by building a clock.

[wyojustin] first made a clock based off of a design by [Brian Wagner] that we featured a while back. The clock uses an idler wheel to move the hour ring so it doesn’t need a separate hour hand. After he built his first design, [wyojustin] realized he could add a planetary gear that could move an hour hand as well. After a bit of trial and error with gear ratios, he landed on a design that worked.

The clock’s movement is a stepper motor that’s driven by an Arduino. Although [wyojustin] isn’t too happy with the appearance of his electronics, the drive setup seems to work pretty well. Check out [wyojustin]’s site to see the other clock builds he’s done (including a version with a second hand), and you can peruse all of his design files on GitHub.

Looking for more clock-building inspiration? Check out some other awesome clock builds we’ve featured before.