I have a confession to make. I enjoy the challenge of squeezing software into a tiny space or trying to cut a few more cycles out of a loop. It is like an intricate puzzle. Today, of course, there isn’t nearly as much call for that as there used to be. Today even a “small” microcontroller has a ton of memory and resources.
Even so, there’s still a few cases where you need to squeeze those last few bytes out of memory. Maybe you are trying to maximize memory available for some purpose. Maybe you are anticipating mass production and you are using the smallest microcontroller you can find. Or maybe you’re doing the 1 kB Challenge and just want some advice.
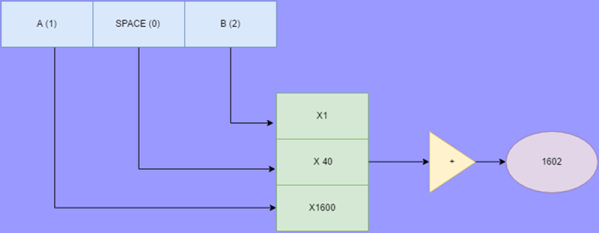
One way to find techniques to maximize resources is to look at what people did “in the old days.” Digital Equipment computers once had a special character set called Squoze (or sometimes DEC Radix-50). This technique can be useful when you need to get a lot of strings into memory. The good news is that you can reliably get 3 characters into 2 bytes (or, as DEC did, 6 characters into 4 bytes). The bad news is that you have to pick a limited character set that you can use. However, that’s not always a big problem.