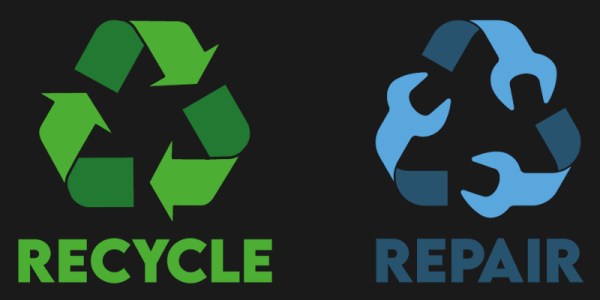
Hardware Project Becomes Successful Product For Solo Developer

[Michael Lynch] has been a solo developer for over three years now, and has been carefully cataloguing his attempts at generating revenue for himself ever since making the jump to being self-employed. Success is not just hard work; it is partly knowing when the pull the plug on an idea, and [Micheal] has been very open about his adventures in this area. He shares the good news about a DIY project of his that ended up becoming a successful product, complete with dollar amounts and frank observations.

About a year ago, we covered a project he shared called TinyPilot, which is an effective KVM-over-IP device, accessible over the web, that could be built with about $100 worth of parts. [Micheal] found it to be a fun and useful project, and decided to see if he could sell kits. However, he admits he didn’t have high expectations, and his thoughts are probably pretty familiar to most hardware types:

I questioned whether there was a market for this. Why would anyone buy this device from me? It was just a collection of widely available hardware components.

Well, it turns out that he was onto something, and the demand for his device became immediately clear. He’s since given TinyPilot more features, an attractive case, and even provides a support plan for commercial customers. This is an excellent reminder that sometimes, what is being sold isn’t the collection of parts itself. Sometimes, what’s being sold is a solution to a problem people have, and those people are time-poor and willing to pay for something that just works.

It’s great to see [Michael] find some success as a solo developer, but his yearly wrap-up covers much more than just the success of TinyPilot as a product, so be sure to check it out if you’re at all interested in the journey of working for yourself.

A Builders Guide For The Perfect Solid-State Tesla Coil

[Zach Armstrong] presents for your viewing pleasure a simple guide to building a solid-state Tesla coil. The design is based around a self-resonant setup using the UCC2742x gate driver IC, which is used in a transformer-coupled full-wave configuration for delivering maximum power from the line input. The self-resonant bit is implemented by using a small antenna nearby the coil to pick up the EM field, and by suitably clamping and squaring it up, it is fed back into the gate driver to close the feedback loop. Such a setup within reason allows the circuit to oscillate with a wide range of Tesla coil designs, and track any small changes, minimizing the need for fiddly manual tuning that is the usual path you follow building these things.

Since the primary is driven with IGBTs, bigger is better. If the coil is too small, the resonant frequency would surpass the recommended 400 kHz, which could damage the IGBTs since they can’t switch much faster with the relatively large currents needed. An important part of designing Tesla coil driver circuits is matching the primary coil to the driver. You could do worse than checkout JavaTC to help with the calculations, as this is an area of the design where mistakes often result in destructive failure. The secondary coil design is simpler, where a little experimentation is needed to get the appropriate degree of coil coupling. Too much coupling is unhelpful, as you’ll just get breakdown between the two sides. Too little coupling and efficiency is compromised. This is why you often see a Tesla coil with a sizeable gap between the primary and secondary coils. There is a science to this magic!

Pretty Lithium Carbonate plasma

A 555 timer wired to produce adjustable pulses feeds into the driver enable to allow easily changing the discharge properties. This enables it to produce discharges that look a bit like a Van De Graaff discharge at one extreme, and produce some lovely plasma ‘fire’ at the other.

We’ve covered Tesla coils from many angles over the years, recently this plasma tweeter made sweet sounds, and somehow we missed an insanely dangerous Tesla build by [StyroPyro] just checkout that rotary spark gap – from a distance.

Continue reading “A Builders Guide For The Perfect Solid-State Tesla Coil”

magnetic toggle swtches

Modified Toggle Switches Grace Hyper-Detailed Cockpit Simulator Panels

In the world of the cockpit simulator hobby, no detail is too small to obsess over. Getting the look and feel of each and every cockpit control just right is important, and often means shelling out for cockpit-accurate parts. But not always, as these DIY magnetically captured toggle switches show.

Chances are good you’ve seen [The Warthog Project]’s fantastically detailed A-10 Thunderbolt II cockpit simulator before; we’ve featured it recently, and videos from the ongoing build pop up regularly in our feeds. The sim addresses the tiniest of details, including the use of special toggle switches that lock into place automatically using electromagnets. They’re commercially available, but only for those with very deep pockets — depending on the supplier, up to several thousand dollars per unit!

The homebrew substitute is mercifully cheap and easy to build, though — a momentary DPST toggle switch is partially gutted, with a length of nail substituted for one of its poles. The nail sticks out of the back of the switch, where a bracket holds a small electromagnet. When energized, the electromagnet holds the nail firmly when the switch is toggled on; the simulated pilot can still manually toggle the switch off, or it can be released automatically by de-energizing the coil. Each switch cost less than $20 to make, including the MOSFETs needed to drive the coils and the Arduino to provide the logic. The panels they adorn look fantastic, and the switches add a level of functional detail that’s just right for the whole build.

Continue reading “Modified Toggle Switches Grace Hyper-Detailed Cockpit Simulator Panels”

PCB sitting inside a 3D printed holder job, with holes to apply vacuum

Solder Paste Stencilling That Doesn’t Suck

Working with solder paste stencils can be a real faff, they rarely sit flat and move around when you so much as breath on them. [Unexpected Maker] airs his frustrations, and comes up with a simple solution, he simply makes a 3D-printed jig to align the PCB panel and applies his shop vacuum cleaner and hey presto!

If you’re ever been tempted to switch from frameless to framed solder stencils, then you’ll notice they can be rather awkward to work with. The usual online vendors have plenty of listings for stencil frame holders, but they do all seem to us, exactly the same, and more suited to stencilling T-shirts, than working with tiny PCB footprints.

The problem with unframed stencils is one of clamping and registration to the PCB, which framed stencils fix, when used with a jig that can dial in the rotation and translation errors.

But problem with those is, unless you have a perfectly flat support region all round the PCB, the weight of the frame tends to make the stencil bow up over the PCB, causing parts of it to lift away from the solder lands. This results in paste not being pushed into the places you want it, and instead it sticks to the stencil apertures and comes away when you lift it up. Most irritating.

You can try offset it by taping spare PCBs of the same thickness all around, but this is not always terribly successful in this scribe’s extensive experience doing this job by hand. [Unexpected Maker] solves this bowing issue by making a 3D printed jig that bolts to the stencil holder, takes a custom top plate with holes in, which in turns allows a vacuum to be applied from below. This sucks the PCB down to the jig, keeping it flat (in case it is also warped) and also pulls the stencil plate directly down to the PCB, making it also lie perfectly flat.

Continue reading “Solder Paste Stencilling That Doesn’t Suck”

Fire-breathing dragon head, side view

Flame-Spitting Dragon Head Heats Up Halloween

Halloween is looming, and [Jonathan Gleich] decided that an ideal centerpiece would be a flame-spitting dragon’s head. It started with an economical wall-mount dragon’s head, combined with a variety of off-the-shelf components to become something greater.

Dragon head with arc ignitor lit
Spark from high-voltage ignitor, right at the torch opening.

The fire comes from a kind of propane torch sold as a weed killer set, which looks a little like a miniature tiger torch. The flow of propane is limited by a regulator (which keeps the flame short and fixed), and controlled with a gas-rated 12 V solenoid valve. Ignition is done with the help of a spark igniter that fires up on demand, fed by a high-voltage ignition coil. The two combine at the Dragon’s mouth, where the flame originates, but the electrical components are otherwise isolated from the gas elements as much as possible.

The dragon head is made of acrylic, and if exposed to enough heat acrylic will first melt, then burn. To help avoid a meltdown, the dragon breathes fire only intermittently.  [Jonathan] also gave the mouth area a heat-resistant barrier made from generous layers of flame-blocking mortar and sealants from the hardware store. The finishing touch comes in the form of bright red LEDs in the eyes, which give the head a bit more life.

Watch the ignitor in action and see the head spewing flames in the two short videos embedded below. The head should make for some good pictures come Halloween, and is a good example of how repurposing off-the-shelf items can sometimes be just what is needed for a project.

Interested in something smaller, but still fiery? Check out this pet fire-breathing dragon project for all your robotic animal companion needs. Continue reading “Flame-Spitting Dragon Head Heats Up Halloween”

IC Shortage Keeps Linux Out Of Phone Charger, For Now

We’ve been eagerly following the development of the WiFiWart for some time now, as a quad-core Cortex-A7 USB phone charger with dual WiFi interfaces that runs OpenWrt sounds exactly like the sort of thing we need in our lives. Unfortunately, we’ve just heard from [Walker] that progress on the project has been slowed down indefinitely by crippling chip shortages.

At this point, we’ve all heard how the chip shortage is impacting the big players out there. It makes sense that automakers are feeling the pressure, since they are buying literally millions of components at a clip. But stories like this are a reminder that even an individual’s hobby project can be sidelined by parts that are suddenly 40 times as expensive as they were when you first put them in your bill of materials.

The new miniature compute board.

In this particular case, [Walker] explains that a power management chip you could get on DigiKey for $1.20 USD a few months ago is now in such short supply that the best offer he’s found so far is $49.70 a pop from an electronics broker in Shenzhen. It sounds like he’s going to bite the bullet and buy the four of them (ouch) that he needs to build a working prototype, but obviously it’s a no go for production.

Luckily, it’s not all bad news. [Walker] has made some good progress on the power supply board, which will eventually join the diminutive computer inside the USB charger enclosure. Part of the trick is that the device is still supposed to be a functional USB charger, so in addition to 5 VDC for the output port, the power supply also needs to produce 1.1 V, 1.35 V, 2.5 V, 3.0 V, and 3.3 V for the computer. We’re glad to see he’s taking the high road with his mains circuitry, making sure to use UL listed components and maintaining proper isolation.

When we last checked in on the WiFiWart back in July, [Walker] had already managed to boot Linux on his over-sized prototype board. Now he’s got PCBs in hand that look far closer to the final size and shape necessary to tuck them into a phone charger. It’s a shame that the parts shortage is slowing down progress, but we’re confident we’ll at least get to see a one-off version of the WiFiWart powered up before the year is out.

Reinforced Concrete: Versatile At Any Size?

In our community we’re no strangers to making things, and there are plenty among us who devote their efforts to modelmaking. It’s uncommon, though, for a scale model of something to be made using the exact same techniques as whatever it’s copying. Instead a model might be made from card, foam, glassfibre, or resin. [tiny WORLD] takes an opposite tack, building scale model civil engineering projects just as they would have been for real. (Video, embedded below.)

Here, a scale model of the Hoover Dam bypass bridge is made as the original, from reinforced concrete. In place of rebar is a wire grid in place of wooden shuttering is what looks like foam board, the concrete is a much smoother mortar, but otherwise it’s the real thing. We see the various bridge parts being cast in situ, with the result being as strong as you’d expect from the original.

We can see that this is a great technique for modelling concrete buildings and structures, but it’s also a material that we think might have other applications at this scale. How would the rigidity, strength, and mass of small-scale reinforced cement compare to 20-20 extrusion, 3D-printed plastic, or wood, for example? Regardless, it’s interesting to watch, as you can see from the video below the break.

Continue reading “Reinforced Concrete: Versatile At Any Size?”