Stereo microscopes are very handy tools, especially for a lot of hackers who now regularly assemble, test and debug SMD circuits using parts as small as grains of sand. We have seen a lot of stereo microscope hacks here at Hackaday, so it helps to take a look inside one to understand how they work. Thanks to [noq2]’s teardown of a Wild Heerbrugg model M8 stereo microscope, we get to do exactly that. His M8 is from the mid-1970s, but it is in mint condition and doesn’t look like it’s over 40 years old. Despite being so old, [noq2] still uses it regularly, so the teardown is not super detailed. But there’s enough for us to get a good idea of how they work.
Stereo microscopes use one of two optical designs — the Common Main Objective (CMO) optical system and the Greenough optical system. [MicroscopeWorld] has a nice blog post explaining these two types and their pros and cons. Not surprisingly, stereo microscopes, just like other optical instruments, are highly modular to allow attaching various extensions, adapters and accessories. The Wild M8 uses the CMO design and its main parts are the binocular head, the main body and the objective lens.
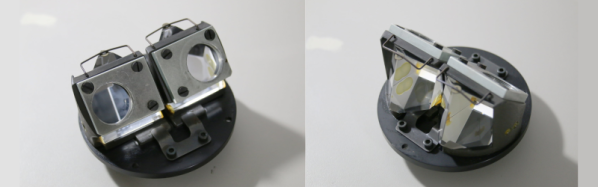
The binocular head consists of the two eyepieces and a pair of prisms that create the binocular split. The alignment of these prisms is critical and they must not be disturbed in their mounting cages. The prism cages have a sliding adjustment to help set the interpupillary distance. The main body contains the zoom and magnification optics and the related mechanics. [noq2] is impressed with the lack of plastics used in the construction of these fine instruments. Finally, there’s the huge objective lens, which [noq2] feels is the Achilles heel of the instrument. Its design is not plan-apochromatic and that causes significant chromatic aberrations, especially when trying to capture photographs. Thankfully, there are other objective lenses which can be used, including some DIY adapter solutions. The Wild Heerbrugg brand was taken over by Leica who still produce a range of stereo microscopes under that badge. If you have one of these microscopes, [noq2] suggests you head over the French forum at lenaturaliste.net where you’ll find extensive information about them.
As a bonus, also check out [noq2]’s ghetto lighting solution for his microscope – a pair of high power LED’s attached to salvaged heatsinks, and mounted on the frame of an old 80 mm cooling fan. The fan frame is perfect since it is the right size to slide over the objective lens. If you’re looking for a more capable lighting solution for your microscope, then check out “AZIZ! Light!”, a microscope ring light with a number of different features.