OpenISA Launches Free RISC-V VEGAboard

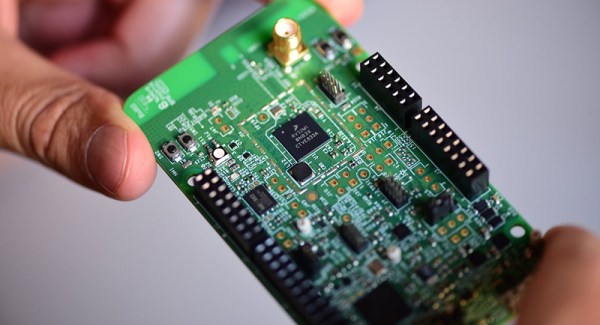
RISC architecture is gonna change everything, and I still can’t tell if we like that movie ironically or not. Nevertheless, RISC-V chips are coming onto the market, chipmakers seem really interested in not paying licensing fees, and new hard drives are shipping with RISC-V cores. The latest development in Open instruction sets chips comes from OpenISA. They’ve developed the VEGAboard, a dev board with two RISC-V chips and Arduino-style pin headers.

The VEGAboard comes loaded with an NXP chip which combines an ARM Cortex-M0 and Cortex-M4. So far, so good, but there are already dozens of boards that combine two ARM microcontrollers on a single development platform. The real trick is the RI5CY and Zero-RI5CY chips on the VEGAboard, a 4-stage RISC-V RV32IMCCXpulp CPU. This comes from the PULP platform, meant to be a small, low-power, but parallel platform for various processing needs. In short, with the VEGAboard, you’re not running a blink() sketch on the RISC-V microcontroller. You run the blink() sketch on the ARM microcontrollers, while using the RISC-V chip to read accelerometers and toggle pins. It’s a coprocessor, but it’s RISC-V.

Other features of the VEGAboard include 4MB of Flash, a light sensor, accelerometer, magnetometer, an RGB LED, OpenSDA serial debug adapter, an on-board BLE radio, and of course those wonky Arduino pin headers.

There are, or were, free VEGAboards available, but those are long gone. It’s still an interesting platform, though, and if you’d like to get your hands on one, production will resume shortly. Of course, if you need RISC-V right now, there are actual RISC-V Arduinos, a RISC-V with built-in neural networks, and SiFive will soon have a Linux-capable RISC-V multicore board. These are exciting times, and every day we’re seeing how RISC architecture is gonna change everything.

A 3D Printed Robotic Chariot For Your Phone

As we’ve said many times in the past, the wide availability of low-cost modular components has really lowered the barrier to entry for many complex projects which previously would have been nigh-on impossible for the hobbyist to tackle. The field of robotics has especially exploded over the last few years, as now even $100 can put together a robust robotics experimentation platform which a decade ago might have been the subject of a DARPA grant.

But what if you want to go even lower? What’s the cheapest and easiest way to put together something like a telepresence robot? That’s exactly what [Advance Robotics] set out to determine with their latest project, and the gadget’s final form might be somewhat surprising. Leveraging the fact that nearly everyone has a device capable of video calls in their pocket, the kit uses simple hardware and 3D printed components to produce a vehicle that can carry around a smartphone. With the phone providing the audio and video link, the robot only needs to handle rolling around in accordance with the operators commands.

The robot chassis consists of a few simple 3D printed components, including the base which holds the phone and electronics, the wheels, and the two rear “spoons” which are used to provide a low-friction way of keeping the two-wheeled device vertical. To get it rolling, two standard DC gear motors are bolted to the sides. With the low cost of printer filament and the fact that these motors can be had for as little as $2 online, it’s hard to imagine a cheaper way to get your electronics moving.

As for the electronics, [Advance Robotics] is using the Wemos D1 Mini ESP8266 development board along with L298N motor controller, another very low-cost solution. The provided source code pulls together a few open source libraries and examples to provide a simple web-based user interface which allows the operator to connect to the bot from their browser and move it around with just a few clicks of the mouse.

If you like the idea of printing a rover to explore your living room but want something a bit more advanced, we’ve seen printable robotics platforms that are sure to meet your needs, no matter what your skill level is.

Continue reading “A 3D Printed Robotic Chariot For Your Phone”

Tiny Cheap ARM Boards Get WiFi

Over the last few years, we’ve seen the value of putting tiny WIFi-enabled microcontrollers on a module that costs a dollar or two. Those smart light bulbs in your house probably have an ESP8266 in them, and you can build a WiFi-enabled anything with one of these chips for next to no money. Now there’s a new module that takes the design philosophy of, ‘a reasonably powerful microcontroller, on a module, that does WiFi’ to its logical conclusion. It’s the W600 module from Seeed Studios. It’s got an ARM Cortex-M3, it’s FCC and CE certified, it’s got WiFi, and it’s cheap. This is what the people want, so somebody’s got to give it to them.

This product seems to be the followup and/or refinement of the Air602 WiFi Development board released by Seeed late last year. While the module itself grew a few more castellated pins and an RF can, the other specs look to be the same. Compared to the ESP-8266, which this module is obviously competing against, the Air600 is more than capable of pulling its own weight with five GPIO pins that do PWM, a decent amount of Flash, and all the WiFi support you could want.

The W600 is part of an entire family of boards, with the module itself readily available, but there’s also a few breakout boards that add connections for power and serial, a bigger breakout board that’s trying really hard to forget the pin misalignment of the Arduino Uno, and since this is Seeed, a board that connects to everything via Grove connectors. What’s a Grove connector? It’s power, ground, and either I2C or serial over a connector I couldn’t buy the last time I checked.

The W600 and its family of boards will be shipping shortly — China is shutting down for two weeks soon, after all — and there are plans for support for the Arduino IDE, Micropython, and an SDK for the tool chain of your choice.

Is the ESP8266 still the go-to for putting WiFi? Probably. But here’s some more competition.

Open Source Fader Bank Modulates Our Hearts

Here at Hackaday, we love knobs and buttons. So what could be better than one button? How about 16! No deep philosophy about the true nature of Making here; [infovore], [tehn], and [shellfritsch] put together a very slick, very adaptable bank of 16 analog faders for controlling music synthesis. If you don’t recognize those names it might help to mention that [tehn] is one of the folks behind monome, a company built on their iconic grid controller. Monome now produces a variety of lovingly crafted music creation tools.

Over the years we’ve written about some of the many clones and DIY versions of the monome grid controller, so it’s exciting to see an open source hardware release by the creators themselves!

The unambiguously named 16n follows in the footsteps of the monome grid in the sense that it’s not really for something specific. The grid is a musical instrument insofar as it can be connected to a computer (or a modular synth, etc) and used as a control input for another tool that creates sound. Likewise, the 16n is designed to be easily integrated into a music creation workflow. It can speak a variety of interfaces, like purely analog control voltage (it has one jack per fader), or i2c to connect to certain other monome devices like Ansible and Teletype. Under the hood, the 16n is actually a Teensy, so it’s fluent in MIDI over USB and nearly anything else you can imagine.

Continue reading “Open Source Fader Bank Modulates Our Hearts”

WiFi Controlled Finger

WiFi Controlled Finger Dims Lights Over UDP

While WiFi controlled lights are readily available, replacing your lighting fixtures or switches isn’t always an option. [Thomas] ran into this issue with his office lights. For the developers in the office, these lights always seemed to run a little too bright. The solution? A 3D printed, WiFi controlled finger to poke the dimmer switch.

This little hack consists of a servo, a 3D printed arm and finger assembly, and a Wemos D1 Mini development board. The Wemos is a low cost, Arduino compatible development board based on the ESP8266. We’ve seen it used for a wide variety of hacks here on Hackaday.

For this device, the Wemos is used to listen for UDP packets on the company’s WiFi network. When it receives a packet, it tells the servo to push the dimming button for a specified amount of time. [Thomas] wrote a Slack bot to automatically send these packets. Now, when the lights are too bright, a simple message to the bot allows anyone to dim the lights without ever leaving the comfort of their desk. Sure, it’s not the most secure or reliable method of controlling lights, but if something goes wrong, the user can always get up and flip the switch the old fashioned way.

Pocket Forth Invades Your TI Calculator

TI certainly have certainly seen off rivals such as HP or Casio to capture the lion’s share of the calculator market. The TI-84 is a real staple, and with as many units as there are out there, hacking them is a given. However, selecting an operating system for the machine can be a hassle. TI-OS is proprietary and doesn’t really want to let you do everything you’d like to. There are alternatives, but many of them won’t let you easily use your calculator to be — well — a calculator.

[Siraben] has zkeme80 which is essentially ANS Forth (mostly) with extensions for the TI hardware. You can easily extend the system, of course, because it is Forth. You can also use the machine for its intended purpose easily.

Continue reading “Pocket Forth Invades Your TI Calculator”

Cool Tools: A Little Filesystem That Keeps Your Bits On Lock

Filesystems for computers are not the best bet for embedded systems. Even those who know this fragment of truth still fall into the trap and pay for it later on while surrounded by the rubble that once was a functioning project. Here’s how it happens.

The project starts small, with modest storage needs. It’s just a temperature logger and you want to store that data, so you stick on a little EEPROM. That works pretty well! But you need to store a little more data so the EEPROM gets paired with a small blob of NOR flash which is much larger but still pretty easy to work with. Device settings go to EEPROM, data logs go to NOR. That works for a time but then you remember that people on the Internet are all about the Internet of Things so it’s time to add WiFi. You start serving a few static pages with that surprisingly capable processor and bump into storage problems again so the NOR flash gets replaced with an SD card and now the logs go there too. Suddenly you’re dealing with multiple files and want access on a computer so a real filesystem is in order. FAT is easy, so the card grows a FAT filesystem. Everything is great, but you start to notice patches missing from the logs. Then the SD card gets totally corrupted. What’s going on? Let’s take a look at the problem, and how to reach embedded file nirvana.

Continue reading “Cool Tools: A Little Filesystem That Keeps Your Bits On Lock”