Automated Drink Mixer Is The Life Of The Party

Hosting a New Year’s Eve party, but don’t want to be stuck behind the bar all night? You could set out a bowl or two of 
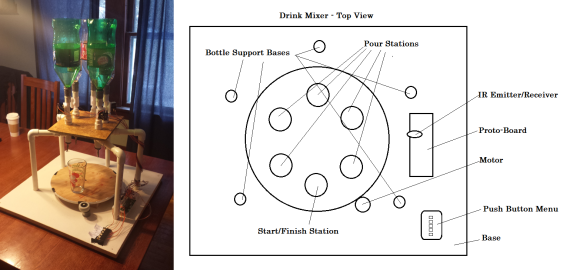
spiked punch, but where’s the hack? Free yourself from drink slinging duties with the Automated Drink Mixer created by Cornell University students [Justin] and [Austin]. Their design uses a 14″ diameter lazy Susan powered by a 12V bi-directional motor attached to a 2″ rubber wheel. The motor is capable of 70RPM, so the glass ultimately rides around at 10RPM. Orders are entered on a push-button menu. As this is a school project that should adhere to IEEE standards, all libations are non-alcoholic.

The software uses an overarching state machine, so the system polls for input from the menu at idle. When it receives an order, the lazy Susan rotates the glass to the right spout or series of spouts and then returns it to the starting point. [Justin] and [Austin] controlled the position of the glass with an IR emitter and phototransistor. This pair detects the black strips of tape around the edge which are spaced 60° apart. A comparator digitizes the signal and triggers an interrupt in the software, which counts the number of 60° slices. A full demonstration is waiting for you after the jump. Before you jump: drink responsibly, kids. If you aren’t up to that particular challenge, make yourself an alcohol-aware LED ice cube. If you need more LEDs in your life, whip up the Inebriator.

Continue reading “Automated Drink Mixer Is The Life Of The Party”

Hacking Digital Scales For The Disabled

analphabeticscale

[Jan] works with both physically and mentally disabled individuals, some of whom cannot read, making many of their tasks more difficult. Although [Jan] is not in a position to teach reading or writing skills, he was able to build an add-on device for the scales used in repackaging sweets to provide simple feedback that the user can interpret.

The device has three LEDs—red, green, and yellow—to indicate the package does not weigh enough (red), weighs too much (yellow), or lies within an acceptable range (green). The industrial scales at [Jan’s] workplace each have a serial output to connect to a printer, which he used to send data to the device. An ATMega8 controls the lights and an attached LCD, with the usual trimpot to change the display’s contrast and a rotary encoder to adjust the device’s settings. Everything fits snugly into a custom-made frosted acrylic enclosure, laser-cut at a local hackerspace.

[Jan] provides a rigorous guide to approaching each step on his Instructables page, along with source code and several pictures. See a video overview below, then enjoy another scale hack: building one from scratch.

Continue reading “Hacking Digital Scales For The Disabled”

Hacking A Heating Pad

HeatingPadBreadboardS

[Bob] and his wife use a bed heating pad. In the winter, they typically turn it on about an hour before bedtime so the bed is nice and warm. The problem is, if they accidentally leave it on, they’ll wake up a few hours later: overheated. What they needed was an advanced timer system.

A normal outlet timer wouldn’t fit his needs: most of the year the pad should shut off after a slight delay, but in the winter they prefer to leave the heating pad on at a much lower temperature. [Bob] decided to create a custom timer with a microcontroller to provide adjustable duration and heating levels.

The circuit is simple. It consists of a microcontroller, a 2-digit LED display, two buttons, and two wires that connect to the heating pad’s original controller. The final build allows you to set the time the pad turns on, turns off, and/or down a few levels. It’s a fantastic hack, and you can see how the interface works in the video following the break.

Continue reading “Hacking A Heating Pad”

Open Your Hackerspace Door With A Phone Call

elabHackerspaceDoor

[Mário] sent us a tip detailing the access control system he and his friends built for the eLab Hackerspace in Faro, Portugal. The space is located in the University of Algarve’s Institute of Engineering, which meant the group couldn’t exactly bore some holes through campus property and needed a clever solution to provide 24/7 access to members.

[Mário] quickly ruled out more advanced Bluetooth or NFC options, because he didn’t want to leave out members who did not have a smartphone. Instead, after rummaging around in some junk boxes, the gang settled on hacking an old Siemens C55 phone to serve as a GSM modem and to receive calls from members. The incoming numbers are then compared against a list on the EEPROM of an attached PIC16F88 microcontroller, which directs a motor salvaged from a tobacco vending machine to open the push bar on the front door. They had to set up the motor to move an arm in a motion similar to that of a piston, thus providing the right leverage to both unlock and reset the bar’s position.

Check out [Mário’s] blog for more details and information on how they upload a log of callers to Google spreadsheets, and stick around for a quick video demonstration below. If you’d prefer a more step by step guide to the build, head over to the accompanying Instructables page. Just be careful if you try to reproduce this hack with the Arduino GSM shield.

Continue reading “Open Your Hackerspace Door With A Phone Call”

Raspi AC And Blinds Controller

raspiBlindsACController

[Chris’s] bedroom has a unique setup with an air conditioning unit perched on the wall next to the top of the blinds that cover his window. Normally, to open the blinds he had to tug on a cord and operating the AC meant fiddling with a remote control. Not anymore. Now [Chris] has an all-in-one Raspberry Pi-based solution to drive both.

The build uses a stepper motor salvaged from a printer to directly drive the blinds, with a familiar-looking Easy Driver connecting it to the Pi. The motor spins the blinds’ mechanism either open or closed, though at a modest pace that’s slow enough to provide the needed torque. [Chris] added an IR diode plugged into the Pi that imitates the air conditioning unit’s remote control, and simply pointed it directly at the unit’s receiver. An inexpensive WiFi dongle gets the Pi onto the network, allowing [Chris] to interact via a custom web interface. The interface itself not only provides a couple of clickable buttons, but a cleverly-designed status image indicating the position of the blinds.

Make sure you see the video below for a demonstration and for more details on the build. This is one of the better examples of home automation devices we’ve seen recently, especially considering it actually fits the “autonomous” implications discussed in our Ask Hackaday post from a few months back—although a relatively simple automation, [Chris’s] interface does allow for operating both the blinds and the AC on a preselected schedule.

Continue reading “Raspi AC And Blinds Controller”

AVR Atmega Based PID Magnetic Levitator

[Davide] saw our recent post on magnetic levitation and quickly sent in his own project, which has a great explanation of how it works — he’s also included the code to try yourself!

His setup uses an Atmega8 micro-controller which controls a small 12V 50N coil using pulse-width-modulation (PWM). A hall effect sensor (Allegro A1302) mounted inside the coil detects the distance to the magnet and that data is used by a PID controller to automatically adjust the PWM of the coil to keep the magnet in place. The Atmega8 runs at 8Mhz and the hall effect sensor is polled every 1ms to provide an updated value for the PWM. He’s also thrown in an RGB LED that lights up when an object is being levitated!

So why is there a kid with a floating balloon? [Davide] actually built the setup for his friend [Paolo] to display at an art fair called InverART 2013!

After the break check out the circuit diagram and a short demonstration video of the device in action!

Oh yeah, those of you not impressed by magnetic levitation will probably appreciate acoustic levitation.

Continue reading “AVR Atmega Based PID Magnetic Levitator”

A Shell For The Stellaris & Tiva

cli

When [antoker] is working on a microcontroller project, he often has to write short bits of test code to make sure everything in his circuit is working properly. This is a time-consuming task, and a while back he started on a small side project. It’s a command line interface for a microcontroller that allows him to send short commands to the uC over a serial connection to play around with the ADC, UART, and GPIO pins.

[antoker]’s tiny Unix-like environment is based on modules  that can keep track of the time, print the current commands and stack to a terminal, and query things like the current speed of the uC and the available Flash and RAM.

This tiny shell also has scripting capabilities and a jump function, making this a true programming language, however minimal it is. Right now [antoker]’s work is available for the TI Stellaris and Tiva series microcontrollers, and a video of a scripted Larson scanner is available below.

Continue reading “A Shell For The Stellaris & Tiva”