Captivating ESP32 Camera Hack

You can never have enough DIY devices at home, so when you look at an ESP32 module that comes with the camera, you automatically start getting ideas. [Daniel Padilla] wanted a way to deploy DIY camera modules without the hassle of configuring them so he made one that looks like an access point and starts streaming as soon as you connect to it.[GitHub]

The code he provides allows the ESP32 to appear as an Open Access Point which you can connect to from a PC or smartphone. The awesome sauce here is that the ESP32 resolves all DNS requests to a redirect in a similar manner to what happens when someone connects to an open Wi-Fi access point in a mall, Instead of a captive portal page that asks the user to authenticate or accept terms and conditions, [Daniel Padilla]’s code instead redirects to the streaming page et voila! Instant camera stream, and it is that simple.

We love this project because it is an elegant way to solve a problem, and it also teaches newbies about captive portals and their implementation. We covered a cheap ESP32 Webcam in the past and this project also comes with code for you to get started. We would love to see what you come up with next.

Homebrew Laptop Makes A Statement With A Steampunk Theme

Some may argue, but your choice of computing hardware says exactly zero about you, at least when you buy off the shelf. Your laptop or PC is only one of millions, and the chances of seeing someone with the exact same machine are pretty good. If you want to be different, you really need to build something yourself.

This homebrew steampunk laptop does a great job at standing out from the crowd. [Starhawk]’s build is an homage to the Steampunk genre, in a wooden case with brass bits and bobs adorning. The guts are based on an Intel motherboard, a bit dated but serviceable enough for the job. There’s a touch-capable LCD in the lid, and we absolutely love the look of the keyboard with its retro-style chrome and phenolic keycaps. Exposed USB cables run to and fro, and the braided jackets contribute to the old-timey look. The copier roller as a lid hinge is a nice touch too.

[Starhawk]’s build log is long and detailed, and covers the entire build. We’ve seen interesting builds from him before, like this junk-bin PC build for a friend in need. Looks like this one is for personal use, though, and we can’t blame him.

Simulated Newton’s Cradle Makes A Flashy Desk Toy

Newton’s Cradle was once upon a time, a popular desk toy in offices around the world. For [TecnoProfesor], however, it wasn’t quite flashy enough. Instead, they built a simulated version with flashing LEDs. As you do.

Rather than relying on the basic principles of the cradle to make it work, this relies on two servo motors to move the balls on the ends, with the ones in the middle remaining stationary. Each ball is fitted with an RGB LED, which flashes with the simulated “motion” of the cradle. By using ping pong balls, the light from the LEDs is nicely diffused. The frame is built from wooden dowels, metal rods, and acrylic.

It’s a project that is sure to confuse at first glance, but it’s a great way to learn basic microcontroller skills like interfacing with LEDs and servomotors. We’d love to see a version that works like a real Newton’s Cradle, flashing the LEDs as they are hit by their neighbours. We’ve even seen them automated, for the truly lazy among us.  Alternatively, one could go completely ridiculous and have such a device tweet on every hit, though you might run afoul of the API’s spam restrictions. If you give it a go, drop us a line.

Ferrofluid Display Fuels The Fun, And The Procrastination

When deadlines loom and your future is on the line, do what top college students through the ages have always done: procrastinate! [Simen] and [Amund] did that in grand style by starting a YouTube channel, delightfully and aptly named “Applied Procrastination”, wherein they plan to avoid their responsibilities as long as possible in favor of making a large-scale ferrofluidic display panel. (Video, embedded below.)

We suppose we should encourage them to hit the books, but honestly they look like they’re having much more fun and learning more than they would in class. The idea isn’t new; we’ve seen ferrofluid clocks before, after all. [Amund] and [Simen] have grander plans for their display, but they’re wisely starting small with basic experiments. They had an early great idea to use a double-pane window as a tank for their display, but coatings on the inside of the glass and the aluminum frame conspired to cloud the display. They also did some tests to make sure they can control 252 electromagnets safely. They did manage to get a small test display working, but really the bulk of the video is just them playing with magnets and ferrofluid. And again, we’re OK with that.

It looks like this is going to be an interesting project, with hopefully regular updates to the channel now that summer break is upon us. Unless they find something else to do, of course.

Continue reading “Ferrofluid Display Fuels The Fun, And The Procrastination”

For Better Photogrammetry, Just Add A Donut

If you don’t have access to a 3D scanner, you can get a lot done with photogrammetry. Basically, you take a bunch of pictures of an object from different angles, and then stitch them together with software to create a 3D model. For best results, you need consistent, diffuse lighting, an unchanging background, and a steady camera.

Industrial designer [Eric Strebel] recently made an Intro to Photogrammetry video wherein he circled an object taking photos with his bare hands. One commenter suggested a different method: build a donut-shaped turntable that circles the object, which sits on a stationary platform. Attach the camera to the donut, counterbalance the weight, and Bob’s your proverbial uncle. [Eric] thought it was a brilliant idea (because it is), and he built a proof of concept. This is that video.

[Eric] can move the camera up and down the arc of the boom to get all the Z-positions he wants. The platform has a mark every 10° and there’s a pointer in the platform to line them up against for consistent camera positioning. He was pleasantly surprised by the results, which we agree are outstanding.

We always learn a lot from [Eric]’s videos, and this one’s no exception. Case in point: he makes a cardboard mock-up by laying out the pieces, and uses that to make a pattern for the recycled plywood and melamine version. In the photogrammetry video, he covers spray paint techniques to make objects reflect as little light as possible so the details don’t get lost.

If you prefer to rotate your objects, get an Arduino out and automate the spin.

Continue reading “For Better Photogrammetry, Just Add A Donut”

Supercapacitors Propel Rocket To The Skies

OK, so this isn’t really a rocket. In the strictest definition, rockets are vehicles or projectiles that propel themselves through jettisoning mass, usually through the combustion of fuel. But with electric motors getting stronger and stronger, folks are building craft that look a lot more like rockets than airplanes. [Tom Stanton] is one such person (Youtube link, embedded below).

We’ve seen “electric rocket” builds before, but where others have used lithium batteries, [Tom] has used supercapacitors instead. Six supercaps are installed in a 3D printed mount, and supply power to a 500 W brushless outrunner motor which gives the rocket the thrust to climb into the sky.

In testing, [Tom] estimates the rocket was able to reach an altitude of approximately 60 m, or 200 ft. That’s not particularly astounding, but it does prove that supercaps can run a high current load in a real world situation. Additionally, their fast recharge rate allows [Tom] to make a repeat flights in just about the time it takes to repack the parachute. Video after the break.

Continue reading “Supercapacitors Propel Rocket To The Skies”

Cold Plasma Torch Produces A Cleansing Flame That Never Consumes

It’s basically a lightsaber. Except smaller. And with an invisible blade. And cold to the touch. But other than that, this homebrew cold plasma torch (YouTube, embedded below) is just like the Jedi’s choice in elegant weaponry.

Perhaps we shouldn’t kid [Justin] given how hard he worked on this project – seventeen prototypes before hitting on the version seen in the video below – but he himself notes the underwhelming appearance of the torch without the benefit of long-exposure photography. That doesn’t detract from how cool this build is, pun intended. As [Justin] explains, cold plasma or non-equilibrium plasma is an ionized stream of gas where the electron temperature is much hotter than the temperature of the heavier, more thermally conductive species in the stream. It’s pretty common stuff, seen commercially in everything from mercury vapor lamps to microbial sterilization.

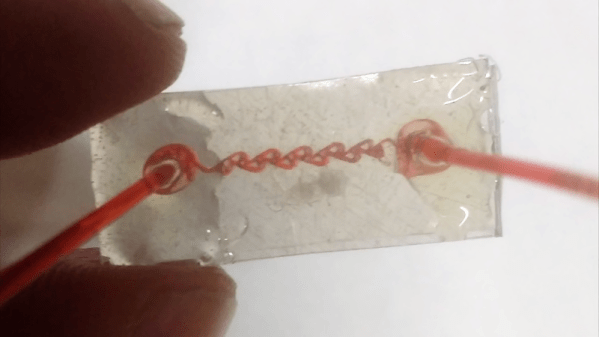
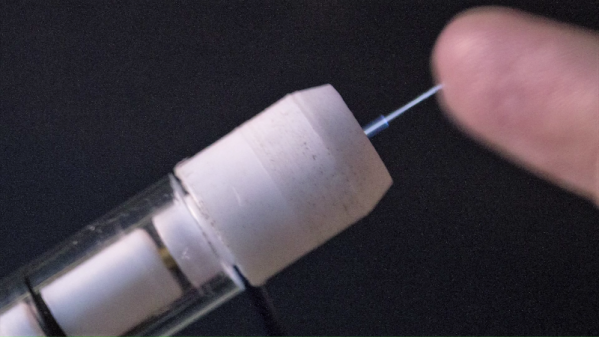
It’s the latter use that piqued [Justin]’s interest and resulted in a solid year of prototyping before dialing in a design using a flyback transformer to delivery the high voltage to a stream of argon flowing inside a capillary tube. The quartz tube acts as a dielectric that keeps electrons from escaping and allows argon to be ionized and wafted gently from the tube before it can reach thermal equilibrium. The result is a faint blue glowing flame that’s barely above room temperature but still has all the reactive properties of a plasma. The video shows all the details of construction and shows the torch in action.

Hats off to [Justin] for sticking with a difficult build and coming through it with an interesting and useful device. We’ve no doubt he’ll put it to good use in his DIY biohacking lab in the coming months.

Continue reading “Cold Plasma Torch Produces A Cleansing Flame That Never Consumes”