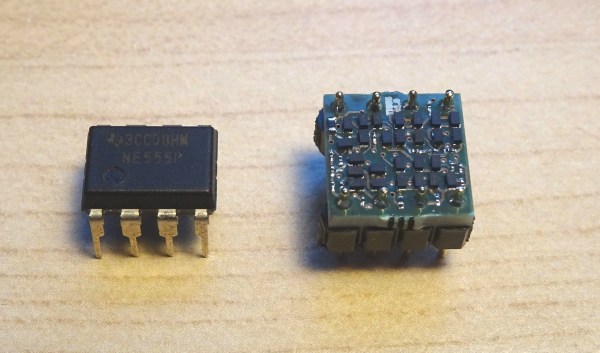
aemkei's xor patterns

Alien Art Drawn With Surprisingly Simple Math

Programmer [aemkei] Tweeted the formula (x ^ y) % 9 alongside code for more “alien art”. But how can a formula as simple as (x ^ y) % 9 result in a complex design? The combination of Bitwise XOR (^) and Modulo (%) generate a repeating pattern that’s still complex enough to satisfy the eye, and it’s ok if that doesn’t sound like an explanation. Bitwise operations are useful when working with memory and shift registers, but also worth learning if you want to drive lines or matrices of LEDs or interpret combinations of multiple switches, or in this case a great way to throw an interesting test pattern up on a new flip-dot display or low-res LED matrix. Are you into it? We are, so let’s jump in.

XOR Truth Table
0b00 0b01 0b10 0b11
0b00 0b00 0b01 0b10 0b11
0b01 0b01 0b00 0b11 0b10
0b10 0b10 0b11 0b00 0b01
0b11 0b11 0b10 0b01 0b00

Bitwise XOR compares each binary digit of the two inputs. The XOR returns a 1 when only one of the two digits is a 1, otherwise, it returns a zero for that position. Let’s say the coordinates were 3, 2. Converted to binary we have 0b11 and 0b10. From this truth table, we can see the most-significant digits are both 1, returning a 0, while only one of the least-significant digits is a 1, so the comparison returns a 1.

Moving onto the %, which is the Modulo operator has nothing to do with percentages. This operator divides two numbers and returns the remainder if any. Take 9 % 5. When dividing 9 by 5, 5 goes in once with a remainder of 4 so 9 % 5 = 4. Now our original formula from the top will draw a black box for every ninth number except that the bitwise XOR throws a wrench into that count, varying how often a number divisible by 9 appears and supplying the complexity necessary for these awesome patterns.

detail of aemkei's xor patterns

What are the most interesting designs can you create in a simple formula?

The Dynamotor Simplified

[Robert Murray-Smith] doesn’t like the price of inverters to convert DC to AC. That led him to build a dynamotor, or what is sometimes called a motor-generator set. These devices are just DC motors driving a generator. Of course, motors can also be used as generators and [Robert] had a stack of brushless motors in the form of PC fans. A two-fan dynamotor was born.

The brushless motors are attractive because, traditionally, the brushes are what usually fail on a dynamotor. The fan that will act as a generator needs some surgery, but it is simple. He scraped off all the control electronics and connected wires to the coils to form a three-phase generator. There’s no need for the fan blades in that configuration, either. If you were using ordinary motors and a generator, getting shafts concentric would be an important task. With the fans, it is simple to just line up the mounting holes and you get perfect alignment for free.

How does it work? [Robert] has a second video showing the output on a scope. You can see both videos below. The dynamotor makes a good-looking sine wave, probably much better than most reasonable-priced solid state inverters. He didn’t mention how much current he could successfully draw, but it probably isn’t much. You’d also need a transformer to replace a commercial inverter that would put out line voltage, so that would be some more loos in the system. On the other hand, if you wanted AC at a lower voltage, you might just replace all the transformers, if you were building a piece of gear yourself.

We’ve looked at how these things work in some detail. There were common in old tube radios, particularly military ones.

Continue reading “The Dynamotor Simplified”

Shoot Above The Waves On This E-Foil Made From A Rifle Case

So you say you want to fly above the waves on an electric hydrofoil, but you don’t have the means to buy a commercial board. Or, you don’t have the time and skills needed to carve a board and outfit it with the motor and wing that let it glide above the water. Are you out of luck? Not if you follow this hackworthy e-foil build that uses a waterproof rifle case as the… hull? Board? Whatever, the floaty bit.

If you haven’t run across an e-foil before, prepare to suddenly need something you never knew existed. An e-foil is basically a surfboard with a powerful brushless motor mounted on a keel of sorts, fairly far below the waterline. Along with the motor is a hydrofoil to provide lift, enough to raise the board well out of the water as the board gains speed. They look like a lot of fun.

Most e-foils are built around what amounts to a surfboard, with compartments to house the battery, motor controller, and other electronics. [Frank] and [Julian] worked around the difficult surfboard build by just buying a waterproof rifle case. It may not be very hydrodynamic, but it’s about the right form factor, it already floats, and it has plenty of space for electronics. The link above has a lot of details on the build, which started with reinforcing the case with an aluminum endoskeleton, but at the end of the day, they only spent about 2,000€ on mostly off-the-shelf parts. The video below shows the rifle case’s maiden voyage; we were astonished to see how far and how quickly the power used by the motor drops when the rifle case leaves the water.

Compared to some e-foil builds we’ve seen, this one looks like a snap. Hats off to [Frank] and [Julian] for finding a way to make this yet another hobby we could afford but never find time for.

Continue reading “Shoot Above The Waves On This E-Foil Made From A Rifle Case”

Harmonic Drive Uses Compliant Mechanism To Slim Down

[Levi Janssen] has a secret: he doesn’t like harmonic drives. But rather than abandon the torque-amplifying transmission completely, he decided to see about improving them using 3D-printed compliant mechanisms.

For the uninitiated, harmonic drives, also known as strain-wave gears, are a compact, high-torque gearbox that has become popular with “robotic dog” makers and other roboticists. The idea is to have a rigid, internally-toothed outer ring nested around an externally-toothed, flexible cup. A wave generator rotates within the inside cup, stretching it so that it meshes with the outer ring. The two gears differ by only a couple of teeth, meaning that very high gear ratios can be achieved, which makes them great for the joints of robot legs.

[Levi]’s problem with the harmonic drive is that due to the depth of the flexible spline cup, compactness is not among its virtues. His idea is to couple the flex spline to the output of the drive through a flat spring, one that allows flexion as the wave generator rotates but transmits torque efficiently. The entire prototype is 3D-printed, except for the wave generator bearings and stepper motor, and put to the test.

As the video below shows after the excellent introduction to harmonic drives, the concept works, but it’s not without its limitations. Even lightly loaded, the drive made some unpleasant crunching sounds as the PLA springs gave out. We could easily see that being replaced with, say, a steel spring, either machined or cut on a water-jet machine. That might solve the most obvious problem and make [Levi]’s dream of a compact harmonic drive a reality. Of course, we have seen pretty compact strain-wave gears before.

Continue reading “Harmonic Drive Uses Compliant Mechanism To Slim Down”

This Custom Dynamometer Is A Stirling Example Of Homebrewing

[Leo Fernekes] has fallen down the Stirling engine rabbit hole. We mustn’t judge — things like this happen in the best of families, after all. And when they do happen to someone like [Leo], things can get interesting mighty quickly.

His current video, linked below, actually has precious little to do with his newfound Stirling engine habit per se. But when you build a Stirling engine, and you’re of a quantitative bent, having some way to measure its power output would be handy. That’s a job for a dynamometer, which [Leo] sets out to build in grand fashion. Dynos need to measure the torque and rotational speed of an engine while varying the load on it, and this one does it with style.

[Leo]’s torque transducer is completely DIY, consisting of hand-wound coils on the ends of a long lever arm that’s attached to the output shaft of the engine under test by a magnetic coupling. The coils are free to move within a strong magnetic field, with a PID loop controlling the current in the coils. Feedback on the arm’s position is provided by an optical sensor, also DIY, making the current necessary to keep the arm stationary proportional to the input torque. The video goes into great detail and has a lot of design and build tips.

We just love the whole vibe of this build. There may have been simpler or quicker ways to go about it, but [Leo] got this done with what he had on hand for a fraction of what buying in off-the-shelf parts would have cost. And the whole thing was a great learning experience, both for him and for us. It sort of reminds us of a dyno that [Jeremy Fielding] built a while back, albeit on a much different scale.

Continue reading “This Custom Dynamometer Is A Stirling Example Of Homebrewing”

Flight Of The Pterothopter: A Jurassic-Inspired Ornithopter

Ornithopters look silly. They look like something that shouldn’t work. An airplane with no propeller and wings that go flappy-flappy? No way that thing is going to fly. There are, however, a multitude of hobbyists, researchers, and birds who would heartily disagree with that sentiment, because ornithopters do fly. And they are almost mesmerizing to watch when they do it, which is just one reason we love [Hobi Cerdas]’s build of the Pterothopter, a rubber band-powered ornithopter modeled after a pterodactyl.

All joking aside, the science and research behind ornithopters and, relatedly, how living organisms fly is fascinating in itself — which is why [Lewin Day] wrote that article about how bees manage to become airborne. We can lose hours reading about this stuff and watching videos of prototypes. While most models we can currently build are not as efficient as their propeller-powered counterparts, the potential of evolutionarily-perfected flying mechanisms is endlessly intriguing. That alone is enough to fuel builds like this for years to come.

As you can see in the video below, [Hobi Cerdas] went through his own research and development process as he got his Pterothopter to soar. The model proved too nose-heavy in its maiden flight, but that’s nothing a little raising of the tail section and a quick field decapitation couldn’t resolve. After a more successful second flight, he swapped in a thinner rubber band and modified the wing’s leading edge for more thrust. This allowed the tiny balsa dinosaur to really take off, flying long enough to have some very close encounters with buildings and trees.

For those of you already itching to build your own Pterothopter, the plans come from the Summer 2017 issue of Flapping Wings, the official newsletter of the Ornithopter Society (an organization we’re so happy to learn about today). You can also find more in-depth ornithopter build logs to help you get started. And, honestly, there’s no reason to limit yourself to uncontrolled flight; we’ve come across some very impressive RC ornithopters in the past.

Continue reading “Flight Of The Pterothopter: A Jurassic-Inspired Ornithopter”

Decoding S/PDIF With A Microcontroller Brings A Few Headaches

The average punter shunts audio around with analog 3.5 mm cables, RCA jacks, or Bluetooth on a regular basis. A useful standard that hasn’t really bothered most of us is S/PDIF, standing for Sony/Phillips Digital Interface. It’s a useful way to pump digital audio around over copper cables or optic fiber. [Andrew Jeddeloh] got curious about the standard after contemplating some long cable runs in his home, and decided to try decoding it.

The target for [Andrew]’s development efforts was the STM32L476 Discovery, which had no SPDIF decoding hardware on board. Instead, [Andrew] tinkered with the peripherals he had to see what would work. In the end, a cavalcade of internal timers were daisy chained to allow the microcontroller to recover a clock from the self-clocked S/PDIF signal. This was then used to generate a clock to sync up the onboard SPI hardware to actually read in the 16-bit PCM data from the S/PDIF signal.

[Andrew]’s original broader plan was to pipe the S/PDIF data to the onboard I2S DAC, though he struggled manipulating the remaining resources on the STM chip to do so successfully. Anyone wishing to have a crack can take a look at [Andrew]’s code over on GitHub. If completed, the STM32L476 would become a useful analog endpoint for S/PDIF streams, allowing you to pump tunes digitally over long distances without signal degradation. If you know the key to getting it done, sound off in the comments! Alternatively, if you need to get up and running more quickly, the Teensy platform has you covered!