Last time, I gave you an overview of what you get from I2C, basics like addressing, interface speeds, and a breakdown of pullups. Today, let’s continue looking into I2C capabilities and requirements – level shifting, transfer types, and quirks like combined transfers or clock stretching.
Peripherals Hacks1528 Articles
Floorboard Is A Keyboard For Your Feet
Whether you have full use of your hands or not, a foot-operated keyboard is a great addition to any setup. Of course, it has to be a lot more robust than your average finger-operated keyboard, so building a keyboard into an existing footstool is a great idea.
When [Wingletang]’s regular plastic footrest finally gave up the ghost and split in twain, they ordered a stronger replacement with a little rear compartment meant to hold the foot switches used by those typing from dictation. Settling upon modifiers like Ctrl, Alt, and Shift, they went about designing a keyboard based on the ATmega32U4, which does HID communication natively.
For the switches, [Wingletang] used the stomp switches typically found in guitar pedals, along with toppers to make them more comfortable and increase the surface area. Rather than drilling through the top of the compartment to accommodate the switches, [Wingletang] decided to 3D print a new one so they could include circuit board mounting pillars and a bit of wire management. Honestly, it looks great with the black side rails.
If you want to build something a little different, try using one of those folding stools.
Keebin’ With Kristina: The One With The Folding Typewriter
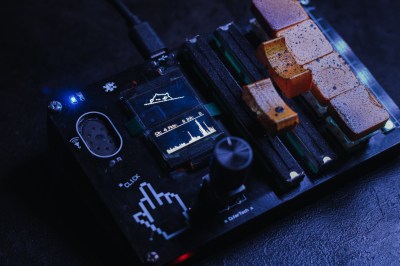
Have you built yourself a macro pad yet? They’re all sorts of programmable fun, whether you game, stream, or just plain work, and there are tons of ideas out there.

This baby runs on an ATmega32U4, which known for its Human Interface Device (HID) capabilities. [CiferTech] went with my own personal favorite, blue switches, but of course, the choice is yours.
There are not one but two linear potentiometers for volume, and these are integrated with WS2812 LEDs to show where you are, loudness-wise. For everything else, there’s an SSD1306 OLED display.
But that’s not all — there’s a secondary microcontroller, an ESP8266-07 module that in the current build serves as a packet monitor. There’s also a rotary encoder for navigating menus and such. Make it yours, and show us!
Continue reading “Keebin’ With Kristina: The One With The Folding Typewriter”
A Simple 6DOF Hall Effect ‘Space’ Mouse
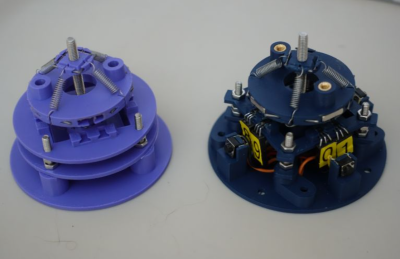
The 3DConnexion Space mouse is an interesting device but heavily patent-protected, of course. This seems to just egg people on to reproduce it using other technologies than the optical pickup system the original device uses. [John Crombie] had a crack at building one using linear Hall effect sensors and magnets as the detection mechanism to good — well — effect.
Using the SS49E linear Hall effect sensor in pairs on four sides of a square, the setup proves quite straightforward. Above the fixed sensor plate is a moveable magnet plate centred by a set of springs. The magnets are aligned equidistant between each sensor pair such that each sensor will report an equal mid-range signal with zero mechanical displacement. With some simple maths, inputs due to displacements in-plane (i.e., left-right or up-down) can be resolved by looking at how pairs compare to each other. Rotations around the vertical axis are also determined in this manner.
Tilting inputs or vertical movements are resolved by looking at the absolute values of groups or all sensors. You can read more about this by looking at the project’s GitHub page, which also shows how the to assemble the device, with all the CAD sources for those who want to modify it. There’s also a detour to using 3D-printed flexures instead of springs, although that has yet to prove functional.
On the electronics and interfacing side of things, [John] utilises the Arduino pro micro for its copious analog inputs and USB functionality. A nice feature of this board is that it’s based on the ATMega32U4, which can quickly implement USB client devices, such as game controllers, keyboards, and mice. The USB controller has been tweaked by adjusting the USB PID and VID values to identify it as a SpaceMouse Pro Wireless operating in cabled mode. This tricks the 3DConnexion drivers, allowing all the integrations into CAD tools to work out of the box.
We do like Space Mouse projects. Here’s a fun one from last year, an interesting one using PCB coils and flexures, and a simple hack to interface an old serial-connected unit.
Using A 2D Scanner To Make 3D Things
[Chuck Hellebuyck] wanted to clone some model car raceway track and realised that by scanning the profile section of the track with a flatbed scanner and post-processing in Tinkercad, a useable cross-section model could be created. This was then extruded into 3D to make a pretty accurate-looking clone of the original part. Of course, using a flatbed paper scanner to create things other than images is nothing new, if you can remember to do it. A common example around here is scanning PCBs to capture mechanical details.
The goal was to construct a complex raceway for the grandkids, so he needed numerous pieces, some of which were curved and joined at different angles to allow the cars to race downhill. After printing a small test section using Ninjaflex, he found a way to join rigid track sections in curved areas. It was nice to see that modern 3D printers can handle printing tall, thin sections of this track vertically without making too much of a mess. This fun project demonstrates that you can easily combine 3D-printed custom parts with off-the-shelf items to achieve the desired result with minimal effort.
Flatbed scanner hacks are so plentiful it’s hard to choose a few! Here’s using a scanner to recreate a really sad-looking PCB, hacking a scanner to scan things way too big for it, and finally just using a scanner as a linear motion stage to create a UV exposure unit for DIY PCBs.
A Journey Into Unexpected Serial Ports
Through all the generations of computing devices from the era of the teleprinter to the present day, there’s one interface that’s remained universal. Even though its usefulness as an everyday port has decreased in the face of much faster competition, it’s fair to say that everything has a serial port on board somewhere. Even with that ubiquity though, there’s still some scope for variation.
Older ports and those that are still exposed via a D socket are in most case the so-called RS-232, a higher voltage port, while your microcontroller debug port will be so-called TTL (transistor-transistor logic), operating at logic level. That’s not quite always the case though, as [Terin Stock] found out with an older Garmin GPS unit.
Pleasingly for a three decade old device, given a fresh set of batteries it worked. The time was wrong, but after some fiddling and a Windows 98 machine spun up it applied a Garmin update from 1999 that fixed it. When hooked up to a Flipper Zero though, and after a mild panic about voltage levels, the serial port appeared to deliver garbage. There followed some investigation, with an interesting conclusion that TTL serial is usually the inverse of RS-232 serial, The Garmin had the RS-232 polarity with TTL levels, allowing it to work with many PC serial ports. A quick application of an inverter fixed the problem, and now Garmin and Flipper talk happily.
Tiny Custom Keyboard Gets RGB
Full-size keyboards are great for actually typing on and using for day-to-day interfacing duties. They’re less good for impressing the Internet. If you really want to show off, you gotta go really big — or really small. [juskim] went the latter route, and added RGB to boot!
This was [juskim]’s attempt to produce the world’s smallest keyboard. We can’t guarantee that, but it’s certainly very small. You could readily clasp it within a closed fist. It uses a cut down 60% key layout, but it’s still well-featured, including numbers, letters, function keys, and even +,-, and =. The build uses tiny tactile switches that are SMD mounted on a custom PCB. An ATmega32U4 is used as the microcontroller running the show, which speaks USB to act as a standard human interface device (HID). The keycaps and case are tiny 3D printed items, with six RGB LEDs installed inside for the proper gamer aesthetic. The total keyboard measures 66 mm x 21 mm.
Don’t expect to type fast on this thing. [juskim] only managed 14 words per minute. If you want to be productive, consider a more traditional design.


