A Hackable Keyboard That Even Has Screens

There are a huge number of available keyboards out in the world these days, catering to all of the plainest and the most advanced desires. However, if you want something that’s just right, sometimes it pays to build your own. [Zach] did just that.

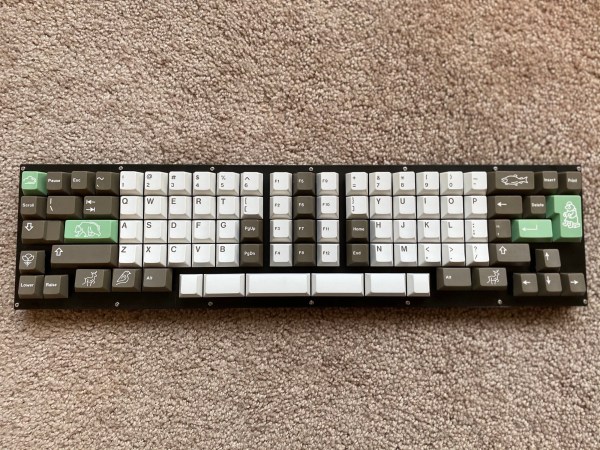
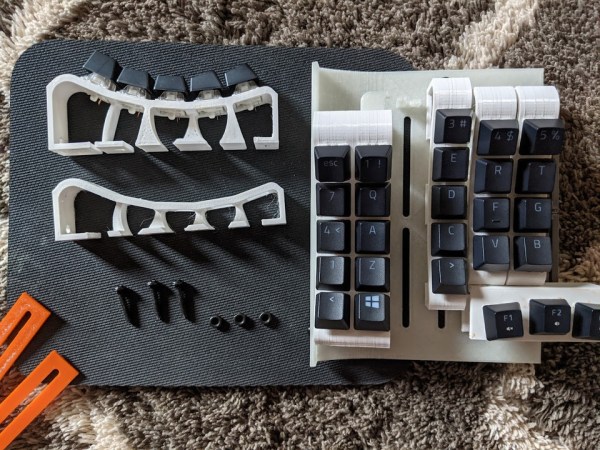
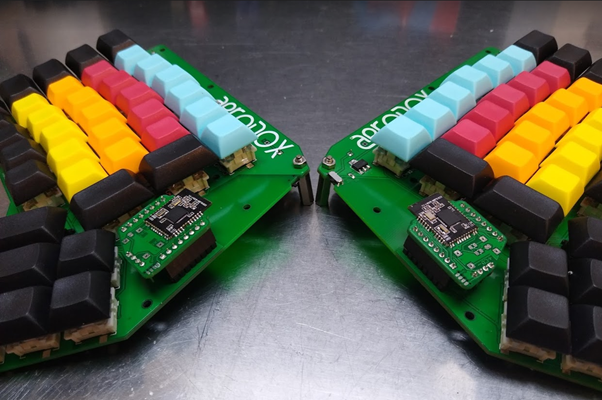
One of the key features of [Zach]’s build is that it diverges away from the Cherry MX switch form factor. The design uses low-profile switches instead, which help with keeping the keyboard low enough to avoid it causing wrist problems. The keyboard also uses IO expanders to hook up all the key switches, helping to reduce the incidence of ghost keys. The board can also be split in half, allowing it to be repurposed as a smaller macropad when desired.

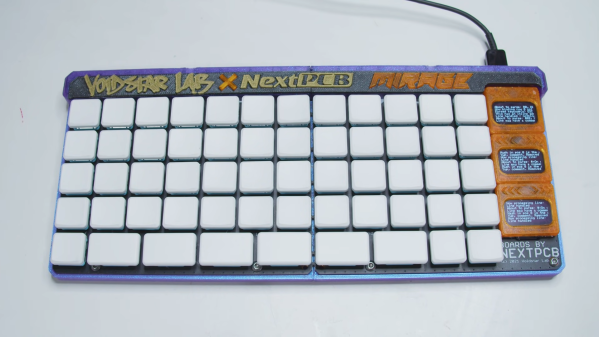
It’s all wrapped up in a cool 3D printed case, and there are even three OLED displays on the right-hand side. They’re soldered to the PCB on special cutouts that allow the displays to flex and trigger tactile switches, acting as giant pressable buttons.

[Zach] does a great job explaining all the nifty engineering decisions he made to cram maximum functionality into the design. We’ve seen some other great DIY ergonomic designs too. Video after the break.

Continue reading “A Hackable Keyboard That Even Has Screens”

Finally, an ortho split keyboard with two Enter keys.

All Aboard! The Railroad Keyboard Is Now Serving Open Sourceville

Sometimes you don’t know what you want until you see it, and that goes for keyboard designs as much as it does the dessert cart. The Railroad is [DiplomacyPunIn10Did]’s first keyboard design, believe it or not. And, well, we like what we see. Good thing it’s open-source, eh?

While we personally don’t normally go for straight-up ortholinear keyboards, this one looks split enough to be comfortable. We love that there is both an ISO Enter and a regular-sized Return, although we might put another Enter on the left side if it were our keyboard. That’s the beauty of this whole open-source keyboard thing, though. I could assign any number of those animal-capped keys to Enter. Another plus is that The Railroad uses semi-normal keycap sets, with none of this 1.25u nonsense of certain split keyboards.

All the files and the BOM are available on GitHub under a Creative Commons license. This represents JLCPCB’s max length, by the way. [DiplomacyPunIn10Did] wanted to add a num pad, but it would have made it too long. Since the pictures are so big, we put our hands up to the screen to test it out. Those innermost 1u thumb keys look like they’re placed just far enough in toward the space bars that they wouldn’t cause strain, but it’s hard to know for sure without trying a real one. (Darn you, global shortages and shipping delays!)

Yep, there are all kinds of ways to make a keyboard your own. We’ve even seen an all-wood keyboard that uses Scrabble tiles for keycaps.

A sandbox for ergonomic keyboard makers.

Dactyl Chimera Leaves The Learning Out Of The Curve

Have you been wanting to build your own keyboard, ergonomic or otherwise, but are hesitant to spend all that time and filament on something that may not be a good fit for your hands? Glad as we are that the dactyl is open-source, to get in there and really mess around with it requires intimate knowledge of either OpenSCAD or Clojure.

Well, not anymore. [WolfIcefang]’s dactyl chimera is an ergo sandbox, a test bench for column curvature, stagger, and height that should keep you from having to iterate all day and night. It was designed in FreeCAD and has three parts — the rack, the tenting foot, and the arches. The rack acts like a bottom plate and has slots for holding the columns (arches) in place. Underneath that is the tenting foot, which changes the lateral inclination. Thirdly are the arches, the business part where the switches go.

[WolfIcefang] says it’s sturdy but not portable, and for some reason feels the need to apologize for the looks. We think it’s beautiful, but then again are easily captivated by such practicality. It’s not quite a keyboard yet, as [WolfIcefang] has neither wired it up nor burned in any firmware. This is still in the early stages, and [WolfIcefang] wants to open it up to collaborators. Plans for the future include interchangeable thumb clusters and a complete build guide.

Even if you aren’t that fluent in OpenSCAD, you’ll have fun messing around on the keycap modeling playground.

Via r/ErgoMechKeyboards

An Open Source Game Boy Printer That Doesn’t Print

While we’ll admit seeing your Game Boy Camera shots come out on a little slip of thermal paper was pretty neat back in 1998, anyone who’s still using the Game Boy Printer these days is probably more interested in getting their images in digital form. Which is why the open source NeoGB Printer is so exciting.

A collaborative effort between [Rafael Zenaro], [Raphaël BOICHOT], and [Brian Khuu], the project combines an ESP32 development board and some common components with their GPLv3 firmware to fully emulate the Game Boy Printer hardware. Once plugged into your Game Boy, any of the 110 titles that support Nintendo’s paper-pushing peripheral will recognize the NeoGB Printer as the real deal and happily send along the image.

But rather than committing it to paper, the NeoGB Printer saves the image to an SD card. From there, you can put the card in your computer and do whatever you wish with the captured files. Incidentally, it turns out there’s already a commercial gadget on the market that does something very similar, but this DIY approach comes well under its $99 USD price tag. In fact, if you’ve got a Game Boy Link Cable you don’t mind cutting up, you’ve probably got everything you need to pull this off in the parts bin right now.

We particularly like how the team has went out of their way to support different hardware configurations for the NeoGB Printer. If you want to go all out and add status LEDs and an OLED display, go for it. But if you just plan on using the thing once to grab a copy of the Pokémon diploma you earned 20 years ago, then you can skip the bells and whistles.

If you’re only worried about getting your snaps out of the Game Boy Camera, we’ve covered projects that will extract them directly from the cartridge. But this approach certainly has its appeal, as works with a much wider variety of games. We’re glad this project exists, as it means a whole new generation can explore all the wacky ways developers came up with to utilize the Game Boy Printer back in the day.

Refining The Greatest Joystick Of The 1980s

The Competition Pro joystick is often considered to be the pinnacle of input devices, at least as far as the 1980s gaming goes. But the design isn’t perfect, and time hasn’t been kind to certain aspects of its mechanism. For example, the large rubber disc used to keep the stick centered on early generations of the hardware will invariably be hardened up on any surviving specimens. Looking to return these classic controllers to their former glory, and then some, [mageb] has released a number of 3D printed modifications for the Competition Pro that should be of great interest to the vintage gamer.

The new microswitches

First and foremost is the deletion of the original rubber disc for a new spring mechanism. Even if this is the only modification you do, [mageb] says you’ll already have a better and longer-lasting joystick to show for it. But if you want to continue with the full rebuild, be aware that there’s no going back to stock. Once you start cutting the original parts, you’re committed to taking it all the way.

Assuming you’re not afraid to get your hands dirty, the next step is cutting the metal contacts from the bottom of the face buttons so they’ll work with the new microswitch array he’s designed. Each button gets its switch, and four handle movement of the joystick. You can try out different switches to adjust the feel of the joystick, but [mageb] assures us that he’s already done the research and put the best quality switches in the bill of materials.

The end result is a Competition Pro joystick that looks more or less the same from the outside, but is considerably improved internally. That’s always a win in our books, though we’re sure somebody out there is going to get mad that the brittle old rubber disc wasn’t sent to the Smithsonian.

Arduino Brings USB Mouse To Homebrew Computer

When building your own homebrew computer, everything is a challenge. Ultimately, that’s kind of the point. If you didn’t want to really get your hands dirty with the nuts and bolts of the thing, you wouldn’t have built it in the first place. For example, take the lengths to which [rehsd] was willing to go in order to support standard USB mice on their 6502 machine.

Code for mapping mouse movement to digital output.

The idea early on was to leverage existing Arduino libraries to connect with a standard USB mouse, specifically, the hardware would take the form of an Arduino Mega 2560 with a USB Host Shield. There was plenty of code and examples that showed how you could read the mouse position and clicks from the Arduino, but [rehsd] still had to figure out a way to get that information into the 6502.

In the end, [rehsd] connected one of the digital pins from the Arduino to an interrupt pin on the computer’s W65C22 versatile interface adapter (VIA). Then eleven more digital pins were connected to the computer, each one representing a state for the mouse and buttons, such as MOUSE_CLICK_RIGHT and MOUSE_LEFT_DOWN.

Admittedly, [rehsd] says the mouse action is far from perfect. But as you can see in the video after the break, it’s at least functional. While the code could likely be tightened up, there’s obviously some improvements to be made in terms of the electrical interface. The use of shift registers could reduce the number of wires between the Arduino and VIA, which would be a start. It’s also possible a chip like the CH375 could be used, taking the microcontroller out of the equation entirely.

From classic breadboard builds to some impressively practical portable machines, we’ve seen our fair share of 6502 computers over the years. Despite the incredible variation to be found in these homebrew systems, one thing is always the same: they’re built by some of the most passionate folks out there.

Continue reading “Arduino Brings USB Mouse To Homebrew Computer”

Illustrated Kristina with an IBM Model M keyboard floating between her hands.

Keebin’ With Kristina: The One With The Curved Typewriter

Aerodox Flies on Wireless Wings

Aerodox, a wireless, split keyboard.[Simon Merrett] didn’t know anything about keyboards when he started this project, but he didn’t let that stop him. [Simon] did what any of us would do — figure out what you like, learn enough to be dangerous, and then start fiddling around, taking all that inspiration and making a mashup of influences that suits your needs.

The Aerodox design became a cross between the ErgoDox‘s key layout and the logic and communication of the Redox Wireless, itself a reduced-size version of the ErgoDox. Interestingly, [Simon] chose the ErgoDox’s dimensions and spacing, and not those of the Redox. Like a lot of people out there, I found the ErgoDox to be too big for my hands, mostly in that the thumb cluster is too far away from the mainland. It’s nice to see that it suits some people, though.

[Simon] worked up a custom hot-swap footprint that makes the board reversible, much like the ErgoDox. Each half has an NRF51822 for a brain, and there’s a third one that acts as a receiver. This external NRF board is connected over UART to an Arduino Pro Micro, which acts as the USB HID and runs QMK. It’s an interesting journey for sure, so go dig into the logs.

Continue reading “Keebin’ With Kristina: The One With The Curved Typewriter”