The ESP8266 has become the hacker’s microcontroller of choice because it’s exceptionally easy to get the chip connected to the network and talking to other devices. The fact that it’s also absurdly cheap is just a bonus. Since nearly every piece of electronics you buy today is “smart” enough to include some form of Internet control, that means there’s no shortage of gadgets these MCUs can potentially poke and prod.
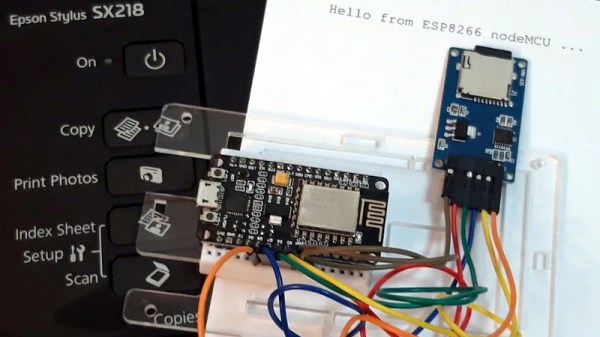
![]() In their latest tip, [TecnoProfesor] shows how you can interface the ESP8266 with Google’s Cloud Print, a service that enables simple remote printing over the web without having to worry about having the proper device drivers. Remote printing from the ESP8266 might seem like little more than a gag at first glance, but if you’re the kind of person who likes to have hard copies of data, adding the capability to generate a daily printed report to your weather station could be a nice weekend project.
In their latest tip, [TecnoProfesor] shows how you can interface the ESP8266 with Google’s Cloud Print, a service that enables simple remote printing over the web without having to worry about having the proper device drivers. Remote printing from the ESP8266 might seem like little more than a gag at first glance, but if you’re the kind of person who likes to have hard copies of data, adding the capability to generate a daily printed report to your weather station could be a nice weekend project.
[TecnoProfesor] provides explanations and source code for printing documents of various sizes from both the ESP8266’s internal flash storage and an SPI-attached SD card. Towards the end of the write-up, there’s even some explanation of how the setPrintDocument() function of the Cloud Print API can be used in more advanced scenarios, such as printing web pages or documents stored in Google Drive.
When we see microcontrollers connected to printers, they’re usually of the small thermal kind. Being able to access “real” printers with such a simple technique offers some interesting possibilities, though like most technology, there’s potential for it to be misused.
[Thanks to Andrew for the tip.]