Macintosh Classic II With E-Ink Display

As various antique computers age, it becomes increasingly hard to operate them as hardware begins to physically fail. Keeping these systems up and running often requires scavenging parts from other machines which are only becoming harder to find as time goes on. But if you throw out the requirement of using only era-appropriate components, there are some interesting ways to revive older devices with a few touches of modern tech, like this Mac Classic with a unique display.

The Macintosh Classic II was the successor to the first Macintosh computer Apple sold that had a price tag under $1000. As such, there were some lower specs for this machine such as the monochrome 512×342 display. This one has been retrofitted with an e-ink display which actually gives it some of the same grayscale aesthetic as the original. The e-ink display is driven by a Raspberry Pi which displays a replica System 7 environment and a set of photos.

While the only part of the computer that’s original is the shell at this point, the project’s creator [Dave] also built in support for the Apple Desktop Bus through an Arduino so the original Apple mouse and keyboard can be used. While it’s largely an illusion of a working Mac Classic, we still appreciate the aesthetic.

If you’re more of a classic Apple purist, though, take a look at this SE/30 which uses almost entirely original parts with the exception of a Raspberry Pi to allow it to communicate with the modern Internet.

Continue reading “Macintosh Classic II With E-Ink Display”

2022 Cyberdeck Contest: Extruded Rig Exudes Coolness

When we came up with the cyberdeck contest, we figured we would see all kinds of builds, and so far, y’all haven’t disappointed us. Take for instance this tidy but post-apocalyptic build by [facelessloser]. It has that “I used what I could find among the rubble” appeal, yet it looks so clean. Now why is that?

It must be partially because of the frame, which is 2020 aluminium extrusion. Now as you can see, this cyberdeck is based on the Raspberry Pi 400, which combines the power of a Pi 4 with a chiclet keyboard and the retro feel of the all-in-one computers of yore.

But this cyberdeck build really began because [facelessloser] had a 7″ HDMI screen kicking around for a while and finally settled on this design. The screen connects to the extrusion rail with a pair of custom-printed brackets, and is prevented from sliding back and forth with more plastic, including a nice enclosure that holds the speaker, amp board, headphone jack, and USB-C port.

Since the screen has no sound of its own, [facelessloser] added a 3 W amplifier board and a speaker for playing chiptunes and other kinds of electronic noise that provide just the right ambiance. We absolutely love the printed mesh cover on the back made of hexagons — not only does it look nice, it’s a functional, minimal, breathable solution to corralling the cabling while simultaneously showing off the internals. You can find a bit more detail and some extra build pictures over on the blog post, and be sure to check out the video after the break to see how [facelessloser] has implemented this cyberdeck into their bench, and stick around for a tour of the build.

Continue reading “2022 Cyberdeck Contest: Extruded Rig Exudes Coolness”

An EMMC Gives Up Its Secrets

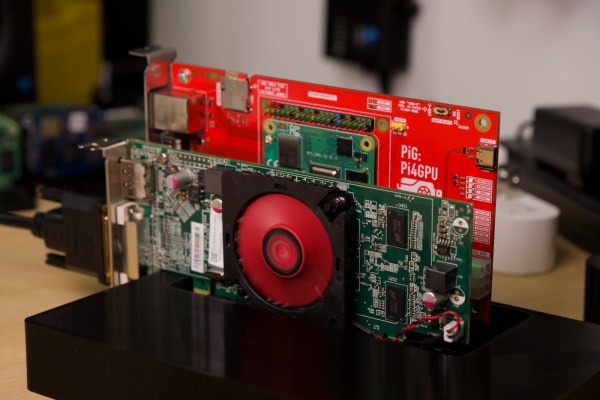
An increasing phenomenon over the years since mobile phones morphed from simply telephones into general purpose pocket computers has been that of the dead device taking with it some treasured digital resource. In most cases this means the device has died, but doesn’t necessarily mean that that the data has completely gone. Inside the device will be an eMMC flash chip, and if that can be read then the data is safe. This applies to some single board computers too, and thus [Jeffmakes]’ adventures in recovering an eMMC from a dead Raspberry Pi CM4 are particularly interesting.

The whole thing relies on the eMMC presenting the same interface as an SD card, so while it comes in a multi-pin BGA package it can be addressed with surprisingly few wires. Using the PCB from another dead CM4 he traced the relevant connections from eMMC to SoC pads, and was thus able with some very fine soldering to construct an interface for an SD card reader. The disk could then be imaged in its entirety.

This work will be of huge use to experimenters who’ve fried their Compute Modules, but of course the information it contains will also be of use to retrieve those photos from the phone that fell in the bath. It’s not the first time we’ve taken a look at someone’s efforts in this area.

Fytó Is Fido For Phytophiles

On the surface, most plants really aren’t all that exciting, save for maybe the Venus flytrap. Sure, you can watch them grow in the long run, but for the most part, they’re just kind of there, quietly bringing peace and cleaner air. Day by day, they hardly move at all, although if you’re one of those people who likes to get the Sim into the pool and take the ladder away, you could always play the drought game just to watch it droop and come back to life a half hour later.

Fytó the smart planter is a much more cool and far less cruel way of spicing up your plant life. The idea is to turn a plant into a pet by giving it an expressive face. Sure, plants have needs, but they communicate them more subtly than the average Earthing. By assigning animated emoji to various conditions, the plant becomes more familiar and in turn, feels more like a pet. Plus, the whole thing is just so darn cute.

Fytó runs on a Raspberry Pi 2W and has six emotions that are based on a capacitive soil moisture sensor, an LM35 temperature sensor, and an LDR module to detect light levels. If everything is copacetic, Fytó puts on a happy face, and will lick its lips after getting a drink of water. If the light is insufficient, Fytó looks sleepy; if the plant needs water, Fytó appears sweaty, red-faced, and parched. Don’t conflate this with the temperature-taking emoji, which indicates that Fytó is too hot. Finally, if the spot is too drafty and cold, Fytó looks like it’s nearly frozen. Be sure to check out the video after the break and watch Fytó work through their range of emotions.

Would you rather hear your plant complain in English? There’s a build for that.

Continue reading “Fytó Is Fido For Phytophiles”

Get Your Raspberry Pi Jamming With MuPiBox

Over the years we’ve seen a lot of Raspberry Pi boards pushed into service as media players. In fact, second to emulating old game consoles, that’s probably the Pi’s most common vocation when it comes to DIY builds. But despite the popularity of this particular use case, it seems like each one has had to reinvent the wheel.

Perhaps there’s where MuPiBox fits in. Developed by [Eric Gerhardt] and [Olaf Split] with the assistance of [Andreas Lippmann] and [Andrew Frericks], this project aims to turn everyone’s favorite Linux single-board computer into everyone’s favorite music player. MuPiBox provides not only the software to run your new high-tech boom box, but it even standardizes the hardware design and provides a 3D printable enclosure — though naturally there’s still room for interpretation if you don’t want yours to look exactly like all the others.

Your MuPiBox can look like whatever you want.

At the very minimum you’ll need a Raspberry Pi, a HifiBerry MiniAmp, and a speaker, though the instructions also recommend you invest in a Pimoroni OnOff SHIM (or wire up something comparable) to facilitate more graceful shutdowns. For the best experience you’ll also want a five inch Waveshare touch screen display and a USB power bank so your beats can go mobile.

The video below shows off the polished stock GUI, which is simple enough that even children should be able to navigate around and find their favorite tracks. Which is good, especially since it’s in German. The video also shows off some advanced setup features so you don’t have to pull the SD card out of the Pi just to change the WiFi network it’s attached to. There’s also a web interface that you can access from other devices on the network.

It’s a slick project, and we really like the aesthetics of the 3D printable enclosure. But even if you don’t want to replicate the project exactly, there’s certainly components here which could be utilized in your own Pi media center build.

Continue reading “Get Your Raspberry Pi Jamming With MuPiBox”

A Merciless Environmental Monitoring System

We’ve seen plenty of environmental monitoring setups here on Hackaday — wireless sensors dotted around the house, all uploading their temperature and humidity data to a central server hidden away in some closet. The system put together by [Andy] from Workshopshed is much the same, except this time the server has been designed to be as bright and bold as possible.

The use of Mosquitto, InfluxDB, Node Red, and Grafana (M.I.N.G) made [Andy] think of Ming the Merciless from Flash Gordon, which in turn inspired the enclosure that holds the Raspberry Pi, hard drive, and power supply. Some 3D printed details help sell the look, and painted metal mesh panels make sure there’s plenty of airflow.

While the server is certainly eye-catching, the sensors themselves are also worth a close look. You might expect the sensors to be based on some member of the ESP family, but in this case, [Andy] has opted to go with the Raspberry Pi Pico. As this project pre-dates the release of the wireless variant of the board, he had to add on an ESP-01 for communications as well as the DTH11 temperature and humidity sensor.

For power each sensor includes a 1200 mAh pouch cell and a Pimoroni LiPo SHIM, though he does note working with the Pico’s energy saving modes posed something of a challenge. A perfboard holds all the components together, and the whole thing fits into an understated 3D printed enclosure.

Should you go the ESP8266/ESP32 route for your wireless sensors, we’ve seen some pretty tidy packages that are worth checking out. Or if you’d rather use something off-the-shelf, we’re big fans of the custom firmware developed for Xiaomi Bluetooth thermometers.

Continue reading “A Merciless Environmental Monitoring System”

Self-Hosted Pi Pico Development

Older readers and those with an interest in retrocomputing may remember the days when a computer might well have booted into a BASIC interpreter. It was simultaneously a general purpose device that could run any software it would load, and also a development environment. Not something that can be said for today’s development boards which typically require a host computer on which to write code. Have we lost something along the way? Perhaps an answer to that question can be found in [lurk101]’s self-hosted development environment for the Raspberry Pi Pico.

It presents itself as a shell, with a flash file system, a port of the vi editor, and a C compiler. We might think of vi as being more at home on a UNIX-derived system, but in this case it’s a port of the vi included in BusyBox. Meanwhile the compiler comes from amacc project.

Of course, this still requires a terminal of some type which in practice will mean a host computer. But the feat is nevertheless an interesting one, and we can see that it might not be impossible given the Pico’s surprising versatility to being some of the terminal features onto the chip itself.

It’s worth noting that this isn’t the first attempt we’ve seen to put a command line interface on a development board.