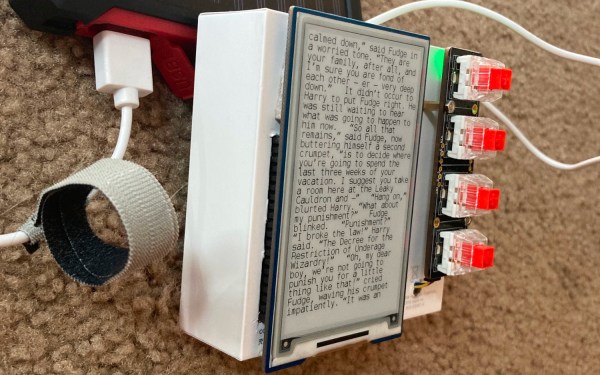
Bare Metal Gives This Pi Some Classic Synths

We’re used to seeing the Raspberry Pi crop up in a wide range of the projects we show you here, but it’s fair to say that they usually feature some sort of operating system. There’s another way to use a Pi, more akin to using a microcontroller such as the Arduino: by programming it directly, so-called bare-metal programming. MiniDexed is an example, and it copies a classic Yamaha professional synthesiser of the 1980s, by emulating the equivalent of eight of the company’s famous DX7 synthesisers in one unit. It takes almost any Pi, and with the addition of an audio board, a rotary encoder, and an LCD display, makes a ready-to-go unit. Below the break is a video of it in operation.

It’s fair to say that we’re not experts in Raspberry Pi bare metal programming, but it’s worth a diversion into the world of 1980s synthesisers to explore the DX7. This instrument was a staple of popular music throughout the 1980s and was a major commercial success for Yamaha as an affordable FM synthesiser. This was a process patented at Stanford University in the 1970s and subsequently licensed by the company, unlike other synths of the day it generated sound entirely digitally. It’s difficult to overestimate the influence of the DX7 as its sound can be heard everywhere, and it’s not impossible that you own a Yamaha FM synth even today if you have in your possession a sound card.

Curious about the DX7? Master chip-reverse-engineer [Ken Shirriff] exposed its secrets late last year.

Continue reading “Bare Metal Gives This Pi Some Classic Synths”

PiSquare Lets You Run Multiple HATs On A Raspberry Pi

The Raspberry Pi’s venerable 40-pin header and associated HAT ecosystem for upgrades has been a boon for the platform. It’s easy to stack extra hardware on to a Pi, even multiple times in some cases. However, if you want to run multiple HATs, and wirelessly at that, the PiSquare might just be the thing for you.

The PiSquare consists of a board featuring both RP2040 and ESP-12E microcontrollers. It interfaces with Raspberry Pi HATs and even lets you run multiple of the same HAT on a single Raspberry Pi, as it’s not actually directly using the UART, SPI, or I2C interfaces on the host Pi itself. Instead, the PiSquare communicates wirelessly with the Pi, handling the IO with the HAT itself.

It’s unclear how this works on a software level. Simply using existing software tools and libraries for a given Raspberry Pi HAT probably won’t work with the wireless PiSquare setup. However, for advanced users, it could serve a useful purpose, allowing one Raspberry Pi to command multiple HATs without the fuss of having to run more single-board computers where just one will do. Boards will be available on Kickstarter for those interested in the device.

We’ve seen other creative things done with the Raspberry Pi and the HAT system, too. If you’ve been cooking up your own neat hacks for the platform, drop us a line!

Camera held in hand

Review: Vizy Linux-Powered AI Camera

Vizy is a Linux-based “AI camera” based on the Raspberry Pi 4 that uses machine learning and machine vision to pull off some neat tricks, and has a design centered around hackability. I found it ridiculously simple to get up and running, and it was just as easy to make changes of my own, and start getting ideas.

Person and cat with machine-generated tags identifying them
Out of the box, Vizy is only a couple lines of Python away from being a functional Cat Detector project.

I was running pre-installed examples written in Python within minutes, and editing that very same code in about 30 seconds more. Even better, I did it all without installing a development environment, or even leaving my web browser, for that matter. I have to say, it made for a very hacker-friendly experience.

Vizy comes from the folks at Charmed Labs; this isn’t their first stab at smart cameras, and it shows. They also created the Pixy and Pixy 2 cameras, of which I happen to own several. I have always devoured anything that makes machine vision more accessible and easier to integrate into projects, so when Charmed Labs kindly offered to send me one of their newest devices, I was eager to see what was new.

I found Vizy to be a highly-polished platform with a number of truly useful hardware and software features, and a focus on accessibility and ease of use that I really hope to see more of in future embedded products. Let’s take a closer look.

Continue reading “Review: Vizy Linux-Powered AI Camera”

A Pi Pico connected to a MYIR Z-turn board with a set of jumper wires

Need A JTAG Adapter? Use Your Pico!

JTAG is a powerful interface for low-level debugging and introspection of all kinds of devices — CPUs, FPGAs, MCUs and a whole lot of complex purpose-built chips like RF front-ends. JTAG adapters can be quite obscure, or cost a pretty penny, which is why we’re glad to see that [Adam Taylor] from [ADIUVO] made a tutorial on using your Pi Pico board as a JTAG adapter. This relies on a project called XVC-Pico by [Dhiru Kholia], and doesn’t require anything other than a Pi Pico board itself — the XVC-Pico provides both a RP2040 firmware implementing the XVC (Xilinx Virtual Cable) specification and a daemon that connects to the Pico board and interfaces to tools like Vivado.

First part of the write-up is dedicated to compiling the Pico firmware using a Linux VM. There’s a pre-built .uf2 binary available in the GitHub repo, however, so you don’t have to do that. Then, he compiles and runs a daemon on the PC where the Pico is connected, connects to that daemon through Vivado, and shows successful single-stepping through code on a MYIR Z-turn board with a Xilinx XC7Z020. It’s worth remembering that, if your FPGA’s (or any other target’s) JTAG logic levels are 1.8V or 2.5V-based, you will need a level shifter between it and the Pi Pico, which is a board firmly in the 3.3V realm.

You just cannot beat the $3 price and the ease of setup. Pi Pico is shaping up to be more and more of a hardware multi-tool. Just a month ago, we covered how the Pico can work as a logic analyzer. A lot of that, we have the PIO peripherals to thank for — an assembly of state machines that even let you “bitbang” high-speed interfaces like DVI. If you’re interested in how PIO functions, there are some good write-ups around here. Lacking a Pi Pico, you can use this board’s bigger sister to interface with JTAG, too.

It’s Almost A New Raspberry Pi Compute Module 4. But Not Quite

We know that readers are familiar with the global chip shortage and its effects on product availability. The Raspberry Pi folks haven’t escaped its shadow, for even though they’ve managed to preserve availability of their RP2040 microcontroller, it’s fair to say that some of their flagship Linux-capable boards have been hard to find. All of this has had an unlikely effect in the form of a new Raspberry Pi, but unexpectedly it’s one which few end users are likely to get their hands on.

The Raspberry Pi Compute Module has been part of the range since the early days, and in its earlier versions took a SODIMM form factor. The last SODIMM Compute Module had a Pi 3 processor, and this unexpected new model is reported as having a very similar hardware specification but featuring the Pi 4 processor. It seems that the chip shortage has affected supplies of the earlier SoC, and to keep their many industrial customers for the SODIMM Compute Modules in business they’ve had to produce this upgrade. As yet it’s not surfaced for sale on its own and there’s a possibility it will stay only in the realm of industrial boards, but as the story develops there’s a Raspberry Pi forum topic about it for the latest and you can find the pertinent info in the video below the break.

Of course, the Compute Module of the moment remains the CM4 in its newer form factor, which we see as possibly the most exciting of all the Pi products of the moment. Meanwhile this is not the first custom industrial Raspberry Pi to be seen in the wild.

Continue reading “It’s Almost A New Raspberry Pi Compute Module 4. But Not Quite”

A Power Button For Raspberry Pi, Courtesy Of Device Tree Overlays

As a standard feature of the Linux kernel, device tree overlays (DTOs) allow for easy enabling and configuration of features and drivers, such as those contained within the standard firmware of a Raspberry Pi system. Using these DTOs it’s trivial to set up features like as a soft power-off button, triggering an external power supply and enable drivers for everything from an external real-time clock (RTC) to various displays, sensors and audio devices, all without modifying the operating system or using custom scripts.

It’s also possible to add your own DTOs to create a custom overlay that combines multiple DTO commands into a single one, or create a custom device tree binary (DTB) for the target hardware. Essentially this DTB is loaded by the Linux kernel on boot to let it know which devices are connected and their configuration settings, very similar to what the BIOS component with x86-based architectures handles automatically.

Ultimately, the DTB concept and the use of overlays allow for easy configuration of such optional devices and GPIO pin settings, especially when made configurable through a simple text file as on the Raspberry Pi SBC platform.

Continue reading “A Power Button For Raspberry Pi, Courtesy Of Device Tree Overlays”

Compaq 286 Laptop Gets Raspberry Transfusion

We know, we know. A lot of you don’t like projects that consist of gutting a vintage computer (or anything else, for that matter) and replacing its internals with modern electronics. But can you really look at the clunky Compaq LTE 286 laptop that [Dmitry Brant] hacked a Raspberry Pi into and honestly say it’s a machine worthy of historical preservation? The 30+ year old laptop had all the design cues of a saltine cracker, and the performance to match. At least now with a Pi under the hood, you can play some newer games on the thing.

Besides, [Dmitry] says the machine was damaged beyond the point of economical repair anyway. The only stock hardware that’s left beyond the case itself is the keyboard, which he was able to get talking USB thanks to a Teensy microcontroller. It’s not immediately clear if any attempt has been made to get the switches above the keyboard working, but we imagine it wouldn’t be too hard to tie them into some spare GPIO pins on the MCU for a bit of added authenticity.

The bottom half of the machine was cleared out to the point of it literally being a husk of its former self, which gave him plenty of room to hold the Pi 3B and the HDMI driver board that controls the new 9-inch TFT display. Speaking of which, the new panel was a close enough match to the original’s aspect ratio that only minor bezel modifications were required to get it to fit. The modern LCD makes for a massive improvement over the original, without looking too conspicuous.

While there’s still plenty of available space inside the Compaq, [Dmitry] has opted not to include an onboard battery at this time. Instead, power is provided to the Pi and associated hardware through a bulkhead mount USB connector on the side of the machine. It looks like it wouldn’t be too much trouble to add support for an off-the-shelf USB battery bank, as we recently saw with a particularly well engineered retro-futuristic folding cyberdeck, but far from us to tell a hacker what they should do with their bespoke computer.