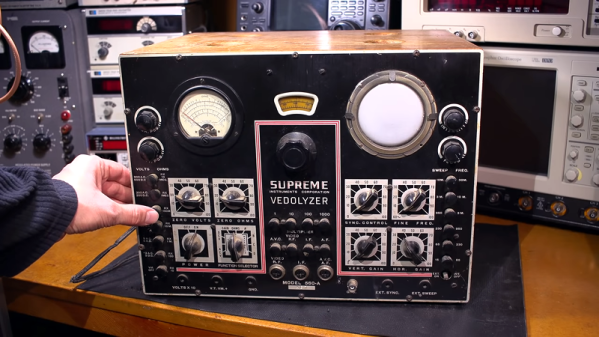
Replace Old Electrolytics? Not So Fast… Maybe

[CuriousMarc] was restoring an old Model 19 TeleType. The design for these dates back to the 1930s, and they are built like tanks (well, except for the ones built during the war with parts using cheaper metals like zinc). Along the way, he restored a hefty tube-based power supply that had two very large electrolytic capacitors. These dated from the 1950s, and common wisdom says you should always replace old electrolytics because they don’t age well and could damage the assembly if powered up. [Marc] didn’t agree with common wisdom, and he made a video to defend his assertion which you can see below.

If you look at the construction of electrolytic capacitors, one plate of the capacitor is actually a thin layer that is formed electrically. In some cases, a capacitor with this plate is damaged can be reformed either by deliberate application of a constant current or possibly even just in normal operation.

Continue reading “Replace Old Electrolytics? Not So Fast… Maybe”

Incredible Atari 800XL Case Restoration

If you’ve been hanging around Hackaday for a while, you know that a large portion of the stuff we publish goes above and beyond what most people would consider a reasonable level of time and effort. One could argue that’s sort of the point: the easy way out is rarely the most exciting and interesting route you can take. We, and by extension our readers, are drawn to the projects that someone has really put their heart and soul into. If the person who created the thing wasn’t passionate about it, why should we be?

That being said, on occasion, even we are left in awe about the lengths some people will go to. A perfect example of this is the absolutely insane amount of time and effort [Drygol] has put into restoring an Atari 800XL that looked like it was run over by a truck. Through trial, error, and a bunch of polyester resin, he’s recreated whole sections of the Atari’s case that were missing.

To start the process, [Drygol] used metal rods to bridge the areas where the plastic was completely gone. By heating the rods with a torch and pushing them into the Atari’s case, he was able to create a firm base to work from. Additional rods were then soldered to these and bent, recreating the shape of the original case. With the “skeleton” of the repair in palce, the next step was filling it in.

[Drygol] borrowed an intact Atari 800XL case from a friend, and used that to create a mold of the missing sections from his own case. Most of his rear panel was missing, so it took some experimentation to create such a large mold. In the end he used silicone and a custom built tray that the case could sit in vertically, but he does mention that he never quite solved the problem of degassing the silicone. The mold still worked, but bubbles caused imperfections which needed to be filled in manually during the finishing process.

Using his silicone mold and the same tray, he was then able to pour polyester resin over the wire frame. This got him most of the way to rebuilding the case, but there was still plenty of filler and sanding required before the surface finish started to look half-way decent. When he got towards the very end of the finishing process, he used a mold he created of the case surface texture to roughen up the smooth areas left over from the filling process. Add a bit of custom spray paint, and the end result looks absolutely phenomenal considering the condition it was in originally.

We were already impressed by the work he put in during the first stages of the restoration, but this case repair is really on a whole new level. Between this and the incredible instructional videos [Eric Strebel] has been putting out, we’re really gaining a whole new respect for the power of polyester.

Continue reading “Incredible Atari 800XL Case Restoration”

Mademoiselle Pinball Table Gets Rock ‘n Roll Makeover

Once upon a time, there was a music venue/artist collective/effects pedal company that helped redefine industry in Williamsburg, Brooklyn. That place was called Death By Audio. In 2014, it suffered a death by gentrification when Vice Media bought the building that DBA had worked so hard to transform. From the ashes rose the Death By Audio Arcade, which showcases DIY pinball cabinets made by indie artists.

Their most recent creation is called A Place To Bury Strangers (APTBS). It’s built on a 1959 Gottlieb Mademoiselle table and themed around a local noise/shoegaze band of the same name that was deeply connected to Death By Audio. According to [Mark Kleeb], this table is an homage to APTBS’s whiz-bang pinball-like performance style of total sensory overload. Hardly a sense is spared when playing this table, which features strobe lights, black lights, video and audio clips of APTBS, and a fog machine. Yeah.

[Mark] picked up this project from a friend, who had already cut some wires and started hacking on it. Nearly every bit of the table’s guts had to be upgraded with OEM parts or else replaced entirely. Now there’s a Teensy running the bumpers, and another Teensy on the switches. An Arduino drives the NeoPixel strips that light up the playfield, and a second Uno displays the score on those sweet VFD tubes. All four micros are tied together with Python and a Raspi 3.

If you’re anywhere near NYC, you can play the glow-in-the-dark ball yourself on July 15th at Le Poisson Rouge. If not, don’t flip—just nudge that break to see her in action. Did we mention there’s a strobe light? Consider yourself warned.

Want to get into DIY pinball on a smaller scale? Build yourself a sandbox and start playing.

Continue reading “Mademoiselle Pinball Table Gets Rock ‘n Roll Makeover”

Amiga 2000 Emergency Repair

Big companies spend small fortunes on making sure their computers stay running and that they can be repaired quickly in an emergency. You wouldn’t expect an emergency repair on an Amiga 2000, though. [RETR-O-MAT] bought an Amiga 2000 that did boot, but was known to have a leaky battery on the motherboard. He wanted to rush to replace the battery before the leakage caused serious damage. You can see all this in the video below.

The computer looked lightly used over its 32-year lifespan, even when the case came off. The battery corrosion was evident, though. Even the bolt holding down the motherboard was clearly corroded from the leaking battery, causing it to be very difficult to remove.

The battery leakage also made unsoldering the battery a challenge. Several chips and sockets — including the CPU — were affected, so they had to come out. You can see a nice demonstration of the “old screwdriver trick” which might be eye-opening if you’ve only worked with SMD chips.

Even if you don’t care much about the Amiga 2000, it is interesting to see inside an old computer like this and note the differences — and similarities — to modern designs. The video is as much a tear down as it is a repair story. It also might be useful if you ever face having to tear out a leaky battery on any piece of gear. Continue reading “Amiga 2000 Emergency Repair”

Smart Power Strip Revived With Raspberry Pi

We’re all for buying broken stuff from eBay to save yourself a few bucks: buy it cheap, fix it, and reap the rewards of being a step ahead of the average consumer. Searching through the “For parts or not working” categories is nearly the official pastime here at the Hackaday Bunker. But buying an eBay find only to have it give up the ghost in a couple weeks? That hurts.

That’s precisely what happened to [idaresiwins] when he bought this beefy looking “Web Power Switch” on the Electronic Bay. After two weeks, the controller board blew and his “smart” power strip became very stupid indeed. But with the addition of a Raspberry Pi, he’s got it back up and running. Not only that, but given the extra horsepower this device now contains, it now doubles as a basic server for the home lab.

This conversion was helped by the fact that the original controller was on a separate board from the relays, and connected with a small ribbon cable. All [idaresiwins] had to do was figure out which wire in the cable went to each of the eight relays, and fire them off with the Pi’s GPIO pins. In an interesting detail, he opened up one of the ends of the ribbon cable and used it as a punch down block of sorts to easily hook the wires up to the Pi’s pins. We might suggest some hot glue to keep everything from moving around, but otherwise it’s a neat tip.

[idaresiwins] found some information online about making a web-based GPIO interface, which he adapted to control the outlets on the power strip. He then wrapped the Pi up in plastic to keep it from shorting out, and tucked it inside the case. Note that he was able to pull 5 VDC from the relay board and run it to the Pi over the ribbon cable, so he didn’t need to bother with hacking a USB adapter in there.

Controlling AC devices over the Interwebs is an extremely popular project, and we’ve even seen a DIY device that looks quite similar to this product. Most of them are now using the ESP8266, but with the Pi onboard this hack is more like a super-sized version of the PowerPwn.

PCB Holder Quick-fix Turns Out To Be Big Improvement

When something needs improving, most hacks often make a small tweak to address a problem without changing how things really work. Other hacks go a level deeper, and that’s what [Felix Rusu] did with his 3D printed magnetic holders. Originally designed to address a shortcoming with the PCB holders in his LE40V desktop pick-and-place machine, they turned out to be useful for other applications as well, and easily modified to use whatever size magnets happen to be handy.

The problem [Felix] had with the PCB holders on his pick-and-place was that they hold the board suspended in midair by gripping the sides. The board is held securely, but the high density of parts on panelized PCB designs leads to vibrations in the suspended board as the pick-and-place head goes to work. Things are even worse when the board is v-scored for the purpose of easily snapping apart the smaller boards later; they sometimes break along the score lines due to the stress.

Most people would solve this problem by putting a spacer underneath the board to stabilize things, but [Felix] decided to go a level deeper and change the mounting system altogether with a simple mod. The boards now lie on a flat metal plate, and his magnetic holders are simple to make and easily do the job of holding any size PCB secure. As a bonus, it turns out that the holders also do a passable job of holding work materials down on a laser cutter’s honeycomb table. A video overview is embedded below, and the design files are available on Thingiverse.

Continue reading “PCB Holder Quick-fix Turns Out To Be Big Improvement”

Hybrid Lab Power Supply From Broken Audio Amp

The lab power supply is an essential part of any respectable electronics workbench. However, the cost of buying a unit that has all the features required can be eye-wateringly high for such a seemingly simple device. [The Post Apocalyptic Inventor] has showed us how to build a quality bench power supply from the guts of an old audio amplifier.

We’ve covered our fair share of DIY power supplies here at Hackaday, and despite this one being a year old, it goes the extra mile for a number of reasons. Firstly, many of the expensive and key components are salvaged from a faulty audio amp: the transformer, large heatsink and chassis, as well as miscellaneous capacitors, pots, power resistors and relays. Secondly, this power supply is a hybrid. As well as two outputs from off-the-shelf buck and boost converters, there is also a linear supply. The efficiency of the switching supplies is great for general purpose work, but having a low-ripple linear output on tap for testing RF and audio projects is really handy.

The addition of the linear regulator is covered in a second video, and it’s impressively technically comprehensive. [TPAI] does a great job of explaining the function of all the parts which comprise his linear supply, and builds it up manually from discrete components. To monitor the voltage and current on the front panel, two vintage dial voltmeters are used, after one is converted to an ammeter. It’s these small auxiliary hacks which make this project stand out – another example is the rewiring of the transformer secondary and bridge rectifier to obtain a 38V rail rated for twice the original current.

The Chinese DC-DC switching converters at the heart of this build are pretty popular these days, in fact we’re even seeing open source firmware being developed for them. If you want to find out more about how they operate on a basic level, here’s how a buck converter works, and also the science behind boost converters.

Continue reading “Hybrid Lab Power Supply From Broken Audio Amp”