[Josh] is replacing the springs in his car’s suspension. He wanted to know the travel rates of these springs, but apparently, this is a closely guarded trade secret in the industry. One company did manage to publish the spring rates, but they weren’t believable. Instead of taking this company’s word, [Josh] built a spring tester.
The theory behind a spring tester is pretty simple: apply a force to a spring, measure it, then measure how much the spring has traveled. Or compress a spring an inch or so, measure the force, and compress it some more. Either gets you the same data.
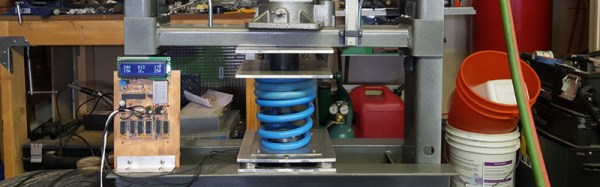
This spring tester is built around a Harbor Freight hydraulic press. Yes, the spring is completely captured and won’t fly out of the jig if you look at it wrong. The bottom of the press contains a few load cells, fed into an ATmega8, which displays a value on an LCD. For the displacement measurement, a ruler taped to the side of the press will suffice, but [Josh] used a Mitutoyo linear scale.
What were the results of these tests? You shouldn’t buy coils from Bilstein if these results are correct. The rates for these springs were off by 70%. Other springs fared better and won’t bind when going over bigger bumps. That’s great work, and an excellent application of Horror Fraught gear.