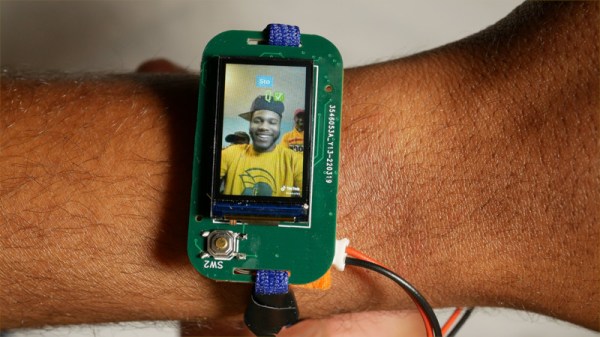
One of the ultimate objects of desire in the early 1980s was the Seiko TV wristwatch. It didn’t matter that it required a bulky external box in your pocket for its electronics, it was a TV on your wrist, and the future was here! Of course, now we have the technology to make wrist-mounted video a practical reality, but it’s sad to see we’ve opted to use our phones for video and never really followed up on the promise of a wrist-mounted television. There’s always hope though, and here it is in the form of [Dave Bennett]’s ESP32-powered TikTok wristwatch.
On the wrist is the ESP32 itself with an audio DAC and amplifier, LCD screen, and battery, but sadly this combo doesn’t have quite the power to talk to TikTok directly. Instead that’s done using Python on a companion PC with the resulting videos uploaded to the device over WiFi. It’s not the bulky electronics of the Seiko TV, so we’ll take it. All the info can be found on GitHub, and there’s a YouTube video below the break.
So the viral videos of a generation can now be taken on the move without resorting to a slightly less portable mobile phone. It may not be the most unobtrusive of timepieces, but it’ll certainly get you noticed.
Google Glass didn’t take off as expected, but — be honest — do you really want to walk around with that hardware on your head? The BBC recently covered Mojo, a company developing smart contact lenses that not only correct vision but can show a display. You can see a video from CNET on the technology below.
The lenses have microLED displays, smart sensors, and solid-state batteries similar to those found in pacemakers. The company claims to have a “feature-complete prototype” and are going to start testing, according to the BBC article. We imagine you can’t get much of a battery crammed into a contact lens, but presumably, that’s one of the things that makes it so difficult to develop this sort of tech.
The article mentions other smart contacts under development, too, including a University of Surrey lens that can monitor eye health using various sensors integrated into the lens. You have to wonder how this would be in real life. Presumably, the display turns off and you see nothing, but it is annoying enough having your phone beep constantly without getting messages across your field of vision all the time.
It seems like this is a technology that will come, of course. If not this time, then sometime in the future. While we usually think the hacker community should lead the way, we aren’t sure we want to hack on something that touches people’s eyeballs. Not everyone can say that, though. For us, we’ll stick with headsets.
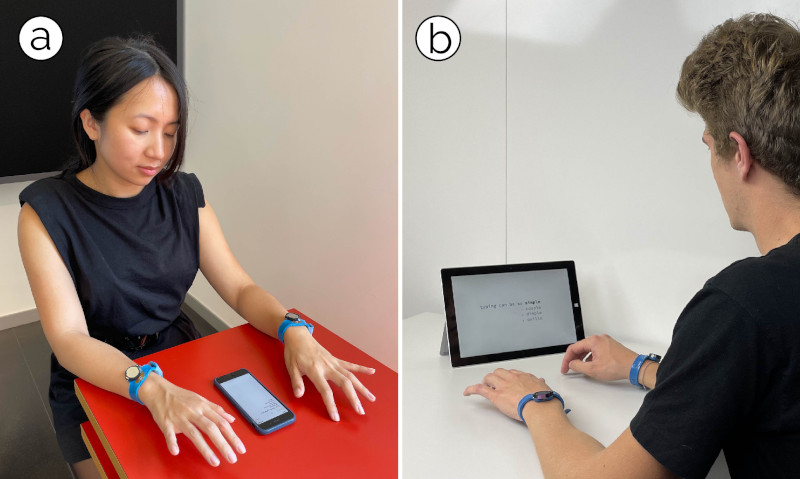
The team from the Sensing, Interaction & Perception Lab at ETH Zürich, Switzerland have come up with TapType, an interesting text input method that relies purely on a pair of wrist-worn devices, that sense acceleration values when the wearer types on any old surface. By feeding the acceleration values from a pair of sensors on each wrist into a Bayesian inference classification type neural network which in turn feeds a traditional probabilistic language model (predictive text, to you and I) the resulting text can be input at up to 19 WPM with 0.6% average error. Expert TapTypers report speeds of up to 25 WPM, which could be quite usable.
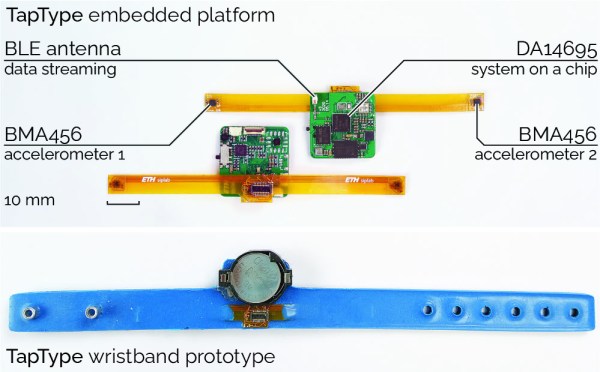
Details are a little scarce (it is a research project, after all) but the actual hardware seems simple enough, based around the Dialog DA14695 which is a nice Cortex M33 based Bluetooth Low Energy SoC. This is an interesting device in its own right, containing a “sensor node controller” block, that is capable of handling sensor devices connected to its interfaces, independant from the main CPU. The sensor device used is the Bosch BMA456 3-axis accelerometer, which is notable for its low power consumption of a mere 150 μA.
User’s can “type” on any convenient surface.
The wristband units themselves appear to be a combination of a main PCB hosting the BLE chip and supporting circuit, connected to a flex PCB with a pair of the accelerometer devices at each end. The assembly was then slipped into a flexible wristband, likely constructed from 3D printed TPU, but we’re just guessing really, as the progression from the first embedded platform to the wearable prototype is unclear.
What is clear is that the wristband itself is just a dumb data-streaming device, and all the clever processing is performed on the connected device. Training of the system (and subsequent selection of the most accurate classifier architecture) was performed by recording volunteers “typing” on an A3 sized keyboard image, with finger movements tracked with a motion tracking camera, whilst recording the acceleration data streams from both wrists. There are a few more details in the published paper for those interested in digging into this research a little deeper.
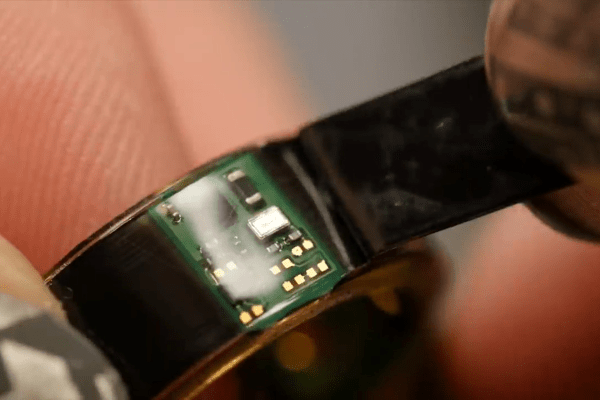
If you wonder how it’s possible to fit a fitness tracker into a ring, well, you’re not alone. [Becky Stern] sent one off to get CT scanned, went at it with a rotary tool, and then she made a video about it with [David Cranor]. (Video embedded below.)
While it’s super cool that you can do a teardown without tearing anything down these days — thanks to the CT scan — most of the analysis is done on a cut-up version of the thing through a normal stereo microscope. Still, the ability to then flip over to a 3D CT scan of the thing is nice.
We absolutely concur with [Becky] and [David] that it’s astounding how much was fit into very little space. Somewhere along the way, [David] muses that the electrical, mechanical, and software design teams must have all worked tightly together on this project to pull it off, and it shows. All along, there’s a nice running dialog on how you know what you’re looking at when tearing at a new device, and it’s nice to look over their shoulders.
Then there’s the bit where [Becky] shows you what a lithium-ion battery pack looks like when you cut it in half. She says it was already mostly discharged, and she didn’t burst into flames. But take it easy out there! (Also, make sure you take your hot xylene out on the patio.)
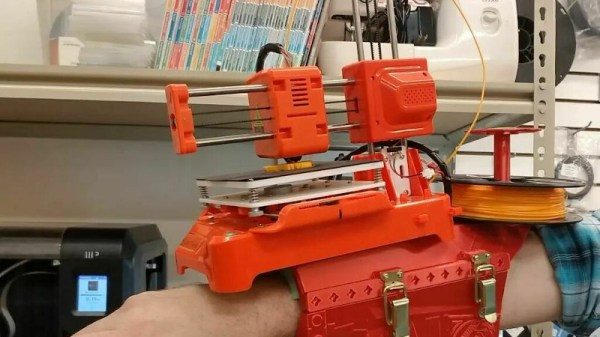
There was a time when a cheap 3D printer was almost certain to mean an awful kit of parts, usually a so-called “Prusa i3”, which was of course as far away in quality from the machines supplied by [Josef Průša] himself as it’s possible to get. But as Chinese manufacturers such as Creality have brought machines with some quality and relaibility into the budget space these abominations have largely been crowded out. There are still cheap 3D printers to be found though, and it’s one of these that [3D Printing Professor] has mounted on his wrist (Nitter) for the ultimate in portable manufacturing.
The Easythreed K7 is a novel take on a 3D printer that positions the device more as a child’s toy than a desktop manufacturing solution. It’s somewhat limited in its capabilities by its tiny size but by all accounts it’s a usable machine, and at around $100 USD it’s about the cheapest 3D printer for sale on the likes of AliExpress. The wearable mount is probably best described as a forearm mount rather than a wrist mount, but has provision for a battery pack and a small roll of filament. And this contraption is claimed to work, but we maybe would think before committing to a day-long print with it.
This may be the smallest wearable 3D printer we’ve shown you so far, but it’s not the first. That achievement goes to Shenzhen maker [Naomi Wu], who strapped one on her back way back in 2017.
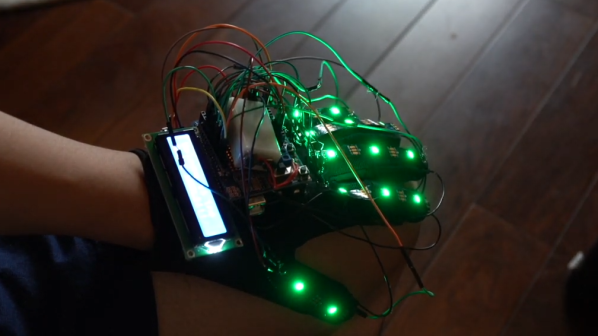
Since the 1980s, we’ve seen innumerable attempts to revolutionize the way we interact with computers. Since the advent of keyboards and mice, we’ve seen everything from magic wands to electric gloves, with [Deemo Chen]’s project fitting into the latter category.
The build takes on a cyberpunk aesthetic, with addressable LEDs installed along each digit. The various digits light up randomly, and the wearer of the glove must tap a button on the corresponding digit in order to test their reaction times. An Arduino Uno runs the show, and keeps track of the score, displaying the results on an attached HD44870-compatible LCD.
The mess-o’-wires aesthetic, with bare electronics hanging off the glove, goes a long way to making this look like a proper bit of sci-fi kit. The lurid, colorful glow is a key part of this look, and something we’ve seen on many projects over the years.
Overall, the reaction trainer served as a great freshman project for [Deemo], along with their chums [Dhruv] and [Ryan]. Along the way, the team clearly picked up skills in microcontroller programming, as well as learning how to work with LCD displays and addressable LEDs. Master these skills and you can pull off some impressive feats. Video after the break.
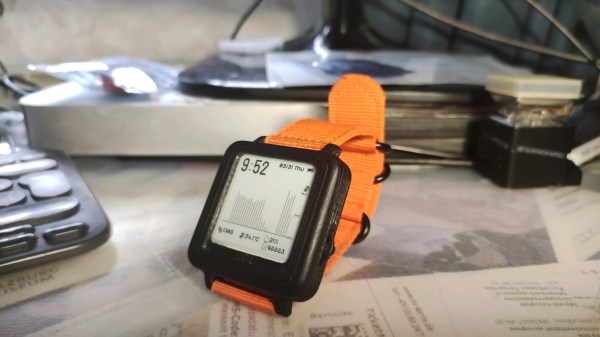
TshWatch is a project by [Ivan / @pikot] that he’s been working on for the past two years. [Ivan] explains that he aims to create a tool meant to help you understand your body’s state. Noticing when you’re stressed, when you haven’t moved for too long, when your body’s temperature is elevated compared to average values – and later, processing patterns in yourself that you might not be consciously aware of. These are far-reaching goals that commercial products only strive towards.
At a glance it might look like a fitness tracker-like watch, but it’s a sensor-packed logging and measurement wearable – with a beautiful E-Ink screen and a nice orange wristband, equipped with the specific features he needs, capturing the data he’d like to have captured and sending it to a server he owns, and teaching him a whole new world of hardware – the lessons that he shares with us. He takes us through the design process over these two years – now on the fifth revision, with first three revisions breadboarded, the fourth getting its own PCBs and E-Ink along with a, and the fifth now in the works, having received some CAD assistance for battery placement planning. At our request, he has shared some pictures of the recent PCBs, too!